Beetroot Pachadi recipe with step by step photos and video. Beetroot Pachadi is a chutney style Kerala side dish made with coconut , beetroot and spices.

About this recipe
Beetroot Pachadi is a native of Kerala . It is a one of the must dish for Onam sadya , its easy to make and goes well as a side dish along with steamed rice. Sadhya means banquet in Malayalam. Sadhya is typically served as a traditional dish for Onam, the state festival of Kerala. Onam Sadya is a wide spread menu , which can have about 24–28 dishes served as a single course and one of it being Beetroot Pachadi.
What is Pachadi?
Pachadi is a South Indian side dish which is more like a Chutney or Raita. Pachadi is made with wide variety of vegetables and also with fruits like pineapple . It can be served as a side dish with Sambar - Rice , Rasam- Rice , Curd- rice . But for a healthy variation and going on creative you can also use it as a dip with crackers !
Irrespective of Onam , I make this Pachadi often at home for its nutritional values. Its healthier and tastes delicious too along side of rasam and rice. Here is how to make this super easy and nutritious recipe .
Beetroot Health Benefits
Beetroot is very rich in Nitrates. One of the most important nutrient that helps in vasodilation. It improves blood flow and helps to lower blood pressure. Also beetroot juice can be used as a pre-workout drink as it helps to improve the stamina during intense exercise. Along with nitrates Beets are also good sources of folate, potassium, vitamin C, fiber, and antioxidants.
Beetroot is also considered as lung protective food. And hence its used for detoxification . Also it helps to improves iron content in blood , it is used as tonic for anemia since ages. Due to these 2 reasons , its works as blood purifier too and helps to give a clearer and glowing skin.
How to Cook Beetroot ?
Beetroots nutrients are sensitive to heat , as cooking temperature and time increasses , beetroot tends to loose its nutrients. So the best way to consume Beetroot is to eat it in raw or steamed form for its nutrients to get easily availble for the body.
Making Beetroot Pachadi is very easy and can be made within 15 minutes . Lets see on how to make this tasty and nutritious beetroot pachadi recipe.
Watch Video
Step by Step directions to make Beetroot Pachadi Recipe
In a wide pan , boil ½ cup of water

and add 2 cup of grated beetroot , turmeric powder and salt.

Cover and cook for just 5 minutes. Cooking more will make beetroot loose nutrients. Hence, I’m cooking for only 5 minutes, you can cook more if you want.

Whilst in a mixer jar / blender, add fresh grated coconut , green chillies, jeera/cumin seeds , mustard seeds ,

add little water and grind /blend to a fine paste .

Add ground masala and

cook for 3-4 minutes on medium heat until raw smell goes off.

Turn off stove and set aside till it cools down completely. Its necessary to cool down the mixture before adding curds. If not , curds will split when added to hot cooked beet mixture.

When it cools completely, add whisked curds and mix well.

Heat 1 tablespoon of coconut oil in a tadka / small pan, add mustard seeds, when it splutters add 2 sprigs of curry leaves and 2-3 dry red chillies

Pour tempering on prepared beetroot pachadi,

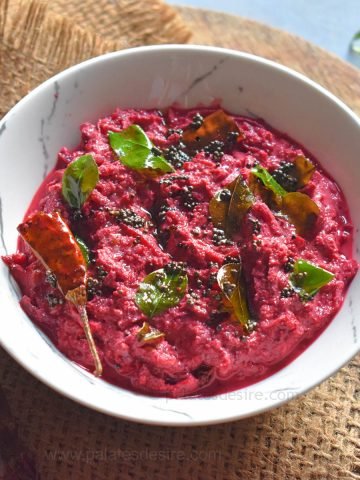
mix well and serve as a side dish along with sambhar and steamed rice .

Recipe

Beetroot Pachadi
Ingredients
- 2 Cups Beetroot grated
- 1 Cup Water , divided into ½ cup each
- ⅛ teaspoon Turmeric Powder
- ½ Cup Fresh Coconut
- 1-2 Green Chillies , as per taste
- 1" inch Ginger
- ½ teaspoon Cumin Seeds / Jeera
- ½ teaspoon Mustard Seeds
- ½ Cup Homemade Curds
- Salt to taste
Tempering
- 1 tablespoon Coconut Oil
- 2-3 Springs of Curry leaves
- 2-3 Dry red Chillies
Instructions
- In a wide pan , boil ½ cup of water and add 2 cup of grated beetroot , turmeric powder and salt.
- Cover and cook for just 5 minutes. Cooking more will make beetroot loose nutrients. Hence, I’m cooking for only 5 minutes, you can cook more if you want.
- Whilst in a mixer jar / blender, add fresh grated coconut , green chillies, jeera/cumin seeds , mustard seeds , add little water and grind /blend to a fine paste .
- Add ground masala and cook for 3-4 minutes on medium heat until raw smell goes off.
- Turn off stove and set aside till it cools down completely.
- When it cools completely, add whisked curds and mix well.
- Heat 1 tablespoon of coconut oil in a tadka / small pan, add mustard seeds, when it splutters add 2 sprigs of curry leaves and 2-3 dry red chillies
- Pour tempering on prepared beetroot pachadi, mix well and serve as a side dish along with sambhar and steamed rice .