Palate's Desire

  • Home
  • Recipe Index
  • Diet Recipes
  • Videos
  • Work with me
  • Subscribe
menu icon
go to homepage
  • Home
  • Recipe Index
  • Diet Recipes
  • Videos
  • Contact
    • Facebook
    • Instagram
    • Pinterest
    • Twitter
    • YouTube
  • subscribe
    search icon
    Homepage link
    • Home
    • Recipe Index
    • Diet Recipes
    • Videos
    • Contact
    • Facebook
    • Instagram
    • Pinterest
    • Twitter
    • YouTube
  • ×

    Chicken Tikka , how to make best chicken tikka

    Published : August 18, 2017 | Last Update on September 27, 2022 By Muktha Gopinath

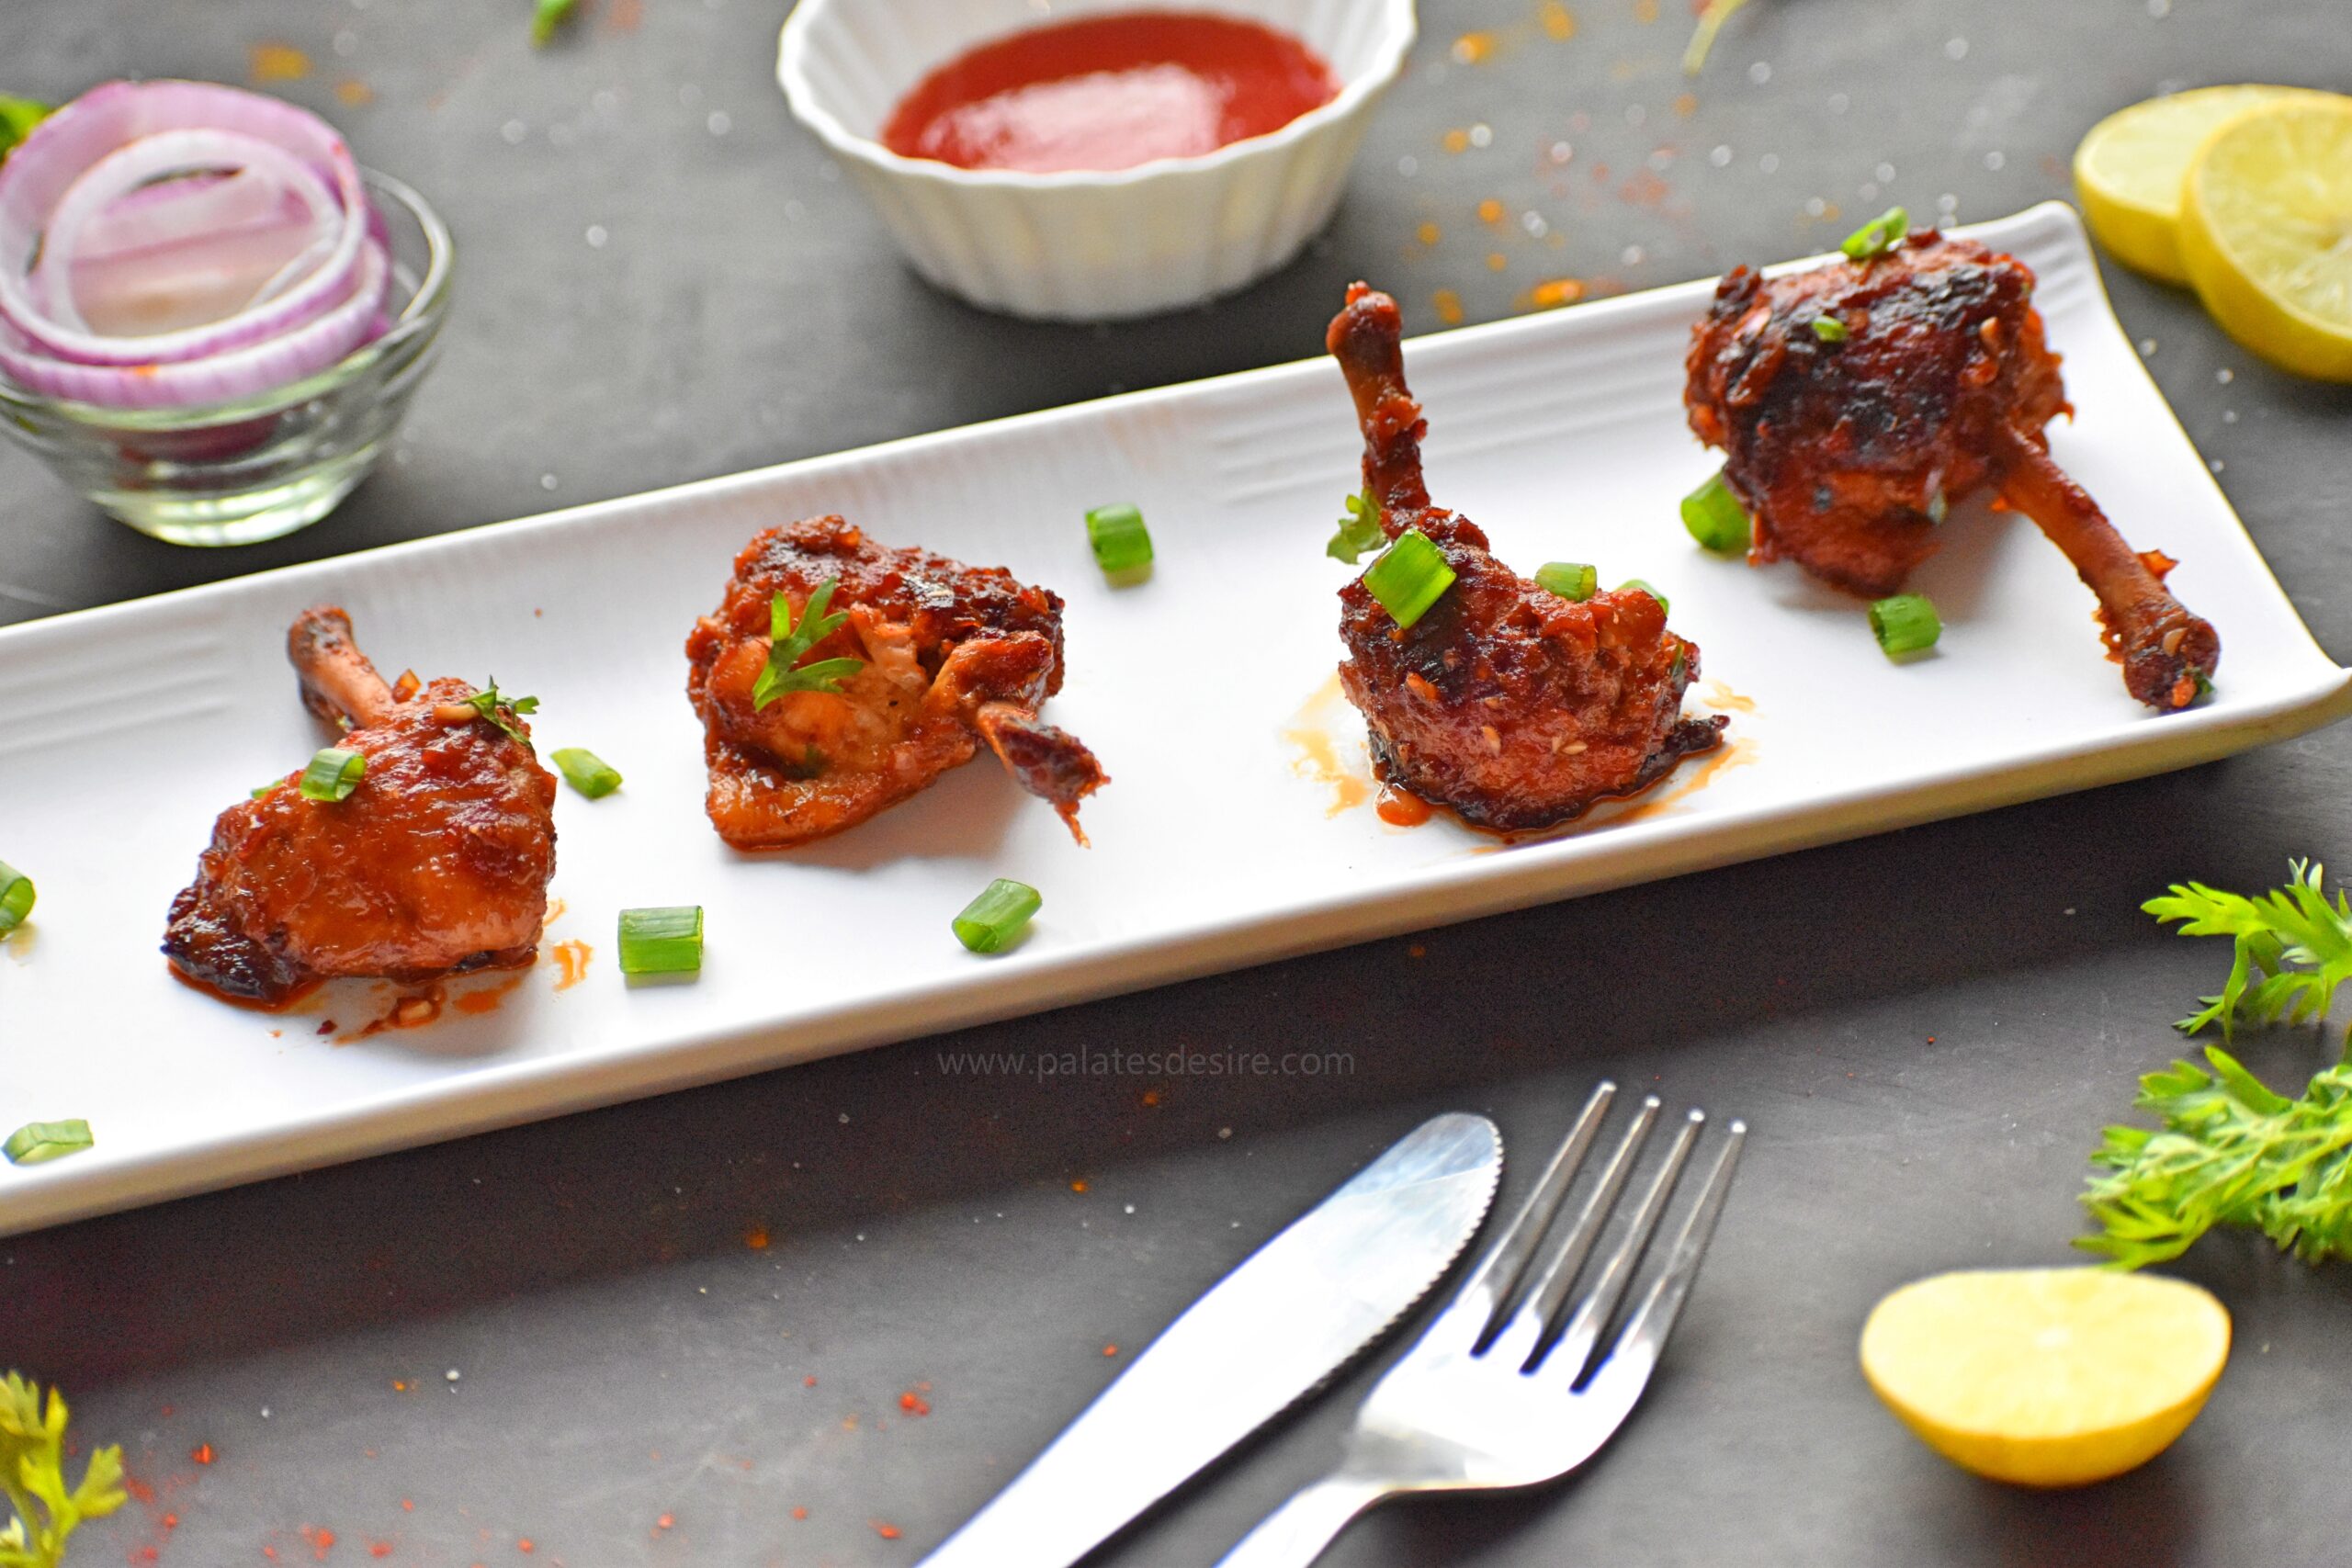
    Chicken Tikka recipe with step by step photos and video .  Chicken Tikka is a popular starter from India where boneless chicken pieces are marinated with yogurt and spices and then grilled to perfection. 

    These grilled chicken bites are tender , juicy and burst with flavors. You can also use this chicken tikka to make chicken tikka masala

    Chicken Tikka
    [feast_advanced_jump_to]

    About this recipe

    Tandoori chicken tikka is one of the most popular chicken appetizer/starter originating from North India . The word Tikka basically means  "bits" or "pieces" orginated from Turkish word " Tike " which mean "pieces"

    Boneless chicken pieces are mixed in hung curd and spices left for few hours to tenderize chicken and absorb all flavors. Its always essential to allow chicken in marination for minimum 3 hours. More hours of marination gives more flavourful chicken.

    In any meat marination , its essential to make a marinade with acidic , salt and oil medium , as it allows meat to tenderize without addition of any chemicals . So you can see this 3 main ingredients in any meat marination. For acidic medium , you can use either lime juice or vinegar.

    Also to get that authentic taste , secert here is to baste chicken tikka with butter at intervals while grilling in tandoor oven . This not ony avoids drying of chicken but enhances the taste.

    Traditionally Chicken tikka was made in a clay oven also called ‘Tandoor’. But you can make it in an oven, microwave, air fryer, stove top or outdoor grill.

    Here I made 1 batch of chicken in oven and other batch on stove top. But yields almost same taste without drying out the chicken. It was moist and juicy ! Additionally to give a smokey flavour , I have infused smoke using coal technique which makes this chicken tikka , to good to resist.

    Also , do you love charred look on your chicken tikka? Then place it directly on high flame for few seconds to get charred spots on chicken tikka.

    Checkout the video recipe !

    Serving Suggestions

    You can serve this delicious Chicken Tikka along with Mint Chutney / Mint Dip with a side of some sliced onions and lemon wedges. Also sprinkle some lemon juice and chaat masala over it , while serving.

    You can also make a wrap out of it by placing some chicken tikka in a wrap along with mint dip , sliced onions , chopped coriander leaves and sprinking some chaat masala.

    You can also make a salad by placing some chicken tikka on lettuce berg leaves along with cucumber and julliences of carrot , beetroot and cabbage with simple Vinaigrette dressing .

    Step by step directions to make Chicken Tikka recipe

    Clean chicken , allow water to drain completely and then pat dry it with a kitchen paper towel.

    In a mixing bowl , add  spices, salt ,  hung curd, ginger,  garlic paste, roasted gram flour , mustard oil, lime juice  and mix well.

    Chicken Tikka , how to make best chicken tikka

    Add chicken pieces , mix well in marination and

    Chicken Tikka , how to make best chicken tikka

    allow to sit in refrigerator for minimum 3 hours or more. You can also keep marination overnight . 

    Chicken Tikka , how to make best chicken tikka

    After 3 hours ,

    Chicken Tikka , how to make best chicken tikka

    add all the cubed vegetables to the  chicken marinade ,

    Chicken Tikka , how to make best chicken tikka

    Mix gently and keep it  aside for 10 minutes.

    Chicken Tikka , how to make best chicken tikka

    Now  thread chicken and veggies alternatively on skewers.

    Chicken Tikka , how to make best chicken tikka

    You can either grill in 200 deg Celsius , preheated oven  for 18 to 20 minutes. Pause at midway around 10 minutes , and baste butter on tikka and continue to grill for another 8-10 minutes.

    Chicken Tikka , how to make best chicken tikka

    If making on stove top , in a frying pan , grease ½ teaspoon of mustard oil .

    Chicken Tikka , how to make best chicken tikka

    Arrange skewers on frying pan and

    Chicken Tikka , how to make best chicken tikka

    cook on medium heat rotating skewers at equal intervals.

    Chicken Tikka , how to make best chicken tikka

    Add ½ tablespoon of butter on top of skewers , rotate skewers and continue to cook till done.

    Chicken Tikka , how to make best chicken tikka

    It took about 18 minutes for me to cook on medium flame.

    Chicken Tikka , how to make best chicken tikka

    To infuse smokey flavour :

    Heat a piece of charcoal until it turns red hot .

    Place a charcoal piece inside a small bowl , drizzle few drops of oil or ghee over it.

    Chicken Tikka , how to make best chicken tikka

    Keep charcoal bowl along with chicken tikka and immediately close the lid of frying pan. Let it sit for 8 or more minutes to absorb smokey flavour.

    Chicken Tikka , how to make best chicken tikka

    To get charred look :

    Place chicken skewers directly on high flame and rotate for few seconds until charred spots appear on chicken tikka.

    Chicken Tikka , how to make best chicken tikka

    Remove , sprinkle some chaat masala and serve with mint chutney , lemon wedges and onion rings.

    chicken tikka on stove_top

    Recipe

    Chicken tikka recipe
    5 from 4 votes

    Chicken Tikka | Bestever Chicken Tikka Recipe

    Chicken Tikka is a tender and juicy Indian starter , where boneless chicken pieces are marinated with yogurt and spices and then grilled to perfection.
    Prep Time10 minutes mins
    Cook Time25 minutes mins
    Marination TIme3 hours hrs
    Total Time3 hours hrs 35 minutes mins
    Course: Appetizer, Starters
    Cuisine: Indian, North Indian
    Keyword: Bachelor's Cooking, Chicken, Gluten Free, Healthy
    Servings: 5 People
    Calories: 264kcal
    Author: Muktha H S

    Ingredients

    • 500 grams Boneless Chicken
    • ½ Cup Hung Curd
    • 1 teaspoon Ginger Paste
    • 1 teaspoon Garlic Paste
    • 1.5 tablespoon Kasuri Methi / Dried Fenugreek leaves
    • ¼ teaspoon Turmeric Powder
    • ½ teaspoon Red Chilli Powder
    • ½ teaspoon Coriander Powder
    • ½ teaspoon Garam Masala
    • ¼ teaspoon Cumin / Jeera Powder
    • ½ teaspoon Black Pepper Powder
    • 1.5 tablespoon Roasted Besan / Gram Flour
    • ½ tablespoon Mustard Oil
    • ½ tablespoon Butter
    • Lemon Juice: 1 Tbsp
    • Salt to taste

    For Dungar :

    • 1 Piece of Charcoal
    • Few drops of mustard oil or ghee

    For Assembly :

    • 10-12 skewers
    • 1 cup Onion Cut into cubes
    • 1 cup Capsicum Cut into cubes
    • 1 cup Tomato Cut into cubes

    Instructions

    • Clean chicken , allow water to drain completely and then pat dry it with a kitchen paper towel.
    • In a mixing bowl , add spices, salt , hung curd, ginger, garlic paste, roasted gram flour , mustard oil, lime juice and mix well.
    • Add chicken pieces , mix well in marination and allow to sit in refrigerator for minimum 3 hours or more. You can also keep marination overnight .
    • After 3 hours , add all the cubed vegetables to the chicken marinade , keep it aside for 10 minutes.
    • Now thread chicken and veggies alternatively on skewers.
    • You can either grill in 200 deg Celsius , preheated oven for 18 to 20 minutes. Pause at midway around 10 minutes , and baste butter on tikka and continue to grill for another 8-10 minutes.
    • If making on stove top , in a frying pan , grease ½ teaspoon of mustard oil .
    • Arrange skewers on frying pan and cook on medium heat rotating skewers at equal intervals.
    • Add ½ tablespoon of butter on top of skewers , rotate skewers and continue to cook till done. It took about 22 minutes for me to cook on medium flame. When done turn of the flame.

    To infuse smokey flavour :

    • Heat a piece of charcoal until it turns red hot .
    • Place a charcoal piece inside a small bowl , drizzle few drops of oil or ghee over it.
    • Keep charcoal bowl along with chicken tikka and immediately close the lid of frying pan. Let it sit for 5 or more minutes to absorb smokey flavour.

    To get charred look :

    • Place chicken skewers directly on high flame and rotate for few seconds until charred spots appear on chicken tikka.
    • Remove , sprinkle some chaat masala and serve with mint chutney , lemon wedges and onion rings.
    • Keep it inside stove top Brush with butter and grill for another 2-3 minutes to get that charred spots
    • Serve hot with Pudina Chutney / Mint Chutney and Onion rings.

    Video

    Notes

    • Skewers – Try to use metal skewers to thread the chicken pieces. They get hot and cook the chicken from inside as well. If using bamboo skewers, soak them in water for 30 minutes before threading the chicken otherwise they will get burned.

    Nutrition

    Calories: 264kcal

    Similar recipes

    • Chilli Capsicum Chicken
      Chilli Capsicum Chicken
    • Tandoori-chicken-with-mint-chutney
      Tandoori Chicken Recipe
    • pepper-chicken-with-curry-leaves
      Pepper Chicken with Curry Leaves
    • Chicken-ghee-roast-recipe
      Chicken Ghee Roast Masala Recipe

    Basundi | Creamy Sweetened Milk

    Published : August 14, 2017 | Last Update on October 18, 2022 By Muktha

    basundi-sweetened-condensed-milk

    Basundi is a delicious dessert made by reducing milk , sweetened with sugar and flavoured with saffron, cardamom and garnished with nuts.

    It's a easy to make recipe but little time consuming.

    This is a easy recipe which can be served to family and friends during gatherings and festivals.

    And also can be prepared at anytime of the day without any preparations or any fancy ingredients.

    Other Janmashtami festival recipes on blog are : Mathura peda , Murmura Ladoo, Gojju Avalakki | Huli Avalakki Recipe , Sihi avalakki

    basundi-sweetened-condensed-milkt-topped-with-nuts-and-saffron
    [feast_advanced_jump_to]

    What is Basundi?

    Basundi is a popular Gujarati and Maharashtrian milk based dessert. To make this dessert boiled milk is kept on a low flame till it reduces to half the quantity. Once it thickens, add sugar, flavour with cardamom ,nutmeg , saffron strands and garnish with nuts.

    Gujarati version is simlar to Noth Indian Rabri , thick and creamy . Whereas Maharastrian basundi is more like a thin custard. This post shares Maharastrian version of the dessert.

    Though it's time consuming to condense the milk, there is no much involvement required as you can keep the milk for simmering and meanwhile you can do other work. But it's important to stir and scrape the sides of the milk pot in between and also take care not to scorch the milk.

    There is one more easier version where condensed milk is mixed with milk to make this dessert. But here I have not used any readymade condensed milk instead I have used full fat milk and then condensed.

    This easy basundi recipe shared here is a classic basundi sweet recipe but other flavours and fusion of basundi recipes like strawberry basundi ,pineapple basundi are also pretty popular.

    A flavorful milk dessert will be ready which can be served chilled all alone or hot/warm if serving with poori.

    If you are intrested then do check simlar recipes like Kesar badam milk , Kulfi , Rabdi , Shahi Tukda , Home made Khoya.

    Ingredients

    To make this delicious dessert , you just need 4 main ingredients and rest other ingrdeients are optional add on's.

    basundi ingredients

    Milk - Use full fat whole milk to make this dessert . As full cream milk results in rich creamy thick basundi .Having said so , you can still use skimmed milk to make a lesser calorie dessert but be sure to cpmpromise on that rich ad creamy texture of basundi.

    Sugar - I always use white granulated sugar to make this recipe. But you can use any sweetner of your choice.

    Flavours - This plays a major role in this dessert . Cardamom , nutmeg , saffron and rose water together creates magical flavours to basundi. If any of the ingredeint is unavailable , just skip and continue with the recipe. Adding alI the flavours will defineitely elevates the flavors.

    Chopped nuts - Cashews , pistachios , almonds and chironji are added to basundi. Depending on the availability you can add or skip any of the nuts in this recipe.

    Watch Video

    Step by step directions

    Preparations

    Freshly pound green cardamom pods in a mortar pestle. Remove husk and powder cardamom seeds . Finely chop almonds, cashews and pistachios and set aside.

    Take milk in a thick bottom pan and keep on a low flame and bring it gentle boil.

    whole-milk-to-boil

    Keep on sim and stir once in awhile so that milk does not get burnt from the bottom.

    boil milk

    Scrape the milk solids from the sides and stir the milk, keep milk on sim till it get reduced to 2-2.5 cups.

    basundi recipe

    Once milk reduced to half the quantity, add sugar, saffron strands stir well.

    add sugar

    Turn off heat and add chopped nuts ,cardamom powder and nutmeg powder.

    add nuts , cardamom powder and rose water

    Serve chilled in matka or warm with poori's as a part of meal to enjoy.

    maharashtrian basundi

    Recipe

    basundi-topped-with-nuts
    5 from 1 vote

    Basundi Recipe - Creamy Sweetened Milk

    Basundi is a delicious dessert made by reducing milk , sweetened with sugar and flavoured with saffron , rose water and cardamom.
    Prep Time5 minutes mins
    Cook Time1 hour hr
    Total Time1 hour hr 5 minutes mins
    Course: Dessert
    Cuisine: Indian
    Keyword: Festivals, Sweets
    Servings: 4 people
    Calories: 260kcal
    Author: Muktha H S

    Ingredients

    • 1 litre Full Fat Milk
    • 3 tablespoon Sugar or as required
    • ½ teaspoon Cardamom powder or crush 4-5 cardamom seeds
    • 1 pinch nutmeg powder
    • 1 pinch Saffron strands
    • 1 tablespoon Almonds chopped
    • 1 tablespoon Cashews chopped
    • 1 tablespoon Pista chopped
    • 1.5 tablespoon Chironji ,optional
    • ½ teaspoon Rose water ( or 1 drop rose essence) optional

    Instructions

    • Take milk in a thick bottom pan and keep on a low flame and bring it gentle boil. 
    • Keep on sim and stir once in awhile so that milk does not get burnt from the bottom . 
    • Scrape the milk solids from the sides and stir the milk, keep milk on sim till it get reduced to 2-2.5 cups.
    • Once milk reduced to half the quantity, add sugar, saffron strands stir well.
    • Turn off heat and add chopped nuts ,cardamom powder and nutmeg powder.
    • Serve chilled in matka as a dessert or warm with poori's as a part to meal !

    Video

    Nutrition

    Calories: 260kcal

    You may also like

    • Rabdi-dessert
      Rabdi Recipe, how to make best rabri at home
    • rasmalai
      Rasmalai Recipe | Easy Rasmalai Recipe
    • Kesar-badam-milk
      Kesar Badam Milk
    • Shahi Tukda
      Shahi Tukda Recipe

    Paneer Pepper Dry

    Published : February 1, 2017 | Last Update on September 29, 2022 By Muktha

    Paneer-pepper-dry-recipe

    Paneer Pepper dry is a quick , peppery taste side dish made under 30 minutes. It's easy to make with minimal ingredients, eat it all alone as a starter , serve as a side dish or roll as wrap , it tastes delicious.

    If you like Paneer ( Indian Cottage Cheese ) then you can try these recipes too , checkout if these paneer recipes intrests you : Paneer Paratha , Paneer Butter Masala , Chilli Paneer, Palak Paneer and Palak Paneer Salad. 

    paneer-pepper-dry-with-roll
    [feast_advanced_jump_to]

    About this recipe

    Paneer pepper dry is a quick and tasty recipe that can be made under 20 minutes . It's spicy , tasty and healthy too. It's non-fried recipe making it more healthy .

    This paneer pepper dry is my version of non deep fried recipe , it's tasty and worth the try.

    Serve paneer pepper dry with pickled onions , cucumber and roti with dal for complete meals . You can also stuff inside roti , add some pickled onions and spread mint chutney or tomato ketchup and roll to make it into kid's lunch box.

    Paneer or cottage cheese is a good source of protein , adding it to your daily diet is very beneficial. If possible, try using homemade paneer as it will be fresh and there will be no preservatives.

    If you are serving it to kid's then reduce the amount of spices as they might find it too hot and spicy.

    Ingredients

    You need some basic ingredients and spices to put up this delicious paneer recipe

    Paneer ( Indian Cottage cheese ) - Always try to use Homemade or any fresh paneer that is available from known source. Use preservative free paneer , as it tastes the best and also body absorbs the nutrients easily when it is preservative free.

    Produce - Onion , Ginger ,Garlic , green chillies and coriander leaves , these are the basic herbs used in this recipe

    Spices - Cumin Powder (jeera powder ) and Blacpepper powder are used.

    Soya sauce - It adds sour , salty taste along with brings out that dark colour to the dish.

    Oil - Any flavourless cooking oil works well here.

    Gram flour - Its one of the key and most important ingredient in this recipe . It helps to absorb excess moisture and just lightly coats panner cubes , giving distinct texture to paneer peppery dry recipe.

    Others - Salt and lime juice , to give taste.

    Top Tip

    Always use Homemade Paneer ( Indian Cottage Cheese ) as it will be soft , fresh and yields better results.

    Don't overcook Paneer as it turns chewy.

    Watch Video

    How to make Paneer Pepper Dry

    Heat oil in a pan, add ginger garlic paste,onion and saute well till raw smell goes off.

    Paneer Pepper Dry

    Add green chillies ,saute for a minute . Now add small cubes of paneer ,toss well .Cook until it turns slight golden brown in colour . It takes around 7-8 minutes on medium heat.

    Paneer Pepper Dry

    Add cumin and black pepper powder, soya sauce and salt . Toss well until water content dries up.

    Paneer Pepper Dry

    Now sprinkle gram flour(besan) over the paneer cubes . And toss on high heat , this helps to absorb extra moisture and coats the paneer lightly.

    Paneer Pepper Dry

    Finally sprinkle pepper powder, lemon juice, coriander leaves and adjust salt . Toss well and serve hot as a side dish.

    paneer_pepper_Dry

    Recipe

    paneer-pepper-dry-with-pickled-onions
    5 from 2 votes

    Paneer Pepper Dry Recipe

    Paneer Pepper dry is a quick , peppery taste side dish made under 30 minutes. It's easy to make with minimal ingredients, eat it all alone as a starter , serve as a side dish or roll as wrap , it tastes delicious.
    Prep Time5 minutes mins
    Cook Time15 minutes mins
    Total Time20 minutes mins
    Course: Appetizer, Starters
    Cuisine: Indian
    Keyword: Bachelor's Cooking, Diet, Kids Recipes, Paneer, Protein Rich, Quick & Easy, Starters
    Servings: 3 people
    Calories: 253kcal
    Author: Muktha H S

    Ingredients

    • 200 grams Paneer ,cut into small cubes
    • 1 Onion finely chopped
    • ½ tablespoon Garlic paste
    • ½ tablespoon Ginger Paste
    • 2 Green chillies finely chopped ,less spice green chilly
    • 1 tablespoon Oil
    • 1 tablespoon Black Pepper powder
    • ½ teaspoon Jeera/ Cumin seeds Powder
    • 1 Tsp Soya Sauce
    • 1 tablespoon Gram flour / Besan
    • 1 teaspoon Lemon juice
    • ½-3/4 teaspoon Salt or as required (note soya sauce contains salt)
    • 1 tablespoon Fresh Coriander Leaves Chopped

    Instructions

    • Heat oil in a non stick pan, add ginger garlic paste, chopped onion and saute well till raw smell goes off.
    • Add green chillies ,saute for a minute,add small cubes of paneer ,toss well and allow to cook till you get slight brown in colour for 7-8 minutes.
    • Add jeera/ cumin seeds powder and 1Tsp Black pepper powder, soya sauce toss well, till it becomes dry. 
    • Now sprinkle 1 tablespoon of gram flour/besan over the paneer. This helps to absorb moisture and coats the paneer lightly
    • Add remaining salt, pepper powder, lemon juice, chopped coriander leaves, and toss well.
    • Serve hot as a starter or a side dish.

    Video

    Notes

    • Always use Homemade Paneer ( Indian Cottage Cheese ) as it will be soft , fresh and yields better results
    • Don't overcook Paneer as it turns chewy

    Nutrition

    Calories: 253kcal

    You may also like

    • Chickpea salad
      Chickpea Salad - Mediterranean Style
    • paneer chilli recipe
      Chilli Paneer |Resturant Style Chilli Paneer
    • Shahi Paneer
      Shahi Paneer Recipe | how to make Shahi Paneer
    • gravies-sides-curries
      Paneer Butter Masala

    Spicy Masala Oats Omelette Recipe

    Published : January 31, 2017 | Last Update on September 28, 2022 By Muktha Gopinath

    Oats-omelette-breakfast

    Spicy masala oats omelette with step by step photos and video. Masala Oats omelette is a healthy and nutritious breakfast with goodness of eggs and whole lot of vegetables.

    It's easy and tasty breakfast to kick start your day , gets ready under 20 minutes.

    I'm very fond of eggs in my breakfast and few of my top favourites include Mushroom Fritata , Shakshuka , Spanish Potato Omlette and Savoury Egg Muffins

    Masala Oats Omelette
    [feast_advanced_jump_to]

    About this recipe

    Masala Oats Omelette is a healthy , nutritious breakfast with goodness of eggs and whole lot of vegetables with a touch of Indian spices (masala) .

    What can be better than an Egg to start your day with ? Its my first choice for breakfast, as its is nutritious with all essential nutritents and keeps us energised till next meal.

    Adding oats and few veggies to Egg, makes it more colourful , fibrous and super nutritious. It tastes so good and looks beautiful that kids fall in love with it.

    What more one can expect in an healthy breakfast ? You can add carrot, beans ,capsicum,cabbage,mushroom, peas and also greens of your choice to make it more healthier.

    Though adding potatoes enhances the tastes, I don't recommend it for weight watchers as oats itself gives you the necessary carbohydrates and there is no need for  extra carbs from starchy potatoes.

    You can incresse the number of eggs , vegetables and spices as per your need.

    If you are looking for more similar Masala Oats recipe with Indian touch then you must check these recipes Oats Matar Chilla , One Oats Many Taste , Oats Dosa and Oats Idli 

    Checkout the video

    How to make Spicy Masala Oats Omelette

    In a mixer add oats and all spices , salt and ground to a powder.

    Spicy Masala Oats Omelette Recipe

    Break eggs into a bowl, add pinch of salt and seasoning , whisk well.

    Spicy Masala Oats Omelette Recipe

    To this add powdered oats and whisk well , beat well, add milk and mix it. Adding milk would give you a fluffy omelette.

    Spicy Masala Oats Omelette Recipe

    Add all chopped vegetables and greens of your choice and give a quick stir.

    Spicy Masala Oats Omelette Recipe

    Heat oil in a nonstick pan, pour egg-oats batter ,close and cook on medium heat for 5 minutes.

    Spicy Masala Oats Omelette Recipe

    Once the base becomes firm,flip it and cook on the other side too for 2-3 minutes.

    Spicy Masala Oats Omelette Recipe

    Cut it into wedges and Serve masala oats omelette hot or warm

    Spicy Masala Oats Omelette Recipe

    Recipe

    Oats-omelette-breakfast
    5 from 3 votes

    Spicy Masala Oats Omelette Recipe

    Masala Oats Omelette : Made with Oatmeal , spices , eggs and whole lot of vegetables make this a perfect and tasty breakfast to kickstart your day.
    Prep Time5 minutes mins
    Cook Time10 minutes mins
    Total Time15 minutes mins
    Course: Breakfast
    Cuisine: Indian
    Keyword: Diet, Healthy, Oats
    Servings: 2 People
    Calories: 170kcal
    Author: Muktha H S

    Ingredients

    • ¼ Cup Oats powdered
    • 2 no's Egg
    • 2 tablespoon Onions finely Chopped
    • 2 tablespoon Tomatoes finely Chopped
    • 2 tablespoon Capsicum finely Chopped
    • 1 tablespoon Coriander Leaves finely Chopped
    • 2 tablespoon Milk (Optional)
    • ½ teaspoon Chilly Powder
    • ½ teaspoon Coriander powder
    • ¼ teaspoon Black Pepper powder
    • ¼ teaspoon Jeera / Cumin Powder
    • ¼ teaspoon Garam Masala
    • ¼ teaspoon Dry Mango powder (Optional)
    • ½ teaspoon Pasta Seasonong (Optional)
    • ½ teaspoon Chilly Flakes (Optional)
    • ¾ -½ teaspoon Salt or as required
    • 1-½ tablespoon Oil

    Instructions

    • Dry roast oats on a low flame. Transfer to a dry mixer jar / blender
    • Add all spice powder and salt
    • Blend oats to a powder in a mixer and make Oats flour / Oatsmeal.
    • Break eggs into a bowl ,add milk and whisk well together
    • Add oats flour with spices ,all chopped veggies to egg.Mix well together.
    • Heat 1 teaspoon oil in a nonstick pan,pour the egg batter ,and cook on medium heat for 3-4 minutes till base become firm.
    • Now flip and cook on other side for 3 more minutes. or till done.
    • Serve Oats omelette ,hot or warm .

    Video

    Notes

    • Adding milk , helps to get a fluffy omelette .
    • You can increasse the eggs number and add more vegetables of your choices .

    Nutrition

    Calories: 170kcal

    You may also like

    • scrambled Egg Curry
      Scrambled Egg Curry
    • mushroom-frittata
      Mushroom Frittata
    • shakshuka recipe
      Shakshuka | How to make Shakshuka recipe
    • Classic Egg Salad recipe
      Classic Egg Salad

    Spinach Mushroom Soya Cutlets

    Published : January 24, 2017 | Last Update on July 23, 2022 By Muktha Gopinath

    Spinach Mushroom Soya Cutlet

    Spinach Mushroom Soya Cutlet is a delicious and healthy snack option . Just like any other cutlets making this easy with almost same spices and method. But this is not deep fried ,I often make all kind of cutlets/patties on Tawa with little oil. You may have not heard about this cutlet combination before as its my own recipe. I developed this recipe to add some protein and fiber in the snack to help my clients to eat tasty food when on diet plan.

    Spinach Mushroom Soya Cutlets

    I'm a great fan of spinach and mushroom combinations,so I often make use of these two ingredients to prepare most of the dishes which helps in weight management. Spinach and Mushroom both have high water content and low calories and lots of nutrients. And also one advantage of this combination is spinach is very high in Sodium and mushroom on other hand is very low in sodium and high in Potassium . Mixing these two gives you a great taste with all nutritional benefits .

    So when you are on a diet or planning for any kind of weight loss prepare this good protein and nutritional rich cutlets and have it alone or along with some tomatoes , cabbage or some veg soup for a main meal. But limit yourself to 2-3 cutlets ,as all your nutritional demands per meal will be met. Here soya chunks are used which provides you with protein. Bread crumbs gives that crunchy texture from outside and little amount of carbs are also met.So this can be a meal for weight watchers, snacks for kids and kitty parties .You can also serve this as starter in parties.

    Spinach Mushroom Soya Cutlet

    Similar recipes on blog are : Sabudana Vada,  Raw Banana Tikki , Poha Cutlets , Vegetable Cutlets 

    RECIPE CARD FOR SPINACH MUSHROOM SOYA CUTLETS

    Recipe

    Spinach Mushroom Coya Cutlets
    4 from 1 vote

    Spinach Mushroom Soya Cutlets

    Spinach Mushroom Soya Cutlet is a delicious Tawa fried healthy snack with good amount of protein and fiber. 
    Prep Time15 minutes mins
    Cook Time25 minutes mins
    Total Time40 minutes mins
    Course: Snack, Starters
    Cuisine: Indian
    Keyword: Healthy, Kids Recipes, Party Snacks
    Servings: 10 Makes
    Author: Muktha H S

    Ingredients

    • 1 Cup Spinach Leaves , finely Chopped
    • 1 Cup Button Mushroom , finely Chopped
    • ½ Cup Soya Granules
    • 2 no Potatoes ,medium size ,boiled
    • 1 no Onion ,Medium Size , finely Chopped
    • 2 no Green Chillies , finely chopped
    • ½ tablespoon Garlic Paste , 8-10 garlic cloves minced
    • ½ tablespoon Ginger Paste , ¾ inch ginger minced
    • 2 teaspoon Cooking Oil
    • 1 ½ tablespoon Gram Flour / Besan
    • ½ teaspoon Cummin Powder / Jeera Powder
    • ½ teaspoon Dry Mango Powder / Amchoor Powder
    • ¼ teaspoon Red Chilli Powder
    • ¼ teaspoon Garam Masala Powder
    • ¼ teaspoon Kitchen King masala
    • ¼ teaspoon Chaat Masala Powder
    • ¾ -1 teaspoon Salt or as required
    • 2 tablespoon Coriander leaves chopped
    • 4 Tbsp Bread Crumbs
    • 11/2 tablespoon Cornflour
    • 4 tablespoon Water
    • 2-3 tablespoon Cooking Oil or as required for tawa frying cutlets

    Instructions

    • Keep potatoes for boiling. Remove skin, mash potatoes and keep aside.
    • Whilst , wash soya mini chunks and set aside. In a pot, add 1 cup water, soya chunks and bring it to rolling boiling.
    • Using a colander, drain water, squeeze extra water from soya chunks and keep it aside.
    • Take a wok/pan/kadai , heat 2 teaspoon of oil for this add onions, ginger garlic paste and saute till raw smell goes off. Add chopped green chillies.
    • Now add in chopped spinach saute for a minute, add chopped mushroom ,¼ teaspoon salt and cook till it becomes completely dry. 
    • For this add gram flour/ besan , so that the moisture content will be absorbed.
    • For this add mashed potato, coriander leaves, coarse ground soya and mix well.
    • Shape the cutlet/patties using moulds or rolling and flattening between your palms and refrigerate for 10 minutes.
    • Mix cornflour with 3 tablespoon of water and make a thin paste. 
    • Dip the refrigerated cutlet in cornflour paste and roll on bread crumbs.
    • Heat Tava/ griddle, grease tava with oil and place the cutlets over it. 
    • Drizzle some oil on patties , flip and cook on both sides till it looks golden in colour.
    • Serve it hot or warm with Tomato Ketchup / Sauce.


    Step by Step Directions for making Spinach Mushroom Soya Cutlets:

    Keep potatoes for boiling. Remove skin, mash potatoes and keep aside.

    Whilst ,wash soya mini chunks and set aside. In a pot, add 1 cup water, soya chunks and bring it to rolling boiling.

    Using a colander, drain water, squeeze extra water from soya chunks and keep it aside.

    Spinach Mushroom Soya Cutlets

    Take a wok/pan/kadai , heat 2 teaspoon of oil for this add onions, ginger garlic paste and saute till raw smell goes off. Add chopped green chillies.

    Spinach Mushroom Soya Cutlets

    Now add in chopped spinach saute for a minute, add chopped mushroom , ¼ teaspoon salt and cook till it becomes completely dry. For this add gram flour/ besan , so that the moisture content will be absorbed.

    Spinach Mushroom Soya Cutlets

    For this add mashed potato, coriander leaves, coarse ground soya and mix well. If there is still moisture , you can add 1 tablespoon of Bread crumbs for binding also.

    Spinach Mushroom Soya Cutlets

    Shape the cutlet/patties using moulds or rolling and flattening between your palms and refrigerate for 10 minutes.

    Spinach Mushroom Soya Cutlets


    Mix cornflour with  3 tablespoon of water and make a thin paste. Dip the refrigerated cutlet in cornflour paste and roll on bread crumbs.

    Spinach Mushroom Soya Cutlets

    Heat Tava/ griddle, grease tava with oil and place the cutlets over it. Drizzle some oil on patties , flip and cook on both sides till it looks golden in colour.

    spinach_mushroom_soya_cutlets

    Serve hot with tomato ketchup.
    Spinach Mushroom Coya Cutlets

    Proso Millet Carrot Payasa/Kheer

    Published : January 23, 2017 | Last Update on January 13, 2020 By Muktha Gopinath

    Millet Carrot Kheer

    Millet Carrot Kheer recipe with step by step photos . A tasty, healthy and delicious millet carrot payasam with all goodness in one bowl to satiate your hunger and sweet tooth.

    Millet Carrot Kheer

    Millets are amazing in their nutritional content, it is 3-5 times nutritionally superior than wheat and rice in terms of proteins, vitamins and minerals. It contains important amino acids and are very beneficial for diabetics, obesity and heart diseases. Proso Millet is known as "Baragu" in kannada, "Pani-varagu" in Tamil and "Chena or Chin" in Hindi.

    Increasing awareness about millets has also influenced me and has found a place in my pantry too. I have brought all kinds of millets and trying new recipes by replacing rice and wheat with millets. Hoping to share few recipes on Millets soon.

    Tried this carrot Kheer payasam recently, as it turned out so good I thought of sharing this recipe here.

     As Millets is very good for diabetics because of its GI ,I prepared this sweet dish to make it diabetic friendly. Hence I have used Black jaggery here and called this as Payasa. Though I'm not a payasa lover, still I loved this sweet and definitely I'll be cooking it in future. If you haven't started using millet yet, it's time for you to introduce it in your family. But don't replace rice and wheat with millets completely , everything as its own pros and cons.  Use everything in moderation , make wise food choices, cook right and eat healthy.

    Ingredients:

    Category:Vegetarian | Cuisine : India | Course: Dessert
    Prep Time : 10 minutes |Cooking Time: 30 Minutes | Serves:4-5

    Proso Millet / Finger Millet :½ Cup

    Milk:2.5  Cups
    Water:1 Cup
    Ghee:1 Tbsp + 1 Tsp
    Black jaggery:⅓ Cup Crumbled
    Carrot:3 Medium Size
    Almonds/Badam:6-8 No's
    Cashews:10
    Raisins:10
    Pista:5 ,finely Sliced
    Cardamom:2 Pods,powdered

    Method:

    Clean the millets,wash it and soak it for 10 minutes in water.Drain and keep it aside.

    Proso Millet Carrot Payasa/Kheer

    Peel carrot,cut it and along with almonds  add 2 tablespoon of milk and pressure cook for one whistle. Once pressure releases on its own,remove the skin of almonds,and add it along with carrot to a blender and make a puree .

    Proso Millet Carrot Payasa/Kheer

    Take a non stick pan/pressure cooker,add  1 tablespoon ghee fry cashews and raisins. Once raisins puffs up,remove it from ghee and reserve it aside.

    Proso Millet Carrot Payasa/Kheer

    In the same pan/pressure cooker,add the drained millet and fry on low heat slowly about 8 minutes till you get nice aroma and millet starts changing the colour.Now add the carrot puree and saute till raw smell of carrot goes off.

    Proso Millet Carrot Payasa/Kheer

    Add 1 cup of milk and 1 cup of water and close the lid and cook ,till the millets get cooked.Or Else alternatively you can pressure cook it for 1-2 whistles.

    Proso Millet Carrot Payasa/Kheer

    Once pressure realesed,add powdered jaggery once it melts,add remaining milk,mix well and allow it to boil.

    Proso Millet Carrot Payasa/Kheer

    Once it comes to boil,turn off the heat,add ghee,cardamom powder,chopped pista and fried raisins and cashews.

    Proso Millet Carrot Payasa/Kheer

    Serve it hot

    Proso Millet Carrot Payasa/Kheer

    Tea Masala Powder | Chai Masala Recipe

    Published : January 22, 2017 | Last Update on January 5, 2022 By Muktha Gopinath

    Chai Masala

    Tea Masala Powder recipe with step by step images and video. Chai Masala or Tea Masala Powder is a blend of spices which adds aromatic flavors in Indian Tea.

    It has medicinal properties and adding a pinch of this spice blend makes a tasty and warm cup of tea.

    Other authentic spice blends , which I often make at home are Sambar Masala , Biryani Masala , Curry leaves powder , Dry chutney Powder.

    Chai Masala
    [feast_advanced_jump_to]

    About this recipe

    What can be better than a Masala Chai to keep you warm in winters. Tea Masala is just blend of spices that can be used while making Tea. From North to South India each family has got their own recipe for tea masala .

    This is basic chai masala which I use ,one can vary the proportions to suit their needs. I prefer using this masala powder for making tea, which gives you a aromatic and mildly spiced tea that soothes throat and soul instantly. That's the love we Indian's possess for masala chai.

    This is a kind of home remedy we use at home to keep oneself warm in cold season. Keeping this Masala powder as a basic chai masala recipe , one can add extra cardamom ,extra cinnamon ,extra fresh ginger to get cardamom tea, cinnamon tea, ginger tea and lemon grass to get respective flavors.

    It's up to one's taste to use the spices as per their mood to get that extra flavorful punch in their tea.

    Than buying an Tea Masala Powder from stores, this is very easy to prepare at home with just few spices and it's pocket friendly too.

    Watch Video

    Step by step directions

    Heat Iron Griddle and dry roast all the ingredients till you get nice aroma, it takes 2-3 minutes.

    tea masala powder recipe

    Take measures not to burn or change the color of spices.

    Once it cools down, transfer to a dry grinding jar and ground to fine powder.

    Tea Masala Powder | Chai Masala Recipe

    Store it in a dry air tight container. Stays good for several months.

    tea masala powder

    How to make Masala Chai ?

    In a sauce pan heat 150 ml of water .

    how to make chai

    Add 2 teaspoon of Tea leaves and bring it to rolling boil. Tea leaves boils well and releases color.

    Now add 150 ml of milk and boil well.

    Tea Masala Powder | Chai Masala Recipe

    Add 1 tablespoon of sugar and ½ teaspoon of prepared chai masala .

    chai masala

    Let it steep in for 2 minutes on simmer.

    Strain prepared tea an serve hot !

    masala chai

    You might also like

    • apple cinnamon tea
      Apple Cinnamon Tea
    • biryani masala powder
      Biryani Masala Powder
    • moringa-tea-to-burn-fat
      Moringa Tea Recipe | Sip everday to Burn Fat easily
    • ragi banana smoothie
      Ragi Banana Smoothie | how to make ragi smoothie

    Recipe

    Chai Masala
    5 from 2 votes

    Tea Masala Powder

    Aromatic Chai Masala Powder for your regular Indian Tea
    Prep Time5 minutes mins
    Cook Time5 minutes mins
    Total Time10 minutes mins
    Course: Condiments
    Cuisine: Indian
    Keyword: Basic, Beverages
    Servings: 50 grams
    Author: Muktha H S

    Ingredients

    • 7-8 1 " inch Cinnamon sticks
    • 7 Cloves
    • 15 Green Cardamom Pods
    • 4 1 "inch Dry Ginger
    • 1 Nutmeg Crushed
    • 2 teaspoon Fennel Seeds
    • 1 teaspoon Black Peppercorns
    • 1 Star Anise

    To Make Chai

    • 150 ml water
    • 150 ml whole milk
    • 2 teaspoon Tea leaves
    • 1 tablespoon Sugar
    • ½ teaspoon chai masala powder

    Instructions

    How to make Chai Masala Powder

    • Heat Iron Griddle and dry roast all the ingredients till you get nice aroma,it takes 2-3 minutes.
    • Take measures not to burn or change the colour of spices.
    • Once it cools down,transfer to a dry grinding jar and ground to fine powder.
    • Store it in a dry air tight container,makes around 50 grams of masala powder.

    How to make Chai

    • In a sauce pan heat 150 ml of water .
    • Add 2 teaspoon of Tea leaves and bring it to rolling boil. Tea leaves boils well and releases color.
    • Now add 150 ml of milk and boil well.
    • Add 1 tablespoon of sugar and ½ teaspoon of prepared chai masala .
    • Let it steep in for 2 minutes on simmer.
    • Strain prepared tea an serve hot !

    Video

    Notes

    1. Keeping this recipe as a basic ,you can enhance any flavour of your choice.
    2. Adding 1inch cinnamon stick while preparing masala chai,gives you cinnamon flavoured Tea.
    3. Likewise ,you can add Cardamom ,Fresh Ginger and lemon grass to get respective flavours of chai.

    Scrambled Egg with Mushroom

    Published : January 18, 2017 | Last Update on October 7, 2022 By Muktha Gopinath

    scrambled mushroom eggs

    Scrambled Egg with Mushroom is a quick, tasty and nutritious breakfast that can keep you energised for long. Eggs , mushroom and green peas with some cheese is heaven made combination that puts up a tasty breakfast within 15 minutes.

    This breakfast recipe is one of my favorite as it is tasty and helps me to put healthy on plate under 15 minutes.

    Few of my other favourite breakfast recipes includes Egg Shakshuka , Mushroom Frittata, Classic Egg Savoury Toast and Oats Omelette

    scrambled mushroom eggs for breakfast
    [feast_advanced_jump_to]

    About this recipe

    Scrambled Egg with Mushroom is a quick, tasty and healthy breakfast that can keep you energised for long.

    This recipe is easy to make and gets ready under 15 minutes.

    Scrambled eggs with mushrooms can be served with bread toast or you can eat it on its own .

    This is a protein rich, low-carb, healthy salad that you can add to your daily meal menu. It's also great for picnics , potluck and get together parties.

    You can serve this in many ways – as a side dish , make sandwich, make wraps , eat it for snack or as a low-carb meal.

    You can serve this for those on Keto Diet too .

    Why Eggs in breakfast?

    Eggs contains all the essential amino acids which is nothing but a high quality complete protein. Starting your day with eggs helps to sustain energy levels .

    Choline, an essential nutrient found in eggs, stimulates brain development and functions. It is because of this reason kids are made to eat at least one egg regularly.

    New studies and researchers have found that eating eggs for morning breakfast doesn't have any impact on blood lipids level .

    So  fearlessly eggs can be added for morning breakfast as it does not increase cholesterol levels. 

    Breakfast egg recipes are not only easy to make , taste delcious but also helps to shed some pounds. If you want to lose some pounds , then eat 2 boiled eggs for morning breakfast and see the miracle it makes to your body.

    Other similar Breakfast Egg recipes on blog are Classic French Toast , Masala Oats Omelette and Spanish Potato Omelette.

    Egg are great source of protein and also helps to shed some weight easily. If you want to lose some pounds , then eat 2 boiled eggs for morning breakfast and see the miracle it makes to your body.

    Ingredients

    As the recipe name itself indicates ,to make this recipe you need Eggs, Mushrooms, Greem Peas , Milk , Cheese and Herbs and seasoning.

    scrambled-mushroom-egg-ingredients

    No fancy ingredients are required, its all basic ingredients from kitchen pantry , if any of the ingredients are not available then just skip and follow the recipe.

    For actual measurements , refer recipe card.

    Watch Video

    How to make Scrambled Mushroom Egg Recipe

    Break 4 eggs in a bowl, whisk and add salt, pepper powder and milk.

    eggsand milk

    Whisk everything together and keep it aside.

    whisk eggs

    In a non-stick pan, add butter, once it melts add chopped garlic and onions, sauté well.

    Scrambled Egg with Mushroom

    Add steamed / blanched green peas and cook for 3-4 minutes,

    Scrambled Egg with Mushroom

    add sliced mushroom and cook till it becomes soft. 

    mushrooms into skillet

    With the help of spoon slightly mash the green peas while cooking , it's optional

    Scrambled Egg with Mushroom

    Now add whisked eggs

    add whisked eggs

    Before base turns firm, scramble everything.

    Scrambled Egg with Mushroom

    Add grated cheese mix well and turn off the heat. 

    Scrambled Egg with Mushroom

    Lastly , add chopped coriander leaves, Italian seasoning, pepper powder and salt.

    Mix well everything and serve hot along with bread toast.

    Recipe

    scrambled mushroom eggs
    5 from 2 votes

    Scrambled Egg with Mushroom

    Scrambled Egg with Mushroom is a quick , tasty and healthy breakfast recipe made with button mushrooms, green peas , eggs and cheese. - a great way to kick start the day.
    Prep Time5 minutes mins
    Cook Time15 minutes mins
    Total Time20 minutes mins
    Course: Breakfast
    Cuisine: Fusion, World
    Keyword: Breakfast_Ideas, Egg, Healthy, Protein Rich
    Servings: 3 People
    Calories: 243kcal
    Author: Muktha H S

    Ingredients

    To whisk egg

    • 4 Eggs
    • 2 Tbsp Milk , optional
    • 1 pinch salt
    • 2 pinches pepper powder

    To make scrambled eggs with mushroom

    • 1.5 tablespoon Butter
    • 1 teaspoon Garlic Cloves , finely chopped
    • ¼ cup Onion , finely chopped
    • ½ cup Fresh / Frozen Green peas , steamed
    • 200 grams Button Mushroom ,sliced
    • 3-4 tablespoon Processed Cheese , grated
    • 1 tablespoon Fresh coriander leaves ,chopped
    • 1 teaspoon Mixed herb seasoning
    • ½ teaspoon Black Pepper Powder or as required
    • Salt as required

    Instructions

    • Break 4 eggs in a bowl, whisk and add salt, pepper powder and milk. Whisk everything together and keep it aside.
    • In a non-stick pan, add butter, once it melts add chopped garlic and onions, sauté well.
    • Add steamed / blanched green peas and cook for 3-4 minutes, add sliced mushroom and cook till it becomes soft.
    • With the help of spoon slightly mash the green peas while cooking, add whisked eggs and before base turns firm, scramble everything.
    • Add grated cheese mix well and turn off the heat.
    • Add chopped coriander leaves, Italian seasoning, pepper powder and salt.
    • Mix well everything and serve hot along with bread toast.

    Video

    Notes

    • Be careful while adding alt as both eggs and mushroom are high in sodium and it turns salty soon. 
    • Also processed cheese has salt in it, so be mindful while adding salt.

    Nutrition

    Calories: 243kcal

    You may also like

    • Beans-egg-bhurji-recipe
      French Beans Egg Bhurji
    • Oats-omelette-breakfast
      Spicy Masala Oats Omelette Recipe
    • Classic Egg Salad recipe
      Classic Egg Salad
    • shakshuka recipe
      Shakshuka | How to make Shakshuka recipe

    Peanut Salad

    Published : January 9, 2017 | Last Update on September 28, 2022 By Muktha Gopinath

    Peanut Salad

    Peanut Salad one of the most nutritious and energy giving salad. Peanuts are known for its healthy benefits ,it's rich in monounsaturated fatty acids (MUFA) and helps in lowering the Bad Cholesterol i.e,LDL. Just handful of peanuts can provide you with recommended dietary intake (RDI) of minerals and proteins. Its also rich in vitamin E. Roasting and boiling peanuts enhances its antioxidants bio-availability. So one will be definitely be beneficial by adding this in diet.

    Peanut Salad
     
    It's believed from many that Peanut as fattening nut, but actually it's NOT. Don't go by Myths go by Facts. So try to add this Salad in your diet as it has all goodness of protein, fat, vitamins and minerals.Tomatoes,capscium and cucumber too added in this salad, increases vitamin A and Vitamin C. You can have this salad in breakfast or evening snack like chat. If you are one among those whose prefer eating six-eight meals a day, then you should consider this salad for sure. Eat healthy, Stay Healthy.
    Also like other salads ,no dressing oil or sauces are need for peanut salads because peanuts already contain good amount oil. So dressing is not needed here , only lime juice is added for a zing in taste. Also, one more variation of this peanut salad is peanut chat , where  finely chopped onions , grated carrots , sev and chat masala is added.

     RECIPE CARD FOR PEANUT SALAD

    Recipe

    Peanut Salad
    5 from 1 vote

    Peanut Salad

    A healthy and nutritious protein rich salad.
    Prep Time7 minutes mins
    Cook Time20 minutes mins
    Total Time27 minutes mins
    Course: Breakfast, Salad
    Cuisine: Indian
    Keyword: Diet, Healthy, Protein Rich
    Servings: 3 People
    Calories: 82kcal
    Author: Muktha H S

    Ingredients

    • ⅓ cup Peanuts ,boiled
    • ¼ cup Capsicum ,finely chopped
    • ¼ cup Tomato ,finely chopped
    • ¼ cup Cucumber ,finely chopped
    • 1 tablespoon Coriander leaves ,chopped
    • 1 teaspoon Lime juice
    • ¼ teaspoon Red Chilli powder
    • ½ teaspoon Salt or as required
    • 2 pinches Cumin powder/ Jeera powder

    Instructions

    • Take a pot ,add some water add peanuts ,add pinch of salt and boil it for 15-20 minutes. Alternatively, you can pressure cook for 1 whistle. 
    • Drain water and keep peanuts aside.
    • Finely Chop all the veggies, add boiled peanuts,coriander leaves, add salt ,red chilli powder ,jeera powder and lemon juice .
    • Mix well and serve.

    Notes

    • Use Peanut boiled water to knead atta or prepare any curry.
    • Adding Capsicum gives a crunch and good taste, so don't skip capsicum.

    Nutrition

    Calories: 82kcal

    Step by Step Directions for making Peanut Salad.

    Take a pot ,add some water add peanuts and boil it for 15-20 minutes. Alternatively, you can  pressure cook for 1 whistle. Drain water (you can use this water to knead atta or prepare any curry) and keep peanuts aside.
     
    Peanut Salad
     
    Chop all the veggies, add peanuts,coriander leaves,add salt,red chilli powder,jeera powder and lemon juice .
     
    Peanut Salad
     
    Mix well and serve.
    Peanut Salad

    Serve has a Salad or eat it as a chat , tastes delicious 🙂

    Peanut Salad

    Ragi Soup

    Published : January 7, 2017 | Last Update on September 27, 2022 By Muktha Gopinath

    ragi-soup-with vegetables

    Ragi Soup recipe with step by step photos and video. Ragi soup is a healthy , nutritious bowl of soup made with finger millet flour and assorted vegetables.

    A hot bowl of ragi soup is all you need to meet your calcium needs making bones stronger , keeps anemia and diabetics at bay .

    Ragi Soup

    [feast_advanced_jump_to]

    What is Ragi Soup?

    Ragi Soup is a one pot balanced meal. It is a nutritious soup that can be given to all age groups from 1 year to elderly person. It's rich in nutrients , light on stomach and easily digestible. For weight loss and weight management , this soup creates wonder when added mindfully in diet.

    For all weight watchers , it time to include into your diet . As vegetables are added to this , it provides all vitamins and minerals along with carbohydrates and essential amino acids from ragi.

    Have this nutritious Ragi soup in your dinner along with some protein and see the magic it creates . As it is gluten free grain , you never feel bloated or gassy . Also it curbs all the late night cravings and binge eating.  If you haven't added this super grain in your diet , do consider to add and you'll be benefited for sure.

    Watch Video

    Step by Step directions to make Ragi Soup :

    Warm  ½ cup water , add ragi flour make a paste / slurry

    make ragi slurry

    Keep Ragi slurry as side

    ragi slurry

    Heat Butter/ oil in a wok, add bay leaf, cloves and cinnamon stick , ginger , garlic and green chillies and saute until raw smell goes off.

    spices in butter

    Add onions and saute till it turns translucent.

    saute onions

    Add all the chopped  veggies and blanched green peas.

    chopped vegetables to make soup

    Now add 3.5 cups of water and bring to boil .

    add stock or water

    Once it starts to boil,cover lid and put on simmer for 5 minutes.

    bring chopped vegetable to boil

    Remove bay leaf, cinnamon , cloves and discard it , as its added only to get flavor . If using vegetable or chicken stock then no need to add whole spices. Alternatively you can skip using whole spices , if vegetable or chicken stock is used.

    discard whole spices

    For this add the ragi paste / ragi slurry, 

    pour ragi slurry slowly

    stir and allow it cook.

    Ragi Soup

    Once it starts to thicken , turn off the stove.

    Ragi Soup

    Finally , add salt, pepper powder

    Ragi Soup

    lemon juice and coriander leaves.

    Ragi Soup

    Serve ragi soup hot or warm.Ragi Soup

    Recipe

    ragi-soup-with vegetables
    5 from 4 votes

    Ragi Soup

    Ragi Soup is a healthy and nutritious bowl of soup with lots of vegetables and ragi flour.
    Prep Time10 minutes mins
    Cook Time20 minutes mins
    Total Time30 minutes mins
    Course: Soup
    Cuisine: Indian, South India
    Keyword: Bachelor's Cooking, Diet, Gluten Free, Healthy, Weight Loss
    Servings: 3 People
    Calories: 124kcal
    Author: Muktha H S

    Ingredients

    • ⅓ cup Ragi Flour
    • 4 cups Water
    • 1 Onion, Large , finely chopped
    • 1 tablespoon Garlic , finely chopped
    • 1 tablespoon Ginger , finely chopped
    • ⅓ cup Carrot , finely chopped
    • ¼ cup Green Beans , finely chopped
    • ¼ cup Capsicum , finely chopped
    • ⅓ cup Cabbage , shredded
    • ½ cup Green peas , fresh or frozen, blanched
    • 1 Green chilly , finely chopped
    • 2 tablespoon Coriander leaves , chopped
    • 1 tablespoon Lime Juice , freshly squeezed
    • 1 teaspoon Black pepper powder
    • Salt to taste
    • 1 tablespoon Butter / Oil
    • 1 Bay Leaf
    • 2 Cloves
    • 1 " inch Cinnamon Stick

    Instructions

    • Warm ½ cup water , add ragi flour make a paste and keep it aside.
    • Heat Butter/ oil in a wok, add onion, ginger garlic and saute it till raw smell goes off.
    • Add bay leaf,cloves and cinnamon stick saute and add all the chopped  veggies and blanched green peas ,refer notes
    • Add 3 ½ cup  of water and bring to boil . Once it starts to boil, reduce the heat and put it on sim.
    • Remove bay leaf, cinnamon , cloves and discard it , as its added only to get flavor . Alternatively you can skip using whole spices , if vegetable or chicken stock is used.
    • To this add the ragi paste / ragi slurry,  stir and allow it cook.
    • Once it starts to thicken , turn off the stove.
    • Add salt, pepper powder, lemon juice and coriander leaves. 
    • Serve hot.

    Video

    Notes

    • If you are using vegetable or chicken stock , you can skip adding whole spices .

    Nutrition

    Calories: 124kcal

    Similar Recipes

    • Instant Ragi Idli
      Instant Ragi Idli Recipe
    • ragi banana smoothie
      Ragi Banana Smoothie | how to make ragi smoothie
    • ragi mudde
      Ragi Mudde | Ragi Ball
    • Ragi_ambli_recipe
      Salted Ragi Ambli

    Kaju Katli Recipe

    Published : January 6, 2017 | Last Update on October 31, 2022 By Muktha Gopinath

    kaju katli recipe

    Kaju Katli is a Indian's most loved sweet made with just 3 ingredients cashews, sugar and water. This is a very popular sweet and shared with friends, family and relatives during festivals and special occasions.

    This easy kaju katli recipe gets ready within 30 minutes with no prior preparations.

    If you are looking for similar sweet recipes then do check Paneer Pista Rolls, Moongdal Barfi , Coconut Barfi , Anjeer Khajoor Rolls , Rava Laddu and Mawa Gujiya.

    kaju katli
    [feast_advanced_jump_to]

    What is Kaju Katli

    Kaju Katli is a cashew sweet popular across India. It is believed that gifitng and eating kaju Katli brings prosperity and fortune. Hence it is popularly used in gifting during festivals.

    Kaju Katli translates to " slice of cashew ", hence it is cut into very thin slices. To make this sweet all you need is cashews , sugar and water. Cashews are fine powdered and mixed in sugar syrup to form a mass. Then rolled and cut into desired shape and size.

    This post shares a classic recipe , you can make any fusion recipes like pistachios rolls or even kesar kaju katli by using this original recipe of kaju katli.

    Sweets are integral part of any festival and celebrations. Diwali is one such festival where lots of sweets, snacks are prepeared and shared with friends and relatives.

    Kaju katli is popular during Diwali and Rakshabandhan festivals as it's a great choice for gifting in sweet hampers.

    If interested, you can check collection of Diwali recipes here.

    You need to try this recipe because it is

    • Tasty
    • Easy and simple
    • Gets ready under 30 minutes
    • Economical
    • Great for gifting sweet hampers
    • Easily scalable

    Kaju Katli Ingredients

    To make best kaju katli recipe , you need just 3 main ingredients. Cashews, sugar and water.

    Cashews- Use premium quality cashews to make Kaju Katli . Also don't use cashews that are old and stored in refrigerator. If stored in refrigerator , make sure that cashews comes to room temperature before blending into powder. If not , cashews may tend to leach out oil while processing.

    Sugar- I use crystal white sugar to make this sweet , as white color doesn't alter the cream color of this sweet. If color is not a concern , the you can use brown sugar or even jaggery to make kaju katli recipe.

    Water- To make sugar syrup all you need water , about ½ the quantity of sugar in the recipe.

    Rose water - Though adding rose water is completely optional, I do add small amount of rose water for freshness and hint of lingering flavor which helps to pop out the flavor of cashews.

    Refer recipe card for actual measurements.

    Watch Video

    How to make Kaju Katli

    In a mixer jar ,add cashews and run in pulse mode for 5-8 seconds.

    Scrape the corners of the mixer jar with spoon and again pulse it ,till you get fine powder. Note : Make sure that cashews doesn't release oil while blending.

    In a nonstick  pan ,heat 5 tablespoon of water, add sugar and allow it dissolve completely.

    Once water comes to boil ,lower the flame . Through sieve pass cashew powder and add into sugar syrup.

    Mix well and cook until cashew mix well and comes together just like any halwa. Tip : Test the doneness of cashew dough by taking small mass of cashew between your fingers and try to make small ball of it.  If done, then turn of the heat.

    Allow the mixture to turn warm. Once you are able to handle heat , start kneading the cashew mixture .

    Knead well to a smooth dough, when oil starts to release from cashew dough , stop at that point immediately.

    On a butter paper, using rolling pin ,roll the cashew dough into 3mm thickness.

    Cut into desired shape when still warm and serve when cooled.

    Recipe

    kaju katli recipe
    5 from 1 vote

    Kaju Katli Recipe | Cashew Barfi Recipe

    Kaju Katli is a Indian's most loved sweet made with just 3 ingredients cashews, sugar and water. It's tasty and great for sharing with friends and family during festivals and special occasions.
    Prep Time3 minutes mins
    Cook Time20 minutes mins
    Total Time23 minutes mins
    Course: Dessert
    Cuisine: Indian
    Keyword: Festivals
    Servings: 20 Pieces
    Calories: 84kcal
    Author: Muktha H S

    Ingredients

    Standard Measurement Size 1 Cup =200ml

    • 1 Cup Cashews (160 grams )
    • ½ Cup Sugar (100 Grams)
    • 5 tablespoon Water
    • ½ teaspoon Rose water , optional

    Instructions

    • In a Mixer jar ,add cashews and run in pulse mode for 5-8 seconds.
    • Scrape the corners of the mixer jar with spoon and again pulse it ,till you get fine powder.
    • In a nonstick  pan ,heat 5 tablespoon of water, add sugar and allow it dissolve completely.
    • Once water comes to boil ,lower the flame and add Cashew Powder.
    • Mix well and cook ,test the doneness of cashew by taking small mass of cashew between your fingers and try to make small ball of it.  If done, then turn of the heat.
    • Allow the mixture to warm,grease your palm with some ghee and start kneading the cashew mixture .
    • Knead well to a smooth dough,once oil starts releasing from cashew , stop at that point immediately.
    • On a butter paper, using rolling pin ,roll the cashew dough into 3mm thickness.
    • Cut into desired shape when still warm and serve when cooled.

    Video

    Notes

    • Get Cashews Powdered Properly,that is the main key to get perfect kaju katli.You can even sieve cashew powder to get that fine powder.
    •  Knead the cashew mixture well,so that you get a smooth dough. While kneading ,if oil start to leave from cashew dough,stop at that point immediately.
    • If cashew mass becomes more hard and if you find it difficult to knead then you can add 1-2 teaspoon of milk to knead the dough,but shelf life will be reduced.
    • If you need,you can even add a drop of rose essence to cashew mixture once you turn off the heat ,before kneading. 

    Nutrition

    Calories: 84kcal

    You may also like

    • bhapa-doi-recipe
      Bhapa Doi
    • easy-shrikhand-recipe-photo
      Shrikhand
    • Shahi Tukda
      Shahi Tukda Recipe
    • sheer-kurma-recipe@palatess-desire
      Sheer Khurma Recipe , How to make sheer khurma

    Tiramisu

    Published : November 29, 2016 | Last Update on October 18, 2022 By Muktha Gopinath


    Tiramisu
    Classic Tiramisu


    Tiramisu is a very popular Italian dessert which literally means "pick me up" metaphorically means "Make me Happy" and yes it is........,it definitely makes one happy with a smile on face after having this super delicious dessert,a heavenly experience. Any

    coffee lover would love this dessert.This Classic Tiramisu was in mind from past many years but looking into the recipe and number of steps involved never dared to give a try. I always thought i would prepare this on some special occasion and serve to my loved ones..... LOL 🙂 but never thought it will take so many days. If you need to prepare this dessert ,you need to plan very well in advance at least 3 days before, if you are doing it from scratch.Though this is a very time consuming recipe, it's worth every bit of the effort.As i did it from scratch,i.e, making of mascarpone cheese,lady's finger cookies, zabaglione, pastry cream and whipped cream.Assembling everything together layer by layer, chilled to set the dessert and allowing the flavours to mature for overnight.Truely a heavenly experience,i loved every bit of this dessert,one should definetely try this.And this is a real special dessert for me so im posting it as my 100th Post in this blog :)........,am i sounding crazy........? I dont know ,but i loved this a lot.
    All thanks to the original recipe which is from Washington Post ,and many blogs and goggle.


    Ingredients:

    Category: Eggetarian | Cusine : Italian | Course: Dessert
    PrepTime : 1 hr (active)12hrs (inactive) |Cooking Time: 90 Minutes | Serves: 10-12

    Zabaglione /  Sabayone (Italian Custard)

    Egg yolks :2 large - 36 grams

    Sugar :3 tablespoons / 45 grams
    Marsala wine (or port or coffee) :¼ cup (1.5 teaspoon instant coffee + ¼ cup warm water)
    Pure Vanilla extract :¼ teaspoon / 1.25 ml
    Finely grated lemon zest :½ teaspoon 

    Vanilla Pastry Cream
    Sugar :3 tablespoons /45 grams 
    All purpose flour :1 tablespoon/8gms
    Finely grated lemon zest :½ teaspoon 
    Vanilla extract :½ teaspoon 
    Egg yolk :1 large
    Whole milk :¾ cup /180 ml 
    Whipped Cream
    Sweetened Non-Diary Whipping cream ( Chilled Heavy Cream)  :1 cup /240ml 
    Sugar :¼ cup / 55gms ( *** Only if using unsweetened cream)
    Vanilla Extract :½ Tsp
    Ladyfingers/ Savoiardi Biscuits
    Cake Flour, sifted :½ cup 
    Egg Separated :3 large at room temperature
    Granulated white sugar:2 Tbsp + 3 Tbsp
    Cream of Tartar:⅛ teaspoon (*** Substitute : ½ teaspoon lemon Juice)
    Confectioners sugar/Powdered Sugar for dusting the tops of the cookies
    To assemble the Tiramisu:
    Brewed espresso, warmed : 2 cups/480ml (2 cups warm water plus ½ heaping tablespoon instant coffee)
    Rum extract (optional) :1 teaspoon/5ml ( substitute: vanilla Extract)
    Sugar : 4 Tbsp
    Mascarpone cheese : ⅓ cup/75gms
    Savoiardi/ Ladyfinger biscuits :36 
    Unsweetened cocoa powder : 2 tablespoons/30gms or a bit more as needed


    Method:
    Zabaglione /  Sabayone (Italian Custard)
    1.Heat water in a double boiler. If you don’t have a double boiler, place a pot(with a wide stable base) with about an inch of water in it on the stove. 
    2.In a large mixing bowl, mix together the egg yolks, sugar, the Marsala (or espresso/ coffee), vanilla extract and lemon zest. Whisk together until the yolks are fully blended and the mixture looks smooth. Transfer the mixture to the top of a double boiler or place your bowl over the pan/ pot with simmering water. 
    Tiramisu

    3.Cook the egg mixture over low heat, whisking constantly,for about 8 minutes or until it resembles thick custard.(do not stop whisking or less you get scrambled bits of egg)  It bubbles a bit as it reaches the required consistency.


    Tiramisu
    4.Let cool to room temperature,strain it and transfer the zabaglione to a bowl. Cover and refrigerate at least 4 hours or overnight, until thoroughly chilled. 

    For the vanilla pastry cream
    1. Mix together the sugar, flour, lemon zest and vanilla extract in a medium heavy-bottomed saucepan. To this add the egg yolk and half the milk. Whisk until smooth.

    Tiramisu

    2.Now place the saucepan over low heat and cook, stirring constantly to prevent the mixture from curdling. Add the remaining milk a little at a time, still stirring constantly. After about 12 minutes the mixture will be thick, free of lumps and beginning to bubble. (If you have a few lumps, push the cream through a fine-mesh strainer.)


    Tiramisu

    3. Transfer the pastry cream to a bowl and cool to room temperature. Cover with plastic film and refrigerate at least 4 hours or overnight, until thoroughly chilled.

    For the Ladyfinger Cookies:

    Source: Joy Of Baking

    Before preparing ladyfinger cookies,keep everything ready ,preheat the oven to 180 deg c,piping bag/ziploc cover ,line baking tray with parchment and then start working on it, so that you dont waste time and it gets into the oven at right time to get perfect texture.

     1. Seperate eggs, and take the egg whites in a medium sized bowl, beat with the hand mixer.  When it starts foaming well, add the cream of tartar (or lemon juice),continue to beat gradually increasing the speed to medium high.

    Tiramisu


    When the beater marks show soft peaks form, add the 3 tablespoons of sugar.Continue beating for a minute more till the whites form stiff peaks,if you lift the beaters from the whites, you should be able to see peaks which stand straight. If they droop right away and fall back, you have to beat a little more. Once the whites are whipped to the right consistency, keep the bowl aside. 


    Tiramisu


    2.In the  large bowl,take the egg yolks and the 2 tablespoons of sugar.  Beat on high speed till the mixture turns thick and pale yellow.( when you raise the beaters the batter should fall back into the bowl in a slow ribbon.) 


    Tiramisu


     Beat in the vanilla extract.  Sift the cake flour over the batter but do not fold in.  Fold the whites into the egg yolk and flour mixture in three additions, mixing only until incorporated. Dont over-do this, you will be deflating the batter, knocking off the air and volume.


    Tiramisu


    3. Fill the batter (with a large spoon) into the piping bag/bags. Holding the bag at about a 45 degree angle to the baking sheet, pipe the batter into 3 inch (7.5 cm) long ladyfingers, using the lines drawn on the parchment paper as your guide.  Pipe the batter leaving about a 1 inch (2.54 cm) space between the cookies.  When you have piped all the cookies, place the powdered sugar in a wire strainer, and lightly sift the sugar over the tops of the cookies.  Bake for 9 to 12 minutes or until the ladyfingers are firm but barely browned and are still spongy when pressed with a finger. 


    Tiramisu


    4.Remove the baking sheets from the oven and slide the parchment paper from the baking sheets onto a wire rack.  Let the ladyfingers cool for a few minutes and release them from the parchment paper, with a flat spatula, while they are still warm. If they have grown into each other, use a pizza cutter to cut.  If you left them completely cool before removing them from the parchment they stick and hard to remove without breaking.  Finish cooling the ladyfingers on the wire rack before using or storing.  If you are not using the ladyfingers right away, freeze them. Ladyfingers stale very quickly unless they are soaked in a liquid.To store, place in a plastic bag between layers of wax or parchment paper and freeze up to 2 weeks. 


    Whipped Cream:

    Chill the containers and beaters. Use refrigerated cold water. I used readymade whipped cream powder from brand blue bird,followed the instructions on the packet ,which says to add 50gm of whipped cream powder to 90ml of water and beat over medium to high speed.You'll get the whipped cream ready.

    Tiramisu


    Assemble Tiramisu


    1.  Have ready a rectangular serving dish (about 8″ by 8″ should do) or one of your choice.
    2. Mix together the warm espresso, rum extract and sugar in a shallow dish, whisking to mix well. Set aside to cool.

    Tiramisu
    3.In a large bowl, beat the mascarpone cheese with a spoon to break down the lumps and make it smooth. This will make it easier to fold. Add the prepared and chilled zabaglione and pastry cream, blending until just combined. Gently fold in the whipped cream. Set this cream mixture aside.

    Tiramisu
    4.Now to start assembling the tiramisu.Working quickly, dip12 of the ladyfingers in the sweetened espresso, about 1 second per side. They should be moist but not soggy.  As you dip each ladyfinger, immediately transfer each one to the  ready rectangular serving dish, placing them side by side in a single row.

    Tiramisu


    You may break a lady finger into two, if necessary, to ensure the base of your dish is completely covered. I have made 2 layers of ladyfingers and 2 of cream. i.e. ladyfingers at the bottom and cream on the top layer.

     (Original recipe says Spoon one-third of the cream mixture on top of the ladyfingers, then use a rubber spatula or spreading knife to cover the top evenly, all the way to the edges. Repeat to create 2 more layers, using 12 ladyfingers and the cream mixture for each layer). Clean any spilled cream mixture; cover carefully with plastic wrap and refrigerate the tiramisu overnight. 

    Tiramisu
    5.Carefully lift the dessert out of the tin, or invert and then re-invert onto the serving platter. (May be messy and if not set properly, i didn't do this as i was not confident enough) 

    Tiramisu

    6. Dust the top generously with cocoa, decorate with coffee beans and chocolate curls. If you leave the cocoa dusted dessert in the fridge, it will turn a beautiful darker color gradually. Be sure to keep the Tiramisu covered airtight - a cake caddy works best. Cut into wedges and serve. Save some to eat the next day too!


    Tiramisu


    Copyright Your Blog Name 2009 at palatesdesire.blogspot.com

    Vanilla Ice Cream

    Published : August 5, 2016 | Last Update on July 25, 2018 By Muktha Gopinath

    Vanilla Ice Cream
    Vanilla Ice-Cream
    Though this recipe was meant to post in this summer.........,bcoz of my busy schedule couldn't post it. My lil one has developed lot of interest in eating ice creams and

    chocolates. So i tried this recipe ,which i had written in on a piece of paper few years before. I had even tried this recipe during initial days when i  was new to cooking, it tasted good but was more like a kulfi than a ice cream. But this time,i was more confident as i was aware of many tips (refer notes) for getting a smooth ,creamier and rich ice cream.Its simple,easy and delicious homemade ice cream but its more of time consuming as you need to give more time for ice cream to get set.Other than setting time , its very easy and simple to make.I had done chocolate sauce  for this ice cream topping it was real yummy. Keep this recipe to create a basic vanilla ice cream  and  you can come up with your own variations/flavours.

    Ingredients:
    Category:Vegetarian | Cusine : World | Course: Dessert
    PrepTime : 18 Hours (inactive) |Cooking Time: 30 Minutes | Makes: 1 ltr
    Full Cream Milk : 3 Cups
    Full Cream Milk Raw:½ Cup
    Fresh Cream:250 ml
    Milk Powder:4 Tbsp
    Sugar:8-9Tbsp
    Liquid Glucose:1 tablespoon (optional)
    CMC( Carboxy Methyl Cellulose):1 Tsp
    GMS( Glycerol Menon Terrace):1 TSp
    Water:1 Cup
    Vanilla Essence:1 Tsp
     
    Method:
    1. Dissolve CMC and GMC in one cup water and cook till it looks like starch and cool.
     
    Vanilla Ice Cream
     
    2.Take ½ cup of raw milk (unboiled) ,dissolve sugar and milk powder.
     
    Vanilla Ice Cream
     
    3.Heat 3 cups of milk  and allow it to boil.Now for this boiling milk add above (step 2) prepared  raw milk  mixture and boil for another 5-8 minutes.
    Vanilla Ice Cream
     
    For this add cooled CMC and GMS paste (step1)  along with liquid glucose ( if using) and cook on sim till thick for 30-35 minutes.
    Vanilla Ice Cream
     
    Once its completely cooled add vanilla essence.Pour into the icecream box and freeze for 8 hrs at highest temperature.
     
    Vanilla Ice Cream
     
    4.After 8 hrs ,take out ice cream mix  from freezer and beat little and nicely at a time in mixie/electric beater on a low speed.Again freeze it for 2 hrs .
     
    Vanilla Ice Cream
     
    5.After 2 hrs ,again beat the ice cream mix as above ( step 4) and freeze it for 2 hrs.
     
    Vanilla Ice Cream
     
    6.Now take the mixture from freezer beat it nicely on low speed , add fresh cream slowly and beat lightly and slowly just to incorporate fresh cream to icecream mixture.
     
    Vanilla Ice Cream
     
    Vanilla Ice Cream
     
    7.Transfer the ice cream mixture to preferably aluminium ice-cream box .cover the box with cling film or Ziploc/plastic sheet and keep it in freezer to set at medium temperature for minimum 4 hours.
     
    Vanilla Ice Cream
     
    After 4hrs, Scoop the ice cream and enjoy with your favourite custard,fruit salad,gulab jamun/gajar halwa or any toppings.
     
    Vanilla Ice Cream
     
     
    Notes:
     
    • First time while keeping in freezer for 8 hrs ,please make ensure you keep completely cooled icecream mix in freezer at highest temperature. 
    • Beating icecream slowly and nicely gives you a smooth,rich and creamier texture.
    • Covering the icecream mix with a plastic/cling film is very much essential to smooth creamier icecream
    • Final icecream set should be with medium temperature.

    Chicken Lollipop Recipe

    Published : April 5, 2016 | Last Update on May 10, 2021 By Muktha Gopinath

    Chicken_lollipop

    Chicken lollipop recipe with step by step photos and short video.  Chicken Lollipop is an hot and spicy starter prepared from whole chicken wings shaped into lollipop or drummettes. Chicken dummettes are tenderized in buttermilk , marinated with spices then baked - grilled / cooked to perfection and tossed in spicy sauce seasoning.

    Chicken Lollipop is one of the most ordered dish in a restaurant. Even I love Chicken Lillipop a lot but I  don't prefer eating  in a restaurant because it is deep fried and has additonal MSG ( mono sodium glutamate) . Because of these 2 facts , resturant made Chicken Lollipop are not good on your stomach. How about making a best ever Chicken lollipop without deep frying and MSG. Sounds good right...., YES , its super easy to make this best ever chicken lollipop recipe.

    Chicken Lollipop Recipe
     

    Deep frying meat is  BIG NO for me which I NEVER PREFER making at home. I either Bake / Grill or Air Fry to achieve the taste. And one such recipe is this Chicken Lollipop. You can either Bake / Grill or  pan fry chicken drummettes on stove top and still achieve the same restaurant taste . I make this Chicken every week at home without fail and still not yet bored. It tastes awesome and is also very light on stomach. Its not too oily nor too saucy , it tastes just too good. 

    Tips to make Best Ever Chicken Lollipop

    • Soaking in butter milk for 4 -5 hours helps to tenderize chicken lollipop and gives a nice hint of flavor , but minimum 30 minutes is must , hence don't skip this step.
    • Marinating Chicken for long hours makes more tastier chicken lollipop.
    • Spices : Along with Red Chilli Powder and Blackpepper powder , I have used Garam Masala to get Indian flavours but its upto your choice. Alternatively , you can try with other flavors like peri peri seasoning , chat masala , paprika , mixed herbs or mexican seasoning , its upto your creativity and choice.
    • Flour : Rice Flour gives a nice crispiness to chicken while baking and also while pan frying . If you don't have , you can use all purpose flour. 
    • Cooking Methods : You can either Bake or grill the marinated chicken. Can also pan fry till crisp on stove top or Deep fry on medium heat. You can follow any cooking method , all methods yields almost similar results. Video in the recipe shows pan fry chicken on stove top whereas step by step direction images shows baked version of chicken lollipop.  You can follow either of two.

    This recipe post share is updated recently with new video , featured image and few tips which I have learnt over the years of making Chicken Lollipop. 

    If you are interested in more chicken starters recipes do check these Chicken Recipes on blog :

    • Chilli Capsicum Chicken
    • Curry Leaves Pepper Chicken 
    • Chicken Tikka
    • Chicken Seekh Kebab
    • Tangdi Kebab in pressure cooker
    • Chicken Sukka

    RECIPE CARD FOR CHICKEN LOLLIPOP

    Recipe

    Chicken_lollipop
    4.86 from 7 votes

    Chicken Lollipop Recipe

    A hot and spicy chicken wings shaped to lollipop , marinated with spices baked or pan fried and sauteed in a spicy sauce seasoning.
    Prep Time10 minutes mins
    Cook Time20 minutes mins
    Marination1 hour hr
    Total Time1 hour hr 30 minutes mins
    Course: Appetizer, Starters
    Cuisine: Fusion, Indian, Indo-Chinese
    Keyword: Bachelor's Cooking, Chicken, Party Starters
    Servings: 4 People
    Calories: 76kcal
    Author: Muktha H S

    Ingredients

    For Tenderizing Chicken

    • ½ Kilo Chicken drummettes (10-12 Pieces)
    • 4 tablespoon Curds
    • 500 ml water
    • ¼ teaspoon Turmeric Powder
    • 1 teaspoon Salt

    For Marination

    • ¾ tablespoon Garlic Paste or Garlic cloves 8 crushed
    • ¾ tablespoon Ginger Paste or ¾ "inch Ginger crushed
    • ½ teaspoon Redchilli Powder
    • ¼ teaspoon Pepper powder
    • ½ teaspoon Garam Masala
    • 2 tablespoon Cornflour or All purpose flour
    • 1 tablespoon Rice flour , optional refer notes
    • 1 tablespoon Soya Sauce
    • ½ tablespoon White Vinegar or apple cider vinegar
    • ½ teaspoon Salt
    • 1 Tsp Olive oil or any other cooking oil

    For Spice Sauce Seasoning

    • 1 teaspoon Oil
    • 1 Onion Medium finely chopped
    • 1 tablespoon Garlic Finely Chopped
    • ½ tablespoon Ginger finely chopped
    • ½ tablespoon Red Chilli powder ,mixed with 2-3 tablespoon Water
    • 1 teaspoon Soya Sauce
    • 1 teaspoon White Vinegar
    • 1 teaspoon Brown Sugar
    • ⅓ Cup Water
    • ¼ teaspoon Salt or as required
    • 1 teaspoon Coriander Leaves /celery chopped optional
    • 1 tablespoon Spring onions for garnishing

    Instructions

    • Take 4 tablespoon of curds in a bowl,whisk well.Add water,turmeric powder ,salt 1 teaspoon and prepare buttermilk.
    • Wash and clean chicken.Soak the chicken lollipop pieces in buttermilk for minimum 30 minutes or upto 4-5 hrs , preferabbly in refrigerator .This step is necessary to tenderize the chicken.
    • After 30 minutes, remove chicken pieces from buttermilk and set aside.
    • Marinate the chicken with ginger paste, garlic paste, pepper powder, garam masala, red chilli powder and ¼ teaspoon salt , soya sauce, vinegar , oil and mix well.
    • Add rice flour, corn flour to chicken and mix well, refrigerate for minimum 30 minutes/overnight.

    For Baking / Grilling / Frying Chicken

    • Preheat the oven to 220 deg celsius , grease the tray with oil. Place the marinade chicken over the tray. ( Alternatively,you can even deep fry / shallow fry or pan fry over medium heat)
    • Half the way, around 10 minutes , remove the tray from oven and turn the chicken pieces to other side ,put it back into oven and continue to bake.
    • Bake for 18 minutes. and then grill for 2-3 minutes to get a crisp and charred look.
    • If pan frying , as shown in video , add 2 tablespoon of oil and pan fry on both sides by flipping periodically on medium flame, when it releases juices and cooked well. Toss well on high heat for 2-3 minutes to get charred look .

    For Spicy Sauce Seasoning

    • Whilst, Take a frying pan,add oil,add chopped onions,grated ginger,finely chopped garlic and fry till raw smell goes off.
    • Add red chilli paste (prepare by mixing 1 tablespoon water with ½ tablespoon red chilly powder),soya sauce,vinegar ,salt ,sugar and mix well.
    • Add ⅓ cup water and bring to boil and cook till it thickens like a sauce.
    • By now chicken would have baked, or cooked , remove from the oven or pan , respectively
    • Add baked chicken to the above prepared sauce mix , Toss well so that chicken is completely coated with sauce.
    • Keep it in simmer for 3-5 minutes for flavours to blend.
    • Turn off the heat,garnish with coriander leaves and spring onions.
    • Serve hot with schezwan sauce.

    Video

    Notes

    • Be careful while adding salt ,as you'll add salt to buttermilk and also to the seasoning. And also soya sauce contains salt.
    • Adding Rice flour is optional , but I recommend as it helps to give a very crisp coating.
    • If cooking on stove top , use 2 tablespoon of oil , for baking just grease the baking tray and arrange chicken drummettes.
    • If cooking on stove top , prefer to use Non stick pan.
    • You can also deep fry this instead of grilling & baking, always deep fry it on medium to high heat.
    • If you don't have a combination cooking on your oven, bake it for 15 minutes and grill for last 5 minutes in the same temperature 220 deg celsius. 
    • For spice sauce seasoning , Use ½ tablespoon of oil ,in case if you are baking/grilling the chicken.

    Nutrition

    Serving: 1pc | Calories: 76kcal

    Step by Step Directions to make Chicken Lollipop:


    Add 4 tablespoon of curds in a bowl, whisk well. Add water, turmeric powder , salt 1 teaspoon and prepare buttermilk.

    Soak the chicken in buttermilk for minimum 30 minutes/4-5 hrs .This step is necessary to tenderize the chicken.

    Chicken Lollipop Recipe

    Marinate the chicken with ginger garlic paste, pepper powder, garam masala, red chilli powder , Soya Sauce , Vinegar , oil and ¼ teaspoon salt .

     
    Chicken Lollipop Recipe

    Mix well ,add rice flour,corn flour mix well and refrigerate for minimum 30 minutes/ 4-5 hours.

    Preheat the oven to 220 deg celsius , grease the tray with oil.

    Place the marinade chicken over the tray. ( Alternatively, you can even deep fry over a medium high heat or pan fry as shown in the video. ) 

    Chicken Lollipop Recipe
     

    Bake chicken in preheated oven for about 18 minutes. Half the way , remove from oven , turn chicken pieces to other side and continue to bake just to ensure even cooking on both sides. 

    After 18 minutes , grill for about 2-3 minutes to get the nice crisp and charred look. 

    Chicken Lollipop Recipe

    Take a frying pan, add oil, add chopped onions, ginger, garlic and fry till raw smell goes off.

    Chicken Lollipop Recipe
     

    Add red chilli paste (prepare by mixing 2 tablespoon water with ½ tablespoon red chili powder), soya sauce, vinegar ,salt ,sugar and mix well.

    Add water and bring to boil , cook till it thickens.

    Chicken Lollipop Recipe
     

    For this add baked/ grilled / fried or pan fried chicken , Toss well on high heat such that chicken is completely coated with sauce.then keep it in simmer for 2-3 minutes for flavors to blend and come together.

    Chicken Lollipop Recipe
     

    Turn off the heat, garnish with coriander leaves , spring onions and serve hot with with schezwan sauce or Hot & Sweet Tomato Sauce.

    Chicken_lollipop

    Tandoori Gobi

    Published : April 1, 2016 | Last Update on June 29, 2022 By Muktha Gopinath

    Tandoori-gobi-with-chutney

    Tandoori Gobi Recipe with step by step photos and short video. Tandoori Gobi is a tasty and healthy starter made with marinated cauliflower florets . It's simple and fail proof recipe which you can easily make for any party or dinner tonight

    It needs very less preparation , all you need is to just marinate cauliflower florets with tandoori masala and bake or grill .

    Doesn't it sounds simple , then you must try it definietly and taste some in real.

    tandoori-gobi-with-chutney-onion
    [feast_advanced_jump_to]

    About this recipe

    Tandoori Gobi is one of the low calorie tasty apptizer . Trust me it's delicious , simple to make with some basic spices and is full on flavours.

    Be it a weekday dinner or weekend party , this tandoori gobi is surre to win hearts at the dinning.

    Tandoori Gobi is a crispy dry snack that be served with some mint chutney or coriander chutney , onion and lemon wedges. This tasty recipe is adapted from most popular Tandoori Chicken recipe.

    To make this low calorie appetizer , blanch cauliflower florets , mariante with Tandoori Masala Powder ( or some assorted spices ) and bake in a preheated oven . Just before serving , broil / grill for 5 minutes for charred look and serve with chutney!

    You must try this recipe , as it is

    • Tasty
    • Fool proof recipe
    • Low calories
    • Simple

    Cauliflower has got many health benefits, it boosts heart health, helps  in detoxification and has many digestive benefits too. 

    With less calories it's one of the best option for all those weight watchers. I find it to be one of the healthiest option to include in one's diet.

    But sadly , did you know the amount of pesticides they spray on this vegetable ? So always opt for a organic cauliflower or make sure to blanch cauliflower before use.

    Watch Video

    How to make Tandoori Gobi

    Rinse and cut the cauliflower into medium size florets.

    Bring water to boil, add salt and add cauliflower florets .

    Keep it in simmer for 3 minutes,turn of the heat and let it rest for 8-10 minutes.Drain water  and keep it aside. 

    Take around 2 cups of curds and hung it in a cheese cloth, it takes around 45 minutes to 1 hr to get around ¾ - 1 cup of  thick hung curd.

    Roast gram flour/ besan till you get nice aroma.

    In a bowl take hung curd ,add roasted gram flour , ginger garlic paste, salt , oil, lemon juice and all other spices mix well.

    Add florets into it marinate well and keep it in refrigerate for minimum 1-hour (you can also marinate for 5-6 hrs).

    Preheat the oven to 200 deg Celsius .You can either Grill /Bake or grill-bake both for around 25-30 minutes till corners of cauliflower start browning.

    Once done, sprinkle some chat masala powder . Serve with Mint Chutney / Green Chutney , onion rings and lime wedges.

    Recipe

    tandoori-gobi-recipe@palates-desire
    5 from 1 vote

    Tandoori Gobi

    Marinate Cauliflower florets with hung curd, spices and baked-grilled to perfection.
    Prep Time20 minutes mins
    Cook Time30 minutes mins
    Marination1 hour hr
    Total Time1 hour hr 50 minutes mins
    Course: Snack, Starters
    Cuisine: Indian
    Keyword: Diet, Party Snacks, Starters, Tandoori
    Servings: 4 People
    Calories: 197kcal
    Author: Muktha H S

    Ingredients

    • 1 Cauliflower , Medium Size
    • ¾ Cup Hung Curd
    • 2 tablespoon Gramflour ( Besan)
    • ½ tablespoon Garlic Paste
    • ½ tablespoon Ginger Paste
    • ½ teaspoon Red Chilli Powder
    • ½ teaspoon Coriander Powder
    • 1 teaspoon Tandoori Masala Powder or Garam Masala Powder refer notes
    • ¼ teaspoon Ajwain /Carom seeds
    • 1 teaspoon Kasuri Methi /Dry Fenugreek
    • ½ teaspoon Turmeric Powder
    • ½ teaspoon Chat Masala
    • 1 teaspoon Lemon Juice
    • 1 tablespoon Mustard Oil or any cooking oil

    Instructions

    • Rinse and cut cauliflower into medium size florets.
    • Bring water to boil, add salt , pinch of turmeric powder and add cauliflower florets .
    • Keep it in simmer for 3 minutes, turn of the heat and let it rest for 8-10 minutes. Drain water and keep it aside. 
    • Take 2 cups of curds and hung it in a cheese cloth, it takes around 45 minutes to 1 hr to get around ¾ -1 cup of thick hung curd.
    • Roast gram flour / besan till you get nice aroma.
    • In a mixing bowl take hung curd , add roasted gram flour , ginger garlic paste, salt, oil, lemon juice , all other spices and mix well.
    • Add cauliflower florets into marinade , mix well and keep it in refrigerate for minimum 1 hr .(you can also marinate for 5-6 hrs).
    • Preheat, oven to 200 deg celsius .
    • Grill /Bake for around 25-30 minutes , at halfway rotate cauliflowers florets and continue to grill , till corners of cauliflower start browning.
    • Sprinkle some chat masala on grilled cauliflower and Serve hot with Mint Chutney or Green Chutney , onion rings and lemon wedges.

    Video

    Notes

    • If Tandoori Masala is not available then use ½ teaspoon of garam masala and increase red chilli powder and coriander powder to 1 Tsp 
    • You can find Tandoori Masala Powder Recipe here.

    Nutrition

    Calories: 197kcal

    You may also like

    • hara bhara recipe
      Hara Bhara Kabab
    • Chettinad Fish Fry
      Chettinad Fish Fry
    • butter-garlic-mushroom
      Butter Garlic Mushroom
    • Tandoori-chicken-with-mint-chutney
      Tandoori Chicken Recipe

    Ambur Star Chicken Biryani Recipe

    Published : March 29, 2016 | Last Update on May 1, 2022 By Muktha Gopinath

    spicy-ambur-style-chicken-biryani-with -boiled-eggs

    A spicy red hot flavorful Chicken Biryani made with red chili paste , shallots and flavorful jeera rice is a speciality chicken biryani from Ambur region Tamil Nadu.

    If you are one among Biryani lovers and love to explore South Indian style regional biryani ,then you must try Donne Biryani recipe from Karnataka.

    ambur-star-biryani
    [feast_advanced_jump_to]

    About this recipe

    Ambur Star Chicken Biryani is a South Indian style Dum Biryani which is famous in Ambur, Tamil Nadu.

    Most important key in this Biryani is, Jeera Rice / Seeragam rice which is used to get authentic flavorful Biryani. Jeera rice is a short grain rice which smells aromatic and get blend with the flavors very well.

    Cooking short grain rice to perfection is very important because short grain rice have tendency to break easily. Because of its starch content hence if overcooked it may become mushy and sticky.

    Hot and spicy biryani gets its authentic flavors from Jeera rice, shallots and red chilli paste.

    Serve Ambur Star Chicken Biryani with Onion Tomato raita.

    Ingredients

    Check this image for ingredients used to make ambur star biryani recipe

    Ambur-star-biryani-ingredients

    Chicken / Mutton - You can either use Chicken or Mutton to make this biryani . Meat with bone is recommended to make Ambur star Biryani .

    Rice - short grain rice known as Seeraga Samba is used to make this recipe. Seeraga Samba is also known as Zeera rice . It's aromatic and adds lot of flavor. Incase if it's not available , you can use basmati rice but for sure you'll be compromising on flavor.

    Whole Spices - Bay leaves , Cinnamon stick , Cloves , Mace, Fennel seeds, Peppercorns, Green Cardamom , Black Cardamom , Star Anise are used. To make Biryani , always use premium quality spices .

    Produce - You need fresh Coriander leaves , Mint leaves , Shallots ( pearl onion) , Tomatoes , Garlic , Ginger and green chilies to make this recipe.

    Red Chilies : I have used combination of spice variant guntur and byadgi ( for color) red chilies. You can use any variant but be sure to adjust the spice level as per your taste.

    Other ingredients - Oil , Clarified butter , lime juice and salt.

    Tips and Variations

    You can always make Ambur star biryani with either Chicken or Mutton.

    Main flavor to this biryani comes from red chilli paste and tomatoes . Try to use all the mentioned spices from the ingredient list to get a authentic taste.

    Cooking rice in right way is very important , so be careful while cooking jeera rice as it breaks easily and turns mushy .

    In fact , Ambur star mutton biryani will me more flavorsome in comparison with Chicken Biryani.

    FAQ's

    How to make Ambur Mutton Biryani ?

    Make sure you pressure cook mutton for 1-2 whistles and follow the same recipe.

    Can I use long grain Basmathi Rice ?

    Yeah , you can definitely use and Biryani will taste good too. But you may loose out those flavors from Seeraga samba rice.

    Can I make in Instant Pot ?

    Yes, you can make this recipe in the instant pot. Follow the same recipe instruction and press the “rice” button and cook. 

    What is the liquid to rice ratio to cook Seerega Samba Rice?

    Its 1.5 liquid for every 1 cup of Seeraga Samba rice. So be careful while adding water.

    Can I cook everything together as a pulao instead of separately cooking rice.

    If you need that typical biryani look and feel then I recommend to cook rice separately. But , anyways you can cook everything together. But be careful while adding water .

    What preparations , I can do before hand to speed up the process?

    You can prepare red chili a day before and use it in the recipe the following day .

    How to store left overs?

    Left over ambur biryani tastes great the following day . Stays good for a day in refrigerator. Store in air tight container , reheat and serve.

    Serving Suggestions

    Ambur Biryani pairs well with simple cucumber raita . Always serve ambur star biryani with boiled eggs, raita , lemon wedges and onion slices.

    You may also like

    • Donne-Biryani-Recipe
      Donne Biryani Recipe
    • Egg-biryani-recipe@palates-desire
      Egg Biryani Recipe | Anda Biryani
    • vegetable dum biryani
      Vegetable Dum Biryani Recipe
    • mushroom_pulao
      Chettinad Mushroom Pulao


    How to make Ambur Star Biryani

    Take some lukewarm water in a bowl and add red chilies and set aside for 30 minutes. Then discard water and grind to a fine paste.

    red chilli paste

    Rinse rice couple of times and soak it for 15 minutes . Drain water and set aside. Whilst in a large pot/ vessel , boil 10-12 cups of water.

    Add rice , salt , few drops of oil , 2-3 green cardamoms and 2-3 sprigs of mint leaves torn .

    Ambur Star Chicken Biryani Recipe

    Cook rice until it's 90 % cooked.

    cook rice for biryani

    Drain the water completely. Spread rice on a wide plate and set aside.

    Ambur Star Chicken Biryani Recipe

    Take a thick bottom pot / vessel . Heat 2 tablespoon Ghee and ½ cup oil, add all the whole masala, fry well until whole spices turns aromatic.

    fry whole spices in oil and ghee until aromatic

    Add sliced shallots, ginger paste , garlic paste , green chilies and fry until onions turns golden brown.

    shallots for ambur biryani

    For this add red chili paste cook for 5 minutes .

    Ambur Star Chicken Biryani Recipe

    Now add in chicken , salt and saute until chicken changes it's color.

    Ambur Star Chicken Biryani Recipe

    Then chopped tomatoes , mint and coriander leaves , fry well.

    Ambur Star Chicken Biryani Recipe

    Add curds and mix well.

    Ambur Star Chicken Biryani Recipe

    Cover a lid and cook chicken until done. If there is more water content , slow cook until water content reduces and get a thick gravy.

    Ambur Star Chicken Biryani Recipe

    Now add 90% cooked rice to the chicken.

    Ambur Star Chicken Biryani Recipe

    Mix well everything , sprinkle some salt , chopped greens, 1 tablespoon of ghee and lime juice

    Ambur Star Chicken Biryani Recipe

    Seal the cook pot with atta dough or aluminium foil. Place hot water pot above the lid and cook on dum for 30 minutes.

    Ambur Star Chicken Biryani Recipe

    After 30 minutes, open seal. Mix well everything from bottom and serve hot

    Serve Ambur Star Chicken Biryani with Onion Tomato Raita.

    ambur-star-biryani

    This recipe post is updated from the archives and was first published in March 2016

    Recipe

    spicy-ambur-style-chicken-biryani-with -boiled-eggs
    4.80 from 5 votes

    Ambur Star Chicken Biryani

    A spicy red hot flavorful Chicken Biryani made with red chili paste , shallots and flavorful jeera rice is a speciality chicken biryani from Ambur region Tamil Nadu
    Prep Time20 minutes mins
    Cook Time50 minutes mins
    Total Time1 hour hr 10 minutes mins
    Course: Main Course
    Cuisine: Indian, South India
    Keyword: Biryani, Chicken, Gluten Free
    Servings: 5 People
    Calories: 428kcal
    Author: Muktha H S

    Ingredients

    For Cooking Rice

    • 500 grams Jeera Rice / Seeragam Rice
    • 12 cups Water
    • ¼ cup Mint leaves
    • 2 Green Cardamom
    • 1 teaspoon Salt

    For Biryani

    • 500 grams Chicken with bones
    • 12-14 Dry Red chilli -guntur / or any spicy red chillies
    • 5 Dry Red Chilli - Byadgi /only for colour, no spice
    • 200 grams Shallots /Sambar Onions chopped
    • 2 tablespoon Fresh garlic paste or 20 garlic cloves crushed
    • 2 tablespoon Fresh ginger paste or 2 inch ginger crushed
    • 2 no's Tomatoes, medium to large size , finely chopped
    • 2 no's Green chillies slit
    • 5 tablespoon Curds
    • 3 tablespoon Ghee /Clarified Butter
    • ½ Cup Oil
    • ¼ Cup Mint leaves chopped
    • ¼ Cup Coriander leaves chopped
    • 1 tablespoon Lemon Juice

    Whole Spices

    • 2 Bay leaves
    • 5-6 no's Blackpepper corns
    • 2 Star Anise
    • ½ teaspoon Fennel Seeds / Saunf
    • 4 Green Cardamom
    • 2 Black Cardamom
    • 8 Cloves
    • 2 inch Cinnamon Sticks
    • 2 Mace Strands

    Instructions

    Making red chili paste

    • Take 1 cup lukewarm water in a bowl and add red chillies and set aside for 30 minutes
    • Discard water and grind to a fine paste.

    Cooking rice to 90%

    • Rinse rice couple of times and soak it for 15 minutes . Drain water and set aside.
    • Whilst in a large pot/ vessel , boil 10-12 cups of water.
    • Into the boiling water , add rice , salt , few drops of oil , 2-3 green cardamoms and 2-3 sprigs of mint leaves torn .
    • Cook rice until it's 90 % cooked.
    • Drain the water completely. Spread rice on a wide plate and set aside.
    •  Add 1 tablespoon of ghee to rice, mix well and spread rice on a wider plate.

    To make Biryani

    • Take a thick bottom pot / vessel . Heat 2 tablespoon Ghee and ½ cup oil.
    • Add all the whole masala, fry well until whole spices turns aromatic.
    • Add sliced shallots,ginger garlic paste and fry well till raw smell goes off.
    • Then add green chillies, chopped tomatoes and fry well until tomatoes turns mushy.
    • Add red chilli paste cook for 5 minutes , Add curds and mix well. Now add in chicken , salt and saute until chicken changes it's color.
    • Cover a lid and cook chicken until done. If there is more water content , slow cook until water content reduces and gets a thick gravy.
    • Open the lid and cook chicken till you get thick gravy.
    • Now add 90% cooked rice to the chicken. Top with, chopped greens, 1 tablespoon of ghee, lime juice and sprinkle some salt.
    • Seal the cook pot with atta dough or aluminium foil. Place hot water pot above the lid and cook on dum for 30 minutes.
    • Once done, mix well and serve with Onion Tomato Raita.

    Video

    Notes

    • You should use only jeera rice for this kind of biryani to get the authentic taste.
    • It's a spicy biryani,I have used less red chillies,you can add another 5-8 red chillies to get that heat.

    Nutrition

    Calories: 428kcal

    Low Fat Orange Cake

    Published : March 3, 2016 | Last Update on September 29, 2022 By Muktha Gopinath

    spiced orange cake

    Low fat orange cake is a mildly sweet moist cake with bursting flavors of orange and warm spices. Make this cake effortless with any hand blender or your juicer mixer grinder ,the end results are always same.

    This eggless orange cake is a perfect tea time cake and is good on your waistline too.

    I'm not a cake lover but saying so there are some exceptions for my all time favorite Tres leches , plum cake , banana muffins and also lamingtons.

    This recipe post is updated from achieves , was first published in March 2016

    low-fat-orange-cake@palates-desire
    [feast_advanced_jump_to]

    About this recipe

    This low fat spiced orange cake is a perfect tea time cake , lightly spiced, moist and too good to resist. With Christmas around the corner made this citrus cake , it's so good in taste and has 162 k calories per big slice

    Low fat orange cake is really easy to make with few handful ingredients and you can make effortlessly in a mixer grinder. Or just blend everything with a hand blender and it's good to go. No need of any stand mixer to achieve a moist , utterly delicious orange cake.

    Low fat spiced orange cake is

    • Easy to make
    • Simple
    • Effortless
    • Tasty
    • Low Calories

    Ingredients

    To make this delicious tea cake , all you need is traditional cake ingredients flour, baking powder , cooking soda and salt . Along with it to make a low fat cake with tasty citrus note , following are the ingredients that get in while making this cake, moist and flavorful.

    Low Fat Orange Cake

    Brown Sugar - I'm hooked to this ingredient for baking as it is less sweet and gives a real good color to the baked goods. But you can use unrefined sugar too in this recipe

    Flax eggs - Actually recipe called for eggs but I use Flax eggs as I wanted to make it eggless. You can substitute eggs for flax eggs or chia eggs

    Orange - Orange juice and orange zest , hero ingredient as it adds depth of flavors . Be sure to use fresh fruit orange juice as it adds flavors and naturally acidic , which helps to achieve great texture in cake inspite of using less fat.

    Oil - use olive oil or any vegetable oil to make this cake. Just ¼ cup is sufficient to make this low fat orange cake.

    Yogurt - Yeah , this is a yogurt cake. Don't skip on this !

    Vanilla - Oh yes, it's needed though we are making a orange cake because it hepls the flavors to pop.

    Warm spices - nothing is as better as spiced cakes in winter , isn't it ! I have used cinnamon powder , clove powder , ginger powder and pinches of nutmeg.

    Do refer recipe card for actual measurements.

    FAQ's

    Can I make this with eggs?

    Yes of course , you can use either eggs or flax eggs alternatively in this recipe

    Can I make this with whole wheat flour ?

    Yes you can bake this with whole wheat flour. I have made this several times , tastes great !

    Can I refrigerate leftover flax egg?

    Awww, It stays good in sealed container for 1-2 days in fridge . But I recommend to make it fresh as it is super easy and a quick recipe.

    Watch Video

    How to make low fat spiced orange cake

    Flax Egg:

    In a JMG , blend 1 tablespoon of flaxseed into fine powder.

    Transfer into a bowl and add 3 tablespoon of water.

    Low Fat Orange Cake

    Whisk well together and set aside for 15 minutes.

    how to make flax egg

    After 15 minutes , it turns gelatinous and thick ; Flax egg is ready to use

    Low Fat Orange Cake

    To make Cake :

    Sift all purpose flour , baking powder , cooking soda, salt , warm spices together into a mixing bowl and set aside.

    Low Fat Orange Cake

    Into a JMG jar , add oil , sugar , curds, orange juice, vanilla , orange zest and flax egg .

    Low Fat Orange Cake

    Blend everything together for 1 minute on a low speed.

    Low Fat Orange Cake

    Pour wet ingredients into sift dry ingredients ;

    spiced orange cake batter

    with cut and fold technique mix everything.

    Low Fat Orange Cake

    Now ,pour cake batter into a lined 8 “ inch cake tin.

    Low Fat Orange Cake

    Bake

    Preheat oven to 180 deg Celsius ( 356 deg Fahrenheit  ) and bake for 22 -25 minutes .

    Skewer inserted at center should come out  clean , remove cake tin from oven , cool on wire rack

    Low Fat Orange Cake

    Serving

    Dust some powdered sugar, decorate with few slices of orange and serve

    Low Fat Orange Cake

    Recipe

    spiced orange cake
    5 from 2 votes

    Low fat Spiced Orange Cake Recipe

    Low fat orange yogurt cake is a mildly sweet moist cake with bursting flavors of orange and warm spices.
    Prep Time5 minutes mins
    Cook Time25 minutes mins
    Total Time30 minutes mins
    Course: Dessert
    Cuisine: American, World
    Keyword: Baking, Eggless
    Servings: 10
    Calories: 162kcal
    Author: Muktha H S

    Ingredients

    For Flax Egg

    • 1 tablespoon Flax seed
    • 3 tablespoon Water

    To Make Cake

    Wet Ingredients

    • ¼ cup Oil
    • ⅓ cup Brown Sugar
    • ½ cup Yogurt
    • 2 tablespoon Orange Juice
    • ½ teaspoon Vanilla
    • 1 teaspoon Orange Zest

    Dry Ingredients

    • 1 Cup All purpose flour
    • ½ teaspoon baking powder
    • ¼ teaspoon cooking soda
    • 1 pinch salt
    • ½ teaspoon cinnamon powder
    • ¼ teaspoon clove powder
    • ¼ teaspoon ginger powder
    • 1 pinch nutmeg powder

    Instructions

    Flax Egg

    • In a JMG , blend 1 tablespoon of flaxseed into fine powder.
    • Transfer into a bowl and add 3 tablespoon of water.
    • Whisk well together and set aside for 15 minutes.
    • After 15 minutes , it turns gelatinous and thick ; Flax egg is ready to use

    To make Cake :

    • Sift all purpose flour , baking powder , cooking soda, salt , warm spices together into a mixing bowl and set aside.
    • Into a JMG jar , add oil , sugar , curds, orange juice, vanilla , orange zest and flax egg . Blend everything together for 1 minute on a low speed.
    • Pour wet ingredients into sift dry ingredients ; with cut and fold technique mix everything.
    • Pour cake batter into a lined 8 “ inch cake tin.

    Bake

    • Preheat oven to 180 deg Celsius ( 356 deg Fahrenheit ) and bake for 20 -22 minutes .
    • Skewer inserted at centre should come out clean , remove cake tin from oven , cool on wire rack
    • While serving , Dust some powdered sugar, decorate with few slices of orange and serve

    Video

    Nutrition

    Calories: 162kcal

    You may also like

    • crinkle-cookies
      Chocolate Crinkle Cookies
    • pumpkin-walnut-cake-recipe
      Pumpkin Walnut Cake
    • whole wheat banana muffins
      Banana Muffins
    • fruit-cake
      Plum Cake

    Scrambled Egg Curry

    Published : March 1, 2016 | Last Update on October 7, 2022 By Muktha Gopinath

    scrambled Egg Curry

    Scrambled Egg Curry is a mildly spiced Kerala style egg curry in coconut milk, it gets ready within 30 minutes . Serve it for quick lunch or dinner with malbaar parota , roti or dosa.

    Dominant flavors from coconut and curry leaves flavor in this scrambled egg curry make this dish unique and delicious.

    Few of my favorites from Kerala cuisine includes Beetroot Pachadi , Kerala Egg curry , Prawn curry , Fish Curry and Pathri

    Scrambled Egg Curry
    [feast_advanced_jump_to]

    About this recipe

    This is a Kerala ( South Indian) style ,Scrambled egg curry is mildly spiced and with every bite you get a hint of coconut flavor.

    It has a medium consistency and goes well with steamed rice , dosa or malbar parota

    This recipe is

    • Tasty
    • Simple
    • Minimal Ingredients
    • Quick and Easy

    Ingredients

    Here is a glimpse of ingredients used to make this recipe. For exact measurements check recipe card.

    scrambled-egg-curry-ingredients

    Eggs : You need 4-5 large range eggs.

    Produce : You need Onion ,Tomatoes , Garlic , Ginger , Green chilies, few sprigs of coriander and curry leaves.

    Coconut Oil : I have used coconut oil in this recipe to get depth of flavors, as coconut oil gives a strong coconut flavor. If it's unavailable , you can use vegetable oil too.

    Coconut Milk - is a star ingredient in this recipe . It not only adds flavor but also helps to thicken the curry to give a nice sauce texture to the curry.

    Other Ingredients includes Turmeric powder , red chili powder , garam masala , black pepper powder and salt to taste.

    FAQ's

    Can I use Coconut milk powder instead of coconut milk ?

    Yes of course , you can use. But you may not get authentic taste , it just works fine.

    You may also like

    • kerala egg curry
      Kerala Egg Curry | Easy Egg Recipes
    • shakshuka recipe
      Shakshuka | How to make Shakshuka recipe
    • Egg-gravy-recipe
      Egg Gravy
    • Egg-biryani-recipe@palates-desire
      Egg Biryani Recipe | Anda Biryani

    Watch Video

    How to make Scrambled Egg curry

    Heat coconut oil in a  pan , add curry leaves, minced garlic , grated ginger , green chillies and chopped onions.

    Saute until raw smell of onion goes off and turns translucent.

    Add chopped tomatoes , ½ teaspoon of salt and sauté until tomatoes tuns mushy.

    Add turmeric powder, chilli powder and garam masala.

    Mix well everything and move everything to one side making some space in pan.

    To this break open 4 eggs and scramble eggs .

    Add 1 cup of thick coconut milk and ½ cup of water. And salt to taste .

    Cover and keep on simmer until coconut milk thickens slightly and reaches desired consistency

    Turn off the stove, add black pepper powder and chopped coriander leaves .

    Stir well everything and serve hot with dosa, chapati , rice or phulka.

    Recipe

    scrambled Egg Curry
    5 from 3 votes

    Scrambled Egg Curry Recipe

    Scrambled Egg Curry is a mildly spiced Kerala style egg curry in coconut milk , gets ready under 30 minutes . Serve it for quick lunch or dinner with malbar parota , roti or dosa.
    Prep Time5 minutes mins
    Cook Time15 minutes mins
    Total Time8 hours hrs 20 minutes mins
    Course: Side Dish
    Cuisine: South India
    Keyword: Bachelor's Cooking, Quick & Easy
    Servings: 3 people
    Calories: 337kcal
    Author: Muktha H S

    Ingredients

    • 1.5 tablespoon Coconut oil
    • 4 no’s Eggs
    • 2 no’s onion medium size , chopped
    • ½ teaspoon garlic miced
    • ½ teaspoon ginger grated
    • 2 no’s green chillies chopped
    • 1 no tomato medium size chopped
    • 2 sprigs curry leaves
    • 1 tablespoon coriander leaves
    • 1 cup Coconut Milk thick
    • ½ cup water
    • ¼ teaspoon turmeric powder
    • ½ teaspoon chilli powder
    • ¼ teaspoon garam masala
    • 1 teaspoon black pepper powder
    • Salt to taste

    Instructions

    • Heat coconut oil in a pan , add curry leaves, minced garlic , grated ginger , green chillies and chopped onions.
    • Saute until raw smell of onion goes off and turns translucent.
    • Add chopped tomatoes , ½ teaspoon of salt and sauté until tomatoes tuns mushy.
    • Add turmeric powder, chilli powder and garam masala.
    • Mix well everything and move everything to one side making some space in pan.
    • To this break open 4 eggs and scramble eggs .
    • Add 1 cup of thick coconut milk and ½ cup of water. And salt to taste .
    • Cover and keep on simmer until coconut milk thickens slightly and reaches desired consistency
    • Turn off the stove, add black pepper powder and chopped coriander leaves .
    • Stir well everything and serve hot with dosa, chapati , rice or phulka.

    Video

    Nutrition

    Calories: 337kcal

    Chicken Sukka - Mangalore Style

    Published : December 9, 2015 | Last Update on August 28, 2022 By Muktha Gopinath

    chicken-sukka-recipe

    Chicken Sukka basically means dry chicken preparation made with fresh grated coconut. Freshly roasted spices are pound together and used in this recipe to make a delicious chicken dish.

    Mangalore style Chicken Sukka is very popular and can be seen on many restaurants menu. As coconut trees are abundantly seen in coastal region, most of their dishes contain fresh coconut.

    I'm a ardent lover of Mangalore Cuisine and few of my top favourites includes Kori roti with Kori Gassi , Chicken Ghee Roast , Meen Gassi and Kori Gassi Biryani

    Chicken-sukka
    [feast_advanced_jump_to]

    About this recipe

    Chciken Sukka is a dry chicken dish , It's spicy , aromatic and flavourful. As this recipe style belongs to Mangalore , Coastal regions of Karnataka ,Coconut is important ingredient in most of the Mangalore dishes.

    This Chicken Sukka recipe is tasty , simple and is flavourful .

    Coconuts have slowly become a versatile food commodity, and are being used in everything from our daily cuisine to our beauty regimens.

    Today however, the coconut has made a huge comeback as a miracle food. Coconuts are highly nutritious, rich in fiber , and packed with essential vitamins , minerals and good cholesterol. From culinary creations to magic beauty potions, coconuts pack a good punch.

    Ingredients

    Chicken Sukka - Mangalore Style

    Watch Video

    How to make Chicken Sukka

    In a pan on low heat , dry roast all the ingredients one by one and blend to a coarse powder.

    In a pan , heat 2 tablespoon coconut Oil , add curry leaves , garlic and onions. Saute until onions changes colour to translucent.

    Add tomatoes and saute for another few minutes, until it turns slightly mushy.

    Now add in Chicken , salt , turmeric and red chilli powder. Mix well everything and cook until chicken changes colour from pink to white.

    Once chicken looks pale white in colour, cover lid and cook chicken till done.

    Open lif after 10 minutes and check , if it's cooked well. Once cooked , continue to cook chicken until water content dries up to 70 %.

    Now add in fresh ccoconut, freshly ground spice blend and coriander leaves.

    Mix well everything and serve as a side dish along with rice and curry along with onion slices and lime wedges.

    Recipe

    chicken-sukka-recipe
    5 from 3 votes

    Chicken Sukka

    Chicken Sukka is a tasty and popular dish from Mangalore Cuisine , a spicy dry chicken cooked with fresh ponded spices and fresh coconut .
    Prep Time10 minutes mins
    Cook Time30 minutes mins
    Total Time40 minutes mins
    Course: Side Dish, Starters
    Cuisine: Indian, Mangalore
    Keyword: Chicken, Karnataka, Non-Vegetarian
    Servings: 5 People
    Calories: 370kcal
    Author: Muktha H S

    Ingredients

    • 750 grams Chicken , curry cut pieces , skinout
    • 2 no's Onion large ,finely chopped
    • 1 no Tomato , medium finely chopped
    • 2 sprigs Curry leaves
    • 1 tablespoon Garlic cloves , finely chopped
    • ½ teaspoon Ginger ,optional
    • ½ teaspoon Red Chilli Powder
    • ¼ teaspoon Turmeric Powder
    • 3 tablespoon Freshly Grated Coconut
    • 2 tablespoon Coconut Oil
    • 1 tablespoon Coriander Leaves chopped
    • 1 teaspoon Salt or as required

    Roast and Blend

    • 6 no Guntur / Kashmiri Dry Red chilli
    • 2 no Byadgi Dry Red Chilli
    • 1.5 teaspoon Coriander Seeds
    • 1.5 tablespoon Garlic chopped
    • 4-5 Sprigs Curry Leaves
    • ¼ teaspoon Fenugreek Seeds / Methi Seeds
    • ½ teaspoon Mustard Seeds
    • 1 teaspoon Cumin Seeds
    • ¾ teaspoon Fennel Seeds
    • 2 pieces Cinnamon 1" inch ,each
    • 6 no Cloves
    • ¼ teaspoon Black Peppercorns

    Instructions

    • Dry roast all the ingredients under the list "Roast and Blend" with ½ teaspoon of oil to a coarse powder.
    • Take a pan/kadai ,heat 2 tablespoon of oil ,add chopped garlic,onion,curry leaves and fry well till raw smell goes off.
    • Now add tomato,red chilli powder,turmeric and salt,fry well.
    • For this add chicken ,saute well for 5 minutes,close the lid and allow it to cook in its own juices. 
    • After 15-20 minutes open the lid,check whether chicken is cooked,if done, continue to cook on high heat for 5 minutes , till water gets dried upto 70 % .
    • Now lower the flame and add grounded powder and fresh coconut mix well and keep it in simmer for another 5 minutes.
    • Finally garnish with coriander leaves and serve hot.

    Video

    Nutrition

    Calories: 370kcal

    Chicken Baida Roti

    Published : December 7, 2015 | Last Update on January 18, 2023 By Muktha

    chicken baida roti

    Chicken baida roti is a delicious pan roasted snack from streets of Mumbai. A tasty and spicy filling with juicy chicken mince, spices and eggs are covered in a APF thin sheet dough and pan roasted until crispy and flaky.

    You can serve this chicken baida roti with tomato sauce or ketchup , mint chutney , low fat mayonnaise or eat it just like that.

    It takes around 40-50 minutes roughly to put up this dish all together. It's spicy , super delicious and filling. This is a drool worthy recipe and is worth all the time you spend to make chicken baida roti recipe.

    Few more similar chicken recipes includes chicken kheema paratha and chicken sandwich from streets of Mumbai.

    chicken baida roti
    [feast_advanced_jump_to]

    About this recipe

    Chicken baida roti also known as baida paratha is a popular street snack in Mumbai . It is delcious , spicy and tasty too. It is common during EID festival in Muslim community.

    Baida roti basically means a egg roti mixed with any kind of minced meat . Eggs are also used in the stuffing to make this a spicy and tasty snack.

    Other meat filling variations that gets into baida roti are turkey and quail. And also goat , lamb mutton are used equally.

    Though its served as a snack , its pretty filling and heavy on stomach.

    You can serve this with tomato ketchup and mint chutney.

    This baida roti is

    • Tasty
    • Filling and
    • Crispy

    Ingredients

    Recipe for chicken baida roti is simple , baida roti ingredients includes Eggs, APF , mince chicken and some basic spices and herbs.

    Refer recipe card for actual measurements

    chicken baida roti ingredients

    Chicken mince - Use boneless chicken pieces from thigs to make mince as it will be more juicer when compared with chicken breast. But you can use any minced meat , chicken , pork or even mutton. Just make sure to cook well everything.

    Eggs - You can use any eggs , 3-5 eggs are required to make this baida roti recipe . Depending to your preferance and taste feel free to use eggs in the recipe.

    All purpose flour - is used to make this tasty roti recipe. But you can use 1: 1 APF to wheat flour also. If you use wheat flour then the outer covering may not turn as crispy and flaky. Feel free to use as per your preference.

    Liquids - Water , milk and oil are used in this baida roti.

    Produce - Onions, ginger , green chillies, garlic , coriander leaves, mint leaves and lime juice are used in this recipe.

    Spices - Basic spices and seasonings like pepper powder, salt, red chilli powder, coriander powder and garam masala are used here. If any spice is unavailable then just skip and proceed with the recipe, still it tastes real good.

    Watch video

    Top Tip

    For extra crisp and flaky cover , you can apply oil after every fold to make it super crisp chicken baida roti.

    How to make Chicken Baida Roti

    To make dough

    Into a mixing bowl add all purpose flour, cooking soda, salt and mix .

    Make a well at the centre and add egg , warm milk and mix with a spatula.

    Add warm water as required and mix well everything to make a smooth dough. Dough will be sticky at this point.

    Now drizzle 2 tablespoon of oil and knead dough to make a soft and smooth dough.

    Smear ½ tablespoon of oil on kneaded dough. Cover with a moist damp clot and set aside for 15 to 20 minutes.

    For chicken filling

    Whilst , heat 2 tablespoon of oil in a pan. Add chopped onions, green chillies, ginger garlic paste and sauté for 2 minutes until raw smell goes off.

    Add chicken mince, salt and turmeric powder.

    Cook chicken well until juices run .

    Add red chilli powder, coriander powder, garam masala , black pepper powder and mix well.

    Turn off the stove , add chopped coriander and mint leaves , lime juice and mix well everything.

    Set aside on a kitchen platform until the chicken filling cools down.

    Into a separate bowl , crack open 2-3 eggs , season with salt and pepper .

    Add 2 tablespoon of chopped onions, coriander leaves and whisk well.

    Pour this egg mixture over a prepared chicken filling.

    Chicken filling turns moist with addition of egg. That’s how the filling should be.

    To roll roti

    After 20 minutes, knead dough on work surface and divide into 8 equal size balls.

    Dust work surface with flour, take 1 dough ball and roll into a thin 6 inch diameter circle.

    Place 4 tablespoon of chicken filling at the centre in a rectangular form.

    Fold one side on the dough and cover the filling. Bring the opposite side of the dough over the fold and cover. Now , bring the dough from sideways to centre  to form a rectangular shape.

    Secure the folds and shape into a small rectangular box.

    To roast roti’s

    Heat a iron skillet / pan , drizzle 1 -2 tablespoon of oil.

    Place the roti and cook on medium heat on all sides until crisp ,flaky and golden in colour.

    Once done , cut into half and serve with tomato ketchup/ sauce or mayonnaise mint chutney.

    Recipe

    cicken baida roti
    No ratings yet

    Chicken Baida Roti

    Chicken baida roti is a delicious pan roasted snack from streets of Mumbai. A tasty and spicy filling with juicy chicken mince, spices and eggs are covered in a APF thin sheet dough and pan roasted until crispy and flaky.
    Prep Time10 minutes mins
    Cook Time40 minutes mins
    resting time20 minutes mins
    Total Time50 minutes mins
    Course: Snack, Street Food
    Cuisine: Asian, India
    Keyword: Chicken, Street Food
    Servings: 8 makes
    Calories: 299kcal
    Author: Muktha H S

    Ingredients

    To make dough

    • 2 cups All Purpose Flour refined flour
    • 1 Egg free range
    • ⅓ cup warm milk
    • ¼ cup warm water
    • 2.5 tablespoon oil 2 tablespoon + ½ tablespoon divided
    • 1 teaspoon salt
    • ¼ teaspoon baking powder

    For Chicken filling

    • 300 grams Chicken mince
    • 1 cup onion chopped reserve 2 tablespoon for later use
    • 1 tablespoon ginger paste
    • 1 tablespoon garlic paste
    • 2 no’s green chilli chopped
    • ¼ teaspoon turmeric powder
    • 1 teaspoon red chili powder
    • 1 teaspoon coriander powder
    • ½ teaspoon garam masala
    • ½ teaspoon black pepper powder
    • 2 tablespoon cooking oil
    • 2 tablespoon coriander leaves chopped
    • 2 tablespoon mint leaves chopped
    • Salt to taste
    • 1 teaspoon lime juice
    • 2 no’s egg free range
    • ¼ teaspoon salt or to taste
    • ½ teaspoon pepper powder
    • 2 tablespoon chopped onions
    • 1 tablespoon chopped coriander leaves

    Others

    • Extra oil to roast
    • Extra flour to dust

    Instructions

    To make dough

    • Into a mixing bowl add all purpose flour, cooking soda, salt and mix .
    • Make a well at the centre and add egg , warm milk and mix with a spatula.
    • Add warm water as required and mix well everything to make a smooth dough. Dough will be sticky at this point.
    • Now drizzle 2 tablespoon of oil and knead dough to make a soft and smooth dough.
    • Smear ½ tablespoon of oil on kneaded dough. Cover with a moist damp clot and set aside for 15 to 20 minutes.

    For chicken filling

    • Whilst , heat 2 tablespoon of oil in a pan. Add chopped onions, green chillies, ginger garlic paste and sauté for 2 minutes until raw smell goes off.
    • Add chicken mince, salt and turmeric powder.
    • Cook chicken well until juices run .
    • Add red chilli powder, coriander powder, garam masala , black pepper powder and mix well.
    • Turn off the stove , add chopped coriander and mint leaves , lime juice and mix well everything.
    • Set aside on a kitchen platform until the chicken filling cools down.
    • Into a separate bowl , crack open 2-3 eggs , season with salt and pepper .
    • Add 2 tablespoon of chopped onions, coriander leaves and whisk well.
    • Pour this egg mixture over a prepared chicken filling.
    • Chicken filling turns moist with addition of egg. That’s how the filling should be.

    To roll roti

    • After 20 minutes, knead dough on work surface and divide into 8 equal size balls.
    • Dust work surface with flour, take 1 dough ball and roll into a thin 6 inch diameter circle.
    • Place 4 tablespoon of chicken filling at the centre in a rectangular form.
    • Fold one side on the dough and cover the filling. Bring the opposite side of the dough over the fold and cover. Now , bring the dough from sideways to centre to form a rectangular shape.
    • Secure the folds and shape into a small rectangular box.

    To roast roti’s

    • Heat a iron skillet / pan , drizzle 1 -2 tablespoon of oil.
    • Place the roti and cook on medium heat on all sides until crisp ,flaky and golden in colour.
    • Once done , cut into half and serve with tomato ketchup/ sauce or mayonnaise mint chutney.

    Video

    Notes

    • For extra crisp and flaky cover , you can apply oil after every fold to make it super crisp.

    Nutrition

    Calories: 299kcal

    You may also like

    • crispy fried chicken
      Fried Chicken Recipe | Crispy Fired Chicken
    • sweet-and-spicy-chicken-wings-recipe
      Spicy Chicken Wings
    • crispy chicken nuggets
      Chicken Nuggets Recipe
    • Chilli Capsicum Chicken
      Chilli Capsicum Chicken

    Instant Rava Paddu | Sooji Appe

    Published : December 4, 2015 | Last Update on July 22, 2022 By Muktha Gopinath

    Instant Rava Paddu recipe with step by step photos and short video. Instant Rava Paddu is tasty breakfast made with semolina , yogurt and vegetables .

    It is made with rava , curds and Poha/ beaten rice where everything is mixed well together and tempered with curry leaves and different lentils. Mixed to a thick batter consistency and cooked on appe Pan.

    Instant Rava Paddu | Sooji Appe
    [feast_advanced_jump_to]

    About this recipe

    Anything instant is what catches one's eye. Everyone's life seems to be running very fast , instant and healthy food gains attention. Instant Rava Paddu needs no preparations , no prior plans gets ready within 20-30 minutes.

    This is my quick to go , easy and tasty breakfast recipe.

    Instant Rava Paddu

    Paddu ,Guliyappa,Gunta ponganalu, Kuzhi paniyaram , Appe are the different names for this dish. Authentic Paddu is extremely delicious which is prepared by soaking and grinding different lentils and rice together and fermenting it overnight.

    But here iIm sharing a instant paddu recipe prepared with rava/sooji/semolina. Authentic rice appe recipe is already present on blog. Though you can not match the taste of rice appam with that of rava appe , both recipes  have its own distinct taste and texture. Both these appe recipes are equally loved at our home.

    To make instant rava paddu /  sooji appe , ingredients used are very similar to the ones used for Instant Rava Idli , but I like Paddu better than Rava idli may be because of the amount of oil used on frying appe, makes it more tastier than steamed Rava Idli.

    Two main ingredients that differs in Instant Rave Appam and Instant Rava Idli is the use of Poha in Rava appam and use of Baking soda / Eno salt in Rava Idli. 

    Other south Indian based breakfast recipes for  healthy and quick mornings on my blog are : Instant Rava Idli , Instant Oats Idli , Khara Pongal , Sweet Pongal and Semiya Puliyogare.

    I also make Banana Appam , this is a sweet appam made with rice , banana , jaggery and bits of coconut. This is a delicious  and tasty snack recipe that can be made within 15 minutes and makes a best after school hour snacks for kids.

    This is a kind of more filling breakfast/tiffin as sooji is used here .Serve as a evening tiffin along with coconut chutney and a cup of filter coffee or Masala Tea. Such that light dinner can be planned as a part of healthy diet plan.

    This tastes good when served with plain coconut chutney without any tadka over it ,as all kind of seasoning is used in Instant Paddu recipe itself.This is my healthy evening snack idea ,a swap for any kind of fried food....,What's yours?

    Watch Video

    Step by step directions to make Instant Rava Paddu :

    1.Heat 2 tablespoon oil in a non stick pan, once its hot add mustard seeds allow it to crackle. Now add jeera ,once it starts  to change colour add chana dal,urad dal and moong dal .

    When it starts to change colour add rava/sooji ,mix well and keep it on a low flame for 4-5 minutes stirring in between and turn off the heat.

    Instant Rava Paddu | Sooji Appe

    2.Meanwhile  chop onions,grate carrot and chop greens.Add these to above slightly roasted rava/sooji.

    Also add rice flour, soaked poha ,cooking soda and salt. Mix well.

    Instant Rava Paddu | Sooji Appe

    3.Add curds, now add water part by part slowly till batter reaches the consistency of Idli batter (thick batter ). Keep it aside for 10-15 minutes.

    Instant Rava Paddu | Sooji Appe

    4.Heat Paddu griddle and add 2-3 drops oil to each chamber,take spoonful of batter and pour it into each section. Drizzle some oil over the batter, close the lid and allow it to cook for 3-4 minutes.

    Once you open the lid you can see the pores here and there, drizzle some more oil , remove it with a help of a spoon and turn it other side and cook for 1-2 minutes.

    Instant Rava Paddu | Sooji Appe

    5.Paddu will be ready to serve with coconut chutney. It tastes better only when you have it hot with ghee and coconut chutney 🙂

    Recipe

    instant_rava_paddu
    4.58 from 7 votes

    Instant Rava Paddu | Instant Sooji Appe

    Basic Instant Rava Paddu is a quick South Indian Breakfast/Tiffin 
    Prep Time7 minutes mins
    Cook Time25 minutes mins
    Resting15 minutes mins
    Total Time32 minutes mins
    Course: Breakfast
    Cuisine: South India
    Keyword: South Indian, Tiffin
    Servings: 32 Makes
    Calories: 63kcal
    Author: Muktha H S

    Ingredients

    • 1 Cup Rava
    • ½ Cup Rice flour
    • 2 tablespoon Thin Poha/ Rice Flakes Soaked
    • ¾ Cup Curds
    • 3 tablespoon Oil
    • ½ teaspoon Mustard Seeds
    • 1 teaspoon Jeera/Cumin Seeds
    • 1 tablespoon Channa Dal
    • 1 tablespoon Urad Dal
    • 1 tablespoon Moong Dal
    • ½ inch Ginger grated
    • 2 Green Chilli finely Chopped
    • 2 Sprigs Curry leaves finely Chopped
    • 2 tablespoon Coriander leaves Chopped
    • 1 Onion finely Chopped
    • 1 Carrot grated
    • 1 pinch Baking soda/Cooking soda
    • ¾ teaspoon Salt or as required
    • ⅓ Cup Water or as required

    Instructions

    • Heat 1 tablespoon oil in a pan,add mustard seeds, jeera seeds, channa dal, urad dal and moong dal.
    • When all dals,starts to change colour to golden brown ,add 1 cup rava and fry for 4-5 minutes. Turn off heat.
    • Once it cools down, add salt,cooing soda, rice flour,soaked and smashed poha,chopped coriander leaves,curry leaves ,ginger,green chilies,onions and grated carrot.
    • Whisk curds and mix with above rava/semolina mixture. Add water part by part as required , so that batter consistency should be like dosa batter. Keep it aside for 10 minutes,so that water gets soaked well and batter consistency will become thick like idly batter.Its the right consistency.
    • Heat appe pan, drizzle some oil in all chambers of appe pan.  
    • Take spoonful of batter and drop in all chambers of appe pan,drizzle some oil on top too. Close lid and cook paddu on both sides on medium flame for 5-6 minutes. 
    • Paddu's are ready to serve.

    Video

    Notes

    1.Adding  soaked and smashed poha gives you a soft Paddu's, alternatively you can use refined flour also.
    2.Makes sure rava mixture is cooled ,before adding curds to it.
    3.Consistency of the batter should be thick like Idly batter, so add water part by part and keep the batter thin like dosa batter .After 10-15 minutes of resting time , water will be absorbed well and right consistency will be obtained.

    Nutrition

    Calories: 63kcal

    Congress Kadlebeeja | Spiced Peanuts

    Published : November 23, 2015 | Last Update on October 18, 2022 By Muktha Gopinath

    congress-kadal-ebeeja-recipe

    Congress Kadlebeeja is a dry roasted peanuts tossed in blackpepper powder , salt, asafoetida and curry leaves. Its's simple and quick recipe that gets ready under 15 minutes and great to serve with a drink to munch .

    You can use this spiced masala peanuts on many Indian chaats like churmuri , masala puri and dabeli .

    In Karnataka you can find Spiced Peanuts as "Congress Kadlebeeja " in any Iyengar Bakery or Condiments stores

    congress-kadale-beeja
    [feast_advanced_jump_to]

    About this recipe

    Watch Video

    How to make Congress Kadalebeeja

    Dry roast peanuts on a iron griddle till light golden brown. Don't over do it.

    Allow it cool , then rub peanuts between the palms to de-skin and split the peanuts.

    Heat oil in a nonstick pan, once its hot, add curry leaves ,fry till it become crisp.

    Put the flame to sim and add turmeric powder, red chilli powder, black pepper powder, salt, asafoetida and split peanuts. Gently mix well everything.

    Turn off the heat, take measure not to burn the spices

    Place it on a kitchen paper napkin to absorb the extra oil .

    Store it in a airtight container and use it as required.

    Serve as namkeen along with Masala Chai or Filter coffee

    Recipe

    congress-kadal-ebeeja-recipe
    5 from 2 votes

    Congress Kadalebeeja Recipe

    Dry roasted Peanuts are spiced up with asafoetida ,turmeric and has heat from Black pepper powder.
    Prep Time5 minutes mins
    Cook Time10 minutes mins
    Total Time15 minutes mins
    Course: Condiments, Snack, Starters
    Cuisine: Indian, Karnataka
    Keyword: Karnataka, Namkeen
    Servings: 4 people
    Calories: 237kcal
    Author: Muktha H S

    Ingredients

    • 1 Cup Peanuts
    • 1 tablespoon Oil
    • 1 Spring Curry leaves
    • ¼ teaspoon Turmeric Powder
    • ¼ teaspoon Hing / Asafoetida
    • ½ teaspoon Red Chilli powder ,optional
    • 1 - 1.5 teaspoon Black pepper powder
    • ¾ - 1 teaspoon Salt or as required

    Instructions

    • Dry roast peanuts on a iron griddle till light golden brown. Don't over do it.
    • Allow it cool , then rub peanuts between the palms to de-skin and split the peanuts.
    • Heat oil in a nonstick pan, once its hot, add curry leaves ,fry till it become crisp.
    • Put the flame to sim and add turmeric powder, red chilli powder, black pepper powder, salt, asafoetida and split peanuts. Gently mix well everything . Turn off the heat, Take measure not to burn the spices
    • Place it on a kitchen paper napkin to absorb the extra oil .
    • Store it in a airtight container and use it as required.
    • Serve as namkeen along with Masala Chai or Filter coffee

    Video

    Nutrition

    Serving: 40grams | Calories: 237kcal

    You may also like

    Bourbon Biscuits

    Published : November 22, 2015 | Last Update on June 30, 2020 By Muktha Gopinath

    Bourbon Biscuits
    Burbon Biscuits
    Who doesn't like these chocolaty biscuits....?Im a very big fan of these Burbon ,Hide n Seek ,Milano all these chocolaty biscuits.Though wanted to try all these

    biscuits......,actually didn't give a try till  my friend Sushma wanted to try these chocolaty biscuits for her lil prince Vihaan.As she requested me to post this burbon biscuits with wheat flour .....,i never delayed to prepare it in my kitchen.....,but as always got late to post because of my son......,who always comes crawling to hit the keypad of my laptop :),as he was sleeping......, quickly thought of posting this ......! I have tried these burbon biscuits with wheat flour which tasted almost  90 % similar to the store brought but if you want it 100 % then try with All purpose flour ( please refer the notes).


    Ingredients:
    Category:Veg | Cuisine: Indian|Course:Snack
    Prep Time:10 Minutes|Cooking Time:15 Minutes|Makes:22

    Wheat Flour: 1 Cup
    Baking Powder:1 Tsp
    Baking Soda:¼ Tsp
    Salt:¼ Tsp
    Cocoa Powder:1 Tbsp

    Unsalted Butter: ⅓ Cup + ( 1 Tbsp,if needed)
    Sugar:⅓ Cup
    Honey:1 Tsp
    Vanilla Essence:½ Tsp
    Cold Milk:1 1 /2 Tbsp
    Sugar for sprinkling

    For Filling:

    Butter:¼ Cup
    Sugar:⅓ Cup
    Cocoa Powder: 1 Tsp
    Vanilla Essence: 1 -2 Drops


    Method:
    Sieve wheat flour,baking powder,soda salt and cocoa powder thrice and keep aside.
    Bourbon Biscuits 
    Powder the sugar and keep it aside.Take softened butter  ⅓ Cup and add powdered sugar and cream it. 
    Bourbon Biscuits

    For this add honey,vanilla essence and mix well.Add sieved floured the mixture.

    Bourbon Biscuits

    Mix well,it looks like bread crumbs,add cold milk 1 tablespoon  and check whether it holds together,if not add ½ tablespoon and mix well,now dough should be able to hold together. If it still doesn't hold add ½ to 1 tablespoon of butter for kneading,don't add more milk if you are using wheat flour as it makes the biscuits more hard .

    Bourbon Biscuits


    Place a parchment paper and roll the dough over it using a rolling pin.Cut into 1 ½ " - 2 ½ " inch biscuits,sprinkle some sugar ( i forgot to do it,and later added while baking ).Prick it using a fork/tooth pick.Place it on the greased tray.

    Bourbon Biscuits

    Preheat the oven to 160 deg C and bake it to 14-15 minutes.It will be slightly soft if you touch the biscuits ( you can slightly see the impression once you touch),it will harden once it gets cooled.Cool it on a wire rack.
     Bourbon Biscuits

    While its getting baked prepare the filling by mixing butter,powdered sugar,vanilla essence and cocoa powder and once the biscuits are cooled ,take a tablespoon of choco filling and spread over the biscuits,i.e,sandwich between two biscuits.

    Bourbon Biscuits

    You can Store it in air tight containers for a week or more.

    Bourbon Biscuits

    Notes:
    1. If you add all purpose flour then add ¼ cup of butter,wheat flour needs more fat so i have added ⅓ cup of  butter.
    2. I used homemade butter,water content will be high in homemade butter,you may need an extra tablespoon of milk for dough to hold,it even depends on the quality of the wheat flour you use.I have used Ashirwaad Select range aata.

    Copyright Your Blog Name 2009 at palatesdesire.blogspot.com

    Coconut Burfi recipe , how to make kobbari mithai

    Published : November 4, 2015 | Last Update on October 17, 2022 By Muktha Gopinath

    coconut-barfi-with-saffron-strands

    Coconut burfi recipe with step by step photos and short video. Coconut barfi is a traditional sweet made with fresh coconut , milk , sugar and flavored with cardamom. It is an easy and tasty recipe of coconut barfi made with fresh coconut and sugar. 

    This coconut burfi is a traditional recipe of Karnataka , popularly known as kobbari mithai . Its a easy recipe made with minimal ingredients.  Texture of this sweet shouldn't be soft nor hard , if done rightly .

    Few more similar mithai recipes on blog are Moongdal burfi , Mohan Thal and Mysore Pak

    coconut burfi
    [feast_advanced_jump_to]

    About this recipe

    Coconut burfi aka kobbari mithai is a sweet made with fresh coconut. Though kobbari in kannada means dry coconut , this name is made with fresh coconut. To make this Karnataka style coconut barfi , all you need is fresh coconut , sweethner can be either sugar or jaggery and for flavouring cardamom is used. Little milk is used to to blend coconut , but its optional and can be skipped.

    For me many memories wander with kobbari mithai sweet , on every National Festival after flag hosting at school , coconut barfi was distributed among kids. We eagerly used to wait in white uniforms in staright line queues for this coconut burfi.

    Also in South Indis ( my hometown Mysore ) , every house has minimum 2 coconut tress and is abundantly used in all South Indian cooking . Also we do coconut offerings to Lord in temples and even at home while performing pooja. So it happens many times that from temples and many religous events we do get many cut opened coconuts , so in all such events by default I end up doing this thengai barfi.

    Watch Video

    Ingredients

    Coconut : Fresh coconut always works better for this recipe . But dessicated coconut can also be used.

    Sweetner : White sugar , brown sugar or powdered jaggery anything can be used in this recipe .

    Flavouring : Cardamom powder is generally used , along with edible camphor if used adds lots of flavour and aroma to this sweet. Even saffron and rose water can be used in this recipe.

    Milk : Milk is optional , for vegan option you can just use warm water or almond/ cashew milk to soak coconut .

    Soaking : Mixing fresh coconut with milk and sugar helps in better texture of coconut barfi.

    Top Tip

    Kobbari mithai should always be cooked on low heat , stirring often till it start to leave the corners.

    coconut burfi

    How to make Coconut Barfi

    Grate about 2.5 cups of fresh coconut and blend it in a mixer along with ¼ cup of milk and cardamom seeds ,

    Coconut Burfi recipe , how to make kobbari mithai

    Blend together to get a semi fine coconut . 

    Coconut Burfi recipe , how to make kobbari mithai

    Transfer the blend coconut into a bowl , add sugar, mix well and set aside for about 20 to 30 minutes, this helps to get good flavour and texture to coconut barfi.

    Coconut Burfi recipe , how to make kobbari mithai

    In a thick bottom pan, heat 1 tablespoon og ghee/ clarified butter.

    Coconut Burfi recipe , how to make kobbari mithai

    Add coconut sugar mixture , stir well and cook on a low heat.

    how to make coconut burfi

    Keep stirring often , sugar dissolves completely and when there is very less moisture content , it starts to leave the edges.  

    Coconut Burfi recipe , how to make kobbari mithai

    Now add in another 1 tablespoon of ghee , cardamom powder , edible camphor ( if using) and mix well.

    Coconut Burfi recipe , how to make kobbari mithai

    Keep stirring , at this stage it becomes hard to stir and starts to leaves the edges just reaching halwa consistency.

    Coconut Burfi recipe , how to make kobbari mithai

    Now remove it from stove and spread on a greased tray . plate.

    Coconut Burfi recipe , how to make kobbari mithai

    Spread evenly and tap firmly smoothing the top.

    Coconut Burfi recipe , how to make kobbari mithai

    After 5 minutes , when its still warm , precut into desired shape.

    Coconut Burfi recipe , how to make kobbari mithai

    Now after 15-20 minutes , when its completely cools down. Finally , cut on marked lines and remove coconut burfi from tray. Store in a clean dry jar.

    Stays good for 2-3 days in room temperature and stays good upto a week in refrigerator.

    nariyal burfi

    Recipe

    coconut-barfi-with-saffron-strands
    5 from 2 votes

    Coconut Burfi Recipe | Kobbari Mithai

    Coconut Burfi : A traditional sweet made with fresh coconut , milk , sugar and flavoured with cardamom
    Prep Time10 minutes mins
    Cook Time35 minutes mins
    Total Time45 minutes mins
    Course: Sweets
    Cuisine: Andhra, Indian, Karnataka, South India, Tamil Nadu
    Keyword: Diwali, Sweets
    Servings: 15 pieces
    Calories: 138kcal
    Author: Muktha H S

    Ingredients

    • 2 ½ cups fresh coconut grated
    • 1 ½ cup sugar or powdered jaggery
    • ¼ cup full fat milk
    • 2 tablespoon ghee/ clarified butter
    • ½ teaspoon cardamom powder + 1 cardamom pod seeds
    • 1 pinch edible camphor if available

    Instructions

    • Grate about 2.5 cups of fresh coconut and blend it in a mixer along with ¼ cup of milk and cardamom seeds , to get a semi fine coconut .
    • Transfer the blend coconut into a bowl and set aside for about 20 to 30 minutes, this helps to get good flavour and texture to coconut barfi.
    • In a thick bottom pan, heat 1 tablespoon og ghee/ clarified butter.
    • Add blended coconut, stir well and cook on a low heat.
    • Keep stirring often , sugar dissolves completely and when there is very less moisture content , it starts to leave the edges.
    • Now add in another 1 tablespoon of ghee , cardamom powder , edible camphor ( if using) and mix well.
    • Keep stirring , at this stage it becomes hard to stir and starts to leaves the edges just reaching halwa consistency.
    • Now remove it from stove and spread on a greased tray . plate.
    • Spread evenly and tap firmly smoothing the top.
    • After 5 minutes , when its still warm , precut into desired shape.
    • Now after 15-20 minutes , when its completely coolsdown. Cut on marked lines and serve.
    • Stays good for 2-3 days in room temperature and stays good upto a week in refrigerator.

    Video

    Nutrition

    Calories: 138kcal

    FAQ's

    Can we use dry coconut ? No , dry coconut cnt be used . Instead dessicated coconut can be used by soaking in ½ cup milk for about 30 minutes.

    Can we make using condensed milk ? Yes, condensed milk can be used , then you need to check with the amount of sweetner that needs to be added.

    Why did my barfi did not set? If you have not cooked to right consistency , then there might be difficulty for setting. It should reach halwa like consistency for kobbari mithai to set well.

    My barfi was hard like rock? May be you have over cooked , so always remember to get right texture , you should turn off the stove when mixture starts to leaves edges and it becomes slightly harder to stir the mixture.

    coconut barfi

    Pista Almond Paneer Rolls

    Published : November 3, 2015 | Last Update on October 18, 2022 By Muktha Gopinath

    Pista Almond Paneer Rolls
    Pista Almond Paneer Rolls


    Diwali is approaching and its all about sweets sweets and sweets. While preparing many sweets it always becomes necessary to do some sweets which is simple ,yet delicious.So
    here comes one such simple and delicious dry nuts paneer rolls.Its very simple and can prepare it within 10 minutes,if you have paneer ready .This sweet tastes better if done using a fresh homemade paneer.Give a try ,definitely your family would love this and even you too as its so simple and easy to make it.


    Ingredients:

    Category:Veg | Cuisine: Indian|Course:Dessert

    Prep Time:5 Minutes|Cooking Time:15 Minutes|Makes:5-6

    Full Cream Milk:½ Ltr
    Lemon Juice:1 Tsp
     OR
    Fresh Paneer:½ Cup Crumbled
    ------------------------------------------
    Sugar:2 Tbsp
    Milk Powder:4 Tbsp
    Almond:10 Chopped
    Pista:10 Chopped
    Cashews:10 Chopped
    Rose Essence:1-2 Drop
    Cardamom Powder:¼ Tsp

    Method:
    Heat milk,when it starts to boil add lemon juice,stir well and simmer the flame.Heat further till whey water separates with paneer.Put off the flame and for this add ice cubes (ice cubes are added to get those perfect texture by hardening paneer) .I did it using microwave.Take a strainer pour the curdled milk and wash well with cold water to remove the sourness of lemon juice,keep in the strainer for about 30 minutes.Squeeze out excess water,take out chenna(paneer) in a bowl and knead well to get smooth dough.Make sure there is no water content in the paneer.

    Pista Almond Paneer Rolls

    Take paneer in a bowl ,add powdered sugar,Milk Powder,Cardamom powder,rose essence and knead well to make a smooth dough.

    Pista Almond Paneer Rolls


    Chop the nuts and keep it aside.Dived the paneer mixture into 5 equal balls ,take a small portion of paneer ,between your palms and make a cylindrical shape.Now roll it over the chopped nuts ,so that nuts get coated well.

    Pista Almond Paneer Rolls

    Refrigerate for 30 minutes and serve.

    Pista Almond Paneer Rolls

    Copyright Your Blog Name 2009 at palatesdesire.blogspot.com

    Whole Wheat Masala Bun

    Published : October 9, 2015 | Last Update on May 19, 2021 By Muktha Gopinath

    whole wheat masala bun

    Whole Wheat Masala Bun

    Whole wheat masala Buns are perfect tea time snack. I often bake these mild spiced fresh buns for evening snack. This is my kid’s favorite bun. As it’s globally said not to use refined flour, I hardly bake anything out of all purpose flour. So baking it in a healthy way to feed family is always my priority. That to after my Food and Nutrition Diploma, my concentration always circles around clean eating habits. So trying to do a bit by sharing my recipes and promoting to eat healthy through my blog.

    Initially when I started baking,it was my dream,to bake good bread and buns . I have tried lot many times to bake a perfect bun , cookies and bread . Have no count on the amount of flour and butter that I have wasted to get those perfect buns and breads.After so many errors and trails ,lesson learnt was  good Yeast helps to bake better bun and bread.  If you want to try baking good bread then most key ingredient is your yeast,  good yeast = good bread.

    Now a days , I confidently bake whole wheat buns, breads and pav . I got good instant yeast from a online store and I'm a happy baker now 🙂 In Active Yeast ,a brand named black bird worked for me other than that none of the other yeast worked. But after finding instant yeast ,I don't prefer to use Active Yeast.   Main difference between active and instant yeast is that,active yeast should prove before using where as instant yeast can be used directly without waiting for yeast to prove.

    This is a easy bun recipe for beginners. Its fool proof recipe even if you are a beginner , still you can nail baking this provided Yeast is of good quality.

    Recipe card for Whole wheat Masala Bun

    Recipe

    whole wheat masala bun
    5 from 4 votes

    Whole Wheat Masala Bun

    Masala Bun in a lightly spiced yeast bread that can be served either for breakfast or tea time snack.
    Prep Time5 minutes mins
    Cook Time20 minutes mins
    Resting Time45 minutes mins
    Total Time25 minutes mins
    Course: Breakfast
    Cuisine: Fusion, World
    Keyword: Baking
    Servings: 6 makes
    Calories: 143kcal
    Author: Muktha H S

    Ingredients

    • 1 ½ cup Whole wheat
    • 1 teaspoon Instant Yeast
    • ⅓ to ½ cup Water
    • ¾ teaspoon Salt
    • ½ tablespoon Sugar
    • 2 tablespoon Curds
    • 1 tablespoon Olive Oil
    • 1 tablespoon Butter
    • 1 No's Onion medium size finely chopped
    • 1 No Green chilli finely chopped
    • 1 Tsp Jeera/cumin seeds
    • ½ Cup Grated carrot -optional
    • 2 sprigs Curry leaves chopped
    • 1 tablespoon Coriander leves chopped
    • ½ tablespoon Mint leaves chopped
    • 1 pinch Turmeric powder
    • 1 teaspoon Milk for brushing
    • 1 teaspoon Butter for brushing

    Instructions

    • In a bowl,Take instant yeast,sugar,oil,salt and yogurt.Add warm water and stir well.(If you are using active yeast,then allow it froth as you do in preparing pizza dough)
    • For this add wheat flour and mix it using a spatula or spoon.
    • Add butter, onion,carrot,greens ,jeera and turmeric powder
    • Grease some oil on hands and Knead well the dough  for 5 to 10 minutes . Alternatively ,You can even electric blender / processor for atta kneading.
    • Cover the dough bowl with a cling film /or wet cloth and keep it in a warm place till  dough double in size. (i always keep it in a oven with just light on without turning on the oven). 
    • It took 30 minutes for my dough to get double in size. It always depends on the quality of yeast and also environment temperature.
    • Once the dough doubles in size,punch the dough to release air.
    • Using grease hands ,knead again and pinch some dough and shape like buns.
    • Grease the tray and place shaped buns on the tray. Brush some milk on top.
    • Allow it for another 10-15 minutes,so that again it doubles in volume.
    • Preheat the oven to 210 deg c.
    • Once it doubles,bake it in a preheated oven for 15-20 minutes till you get that nice golden color.
    • Brush some butter on top of buns,allow to cool .
    • Serve it warm or cold with a cup of tea.

    Nutrition

    Calories: 143kcal

    Step By Step directions on making of Whole Wheat Masala Bun:

    In a bowl,add instant yeast,sugar,oil,salt and yogurt.Add warm water and stir well.(If you are using active yeast,then allow it froth as you do in preparing pizza dough)

    Whole Wheat Masala Bun

    For this add wheat flour and mix it using a spatula or spoon. Add  onion,carrot,greens ,jeera and turmeric.
    Whole Wheat Masala Bun

    Mix well using a spoon as it will be very sticky. Grease some oil on hands and knead well for 8-10 minutes or alternatively use electric blender/ processor for kneading.
    Whole Wheat Masala Bun

    Cover the dough, Wrap the bowl either with a cling film or wet cloth and keep it in a warm place till the dough double in size.(I always keep it in a oven with just light on without turning on the oven). It took 30 minutes for my dough to get double

    Whole Wheat Masala Bun

    Once the dough doubles in size, stir the dough using a spoon, knead with greased hands. Grease the tray, Divide the dough into equal size buns,brush the top with milk and place it on the tray.

    Allow it for another 10-15 minutes, so that again it doubles in volume.

    Preheat the oven to 210 deg c. Once dough doubles,bake it in a preheated for 15-20 minutes till you get that nice golden color on top.
    Whole Wheat Masala Bun

    Brush some butter on each buns to get a soft and aromatic buns, allow to cool. Serve bun with a cup of tea.................!

    Whole Wheat Masala Bun

    Cheesy Bell Pepper Toast Recipe

    Published : October 8, 2015 | Last Update on July 23, 2022 By Muktha Gopinath

    Cheesy Bell Pepper Toast is a easy open toast loved by all age groups.This is one of the best toast ,I often prepare.Its simple yet delicious for evening snack as well as morning breakfast.Kids would love this as there will be lots of cheese, I did it with cheese slice on top and also without cheese slices from health point.
     Cheesy Bell Pepper Toast Recipe
    For kids you can always add it and give as it tastes cheesy and yummy, adding cheese to kids is good as it has good protein and fat. High calorie food is what kids body demand for their non-stop physical activities. Cheese is a animal based protein and it is a complete protein with all 9 amino acids. Adding cheese is a easy way to sneak in protein in Kids diet.As proteins are basic building blocks of the body , it is must for Kids. Other vegetarian sources of complete protein are Milk ,Paneer, Curds, Dal- Chawal ,Dal -Roti ( lentil - cereals, combination ) .
    If you are one among those garlic bread lovers then you will definitely love this toast.I have used Whole Wheat Bread here, if you can better opt for whole wheat bread, lets all try together to avoid refined products as much as possible and cultivate a better lifestyle for our future betterment.
    Other similar kind of recipes that may interest you are: Basic Avocado Toast , Whole wheat Masala Buns ,Classic French Toast ,Scrambled Egg with Mushroom , Grilled Veg Sandwiches
    RECIPE CARD FOR CHEESY BELL PEPPER  TOAST

    Recipe

    Cheesy Bell Pepper Toast Recipe
    5 from 2 votes

    Cheesy Bell Pepper Open Toast

    A open toast with crunchy bell pepper,onion ,garlic and lots of cheese
    Prep Time5 minutes mins
    Cook Time8 minutes mins
    Total Time13 minutes mins
    Course: Appetizer, Breakfast
    Cuisine: World
    Keyword: Bread
    Servings: 6 Makes
    Calories: 148kcal
    Author: Muktha H S

    Ingredients

    • 6 Whole wheat bread slices
    • ½ cup Onions finely chopped
    • ½ cup Bell Pepper finely chopped
    • 1 less spice green chilli finely chopped Optional
    • 2 Processed cheese cubes grated
    • 6 Cheese slices
    • 1-2 tablespoon Butter ,as required
    • ¼ teaspoon Salt or as required optional
    • 1 tablespoon Garlic finely minced
    • 2 tablespoon Coriander leaves finely chopped
    • ½ teaspoon Pepper Powder
    • 1 tablespoon Pasta seasoning

    Instructions

    • Preheat oven to 250 deg celsius.
    • In a bowl and mix all the chopped ingredients, grated cheese and add seasoning, pepper and salt as required. Be careful while adding salt, as butter, cheese and bread already contains salt.
    • Take bread slices and apply butter on both sides .Applying butter on both sides gives you a crunchy base.
    • Take a baking tray, arrange the buttered bread .Take a spoon full of above mixture spread it over the bread.
    • Close it with a cheese slice and bake in a pre heated convection oven for 6-8 minutes.
    • If you bake more, it becomes more crunchy and dry. Just make sure that, cheese just starts melting and veggies are cooked, not burnt.
    • Toast are ready, serve  immediately with Tomato Ketchup.

    Nutrition

    Calories: 148kcal

    Step By Step Directions for making Cheesy Bell Pepper Toast:
    Preheat the oven to 250 deg c.
    In a bowl and mix all the chopped ingredients,grated cheese and add seasoning,pepper and salt as required.Be careful while adding salt if you are using a salt bread and also cheese has lots of salt in it already.
    Cheesy Bell Pepper Toast Recipe
    Take bread slices and apply butter on both sides .Applying butter on both sides gives you a crunchy base.Take a baking tray, arrange the buttered bread .Take a spoon full of above mixture spread it over the bread.
    Cheesy Bell Pepper Toast Recipe
    Close it with a cheese slice and bake in an pre heated  convection oven for 6-8 minutes .
    Cheesy Bell Pepper Toast Recipe
    If you bake more ,it becomes more crunchy and dry.Just make sure that,cheese just starts melting and veggies are  just cooked, not burnt.
    Cheesy Bell Pepper Toast Recipe

    Toast are ready ,you can serve  with Tomato Ketchup.

    Cheesy Bell Pepper Toast Recipe

    Picture below is without cheese slices on top, for elders who doesn't like more cheese and for those who doesn't want to increase their waistline by inches 😉

    Cheesy Bell Pepper Toast Recipe

    *** Old posts are re edited and updated with new featured pictures . 

    Vegetable Cutlet

    Published : October 1, 2015 | Last Update on July 25, 2018 By Muktha Gopinath

    Vegetable Cutlet

    Vegetable cutlet is a snack item.Its a best snack to eat during rainy season with a cup hot tea........,though rain is less this year ,i often prepare this as carrot,beans,potatoes and

    peas are in fridge always 🙂 All you need to do is cook the vegetables first then rest of things is very easy and can make it very fast.Though for cutlets they just  pressure cook/steam veggies,i make a slight changes by frying chopped onions,ginger garlic paste and then add veggies and pressure cook,as i find this tastes more good as there is no raw smell of onion, ginger and garlic .Well,here is the recipe........

    Ingredients:

    Category:Vegetarian | Cusine : India | Course: Snack
    PrepTime :5 Minutes  |Cooking Time: 25 Minutes | Makes: 12-15

    Carrot Finely Chopped: 1 Medium

    Cabbage:½ Cup
    French Beans:4-5
    Onion:1 Medium
    Potato:1 Large
    Fresh/Frozen Green Peas:⅓ cup
    Ginger Garlic Paste:1 Tbsp
    Green Chillies Chopped:1-2
    Red Chilly Powder:¼ Tsp
    Jeera/Cumin Powder:½ Tsp
    Garam Masala Powder:¼ Tsp
    Kitchen king masala powder:¼ Tsp
    Amachoor powder:½ Tsp
    Coriander leaves: 2 Tbsp
    Bread Crumbs:3 Tbsp + 3 Tbsp
    Maida/All purpose Flour:2 Tbsp
    Water:3 Tbsp
    Oil:3 tablespoon for shallow frying
    Salt: As required (1 Tsp)

    Method:


    Take a pressure cooker,heat 2 teaspoon of oil  for this add onions,ginger garlic paste and saute till raw smell goes off.Add chopped green chillies and all other chopped vegetables except potatoes and saute well.For this add green peas mix well .Add salt,sprinkle 1 teaspoon of water and pressure cook for 1 whistle.Allow the pressure to release on its own

     Vegetable Cutlet

    Boil,peel and smash potato,For this add all spice powders,chopped fresh coriander leaves,Pressure cooked vegetables and 3 tablespoon of bread crumbs and mix well.Check for the taste ,add salt or any spice powder if required.


    Vegetable Cutlet


    Mix Maida with 3 tablespoon of water and make a thin paste.Shape the cutlet mixture by rolling and flattening between your plams.Dip the shaped cutlet in maida paste and roll on bread crumbs.


    Vegetable Cutlet


    Heat the griddle,drizzle some oil and place the cutlets over it and cook on both sides by drizzling some oil and till it looks golden colour.


    Vegetable Cutlet


    Serve hot with green chutney or tomato ketchup.


    Vegetable Cutlet

    Vatana Methi Malai Masala Recipe | Creamy Dry Peas Fenugreek Gravy Recipe

    Published : September 8, 2015 | Last Update on July 23, 2022 By Muktha Gopinath

    Vatana Methi Malai Masala Recipe | Creamy Dry Peas Fenugreek Gravy Recipe
    Methi  goes on well with most of the legumes and beans.May be most of the people are not aware of this recipe,as it's not that common everywhere.This is a dhaba style vatana methi malai masala , i got this recipe is from my cousin cooking class notes.This recipe is a blend of 2 recipes ,one is dry peas masala and the other is methi malai masala,but its finger licking good.You can have this along with  any kind of indian flat bread like Tandoori Roti, Naan, Paratha and Roti.If you are kinda of  calorie conscious persona ,portion control will help you rather than altering the amount of Cream 🙂 😉

    Recipe

    Vatana Methi Malai Masala Recipe | Creamy Dry Peas Fenugreek Gravy Recipe
    No ratings yet

    Vatana Methi Malai Masala Recipe | Dry Peas Fenugreek Gravy Recipe

    Dry peas and methi in a rich creamy Gravy 
    Prep Time15 minutes mins
    Cook Time40 minutes mins
    Resting Hours8 hours hrs
    Total Time55 minutes mins
    Course: Main Course
    Cuisine: North Indian
    Keyword: Dry Peas, Gravy
    Servings: 5
    Calories: 180kcal
    Author: Muktha H S

    Ingredients

    • 1 Cup Dry Peas
    • 4 Cups Fresh Fenugreek Leaves
    • 1 Cup Milk
    • 2 No's Onions chopped
    • ½ Cup Tomato Puree
    • 3 tablespoon Fresh Cream
    • 1.5 teaspoon Red Chilly Powder
    • 1 teaspoon Jeera Powder
    • ½ teaspoon Garam Masala
    • 4 tablespoon Oil
    • 1 teaspoon Sugar
    • 1.5 teaspoon Salt

    For Masala Paste

    • 1 tablespoon Garlic Paste or 6 garlic cloves
    • 1 tablespoon Ginger Paste or ½ " inch ginger
    • 2 tablespoon Cashew Paste
    • ½ tablespoon Poppy Seeds
    • 1 tablespoon Melon Seeds Optional

    Instructions

    • Soak green peas for 6-8 hrs in hot water.
    • Thoroughly wash and clean methi leaves,Sprinkle salt over it and set aside for 15 minutes.
    • Squeeze out excess water ,pat it with kitchen napkin and set aside.
    • Whilst pressure cook ,soaked dry green peas for 2 whistles.
    • Prepare fine masala by grinding all ingredients under the list masala paste by adding little water.
    • Blanch tomatoes ,peel the skin and make tomato puree.
    • Heat oil in a Kadai,add methi leaves and fry till water dries up. Place fried methi leaves on a tissue paper.
    • In the same kadai ,add jeera seeds and  chopped onions,fry till brown.
    • Add Tomato puree and all spice powders and cook till oil starts releasing from corners.
    • Add above prepared masala paste and continue to cook for 3-4 minutes.
    • Now add cooked ,peas and fried methi ,mix well.
    • Add 1 cup milk ,add sugar  and salt ,continue to cook on sim till it starts to  thicken.
    • Add fresh cream, Mix well. Turn off the heat.
    • Serve with Phulka, Roti,Naana or any indian flat breads.

    Nutrition

    Calories: 180kcal

    Step by Step Directions:

    Thoroughly wash Methi leaves,soak in salt for 15 minutes, Squeeze excess water pat it dry and keep it aside.

    Vatana Methi Malai Masala Recipe | Creamy Dry Peas Fenugreek Gravy Recipe

    Soak Dry green peas in water for 6 hours and pressure cook for 2-3 whistles(missed to take the pic) ,keep it aside.

    Grind all the ingredients listed under masala to a smooth paste.Vatana Methi Malai Masala Recipe | Creamy Dry Peas Fenugreek Gravy Recipe

    Blanch 2 tomatoes,peel skin and prepare puree .(I was preparing extra tomato puree,so pic shows 4 tomatoes)

    Vatana Methi Malai Masala Recipe | Creamy Dry Peas Fenugreek Gravy Recipe

    In a pan heat ,4 tablespoon oil,add methi leaves and fry well. Remove fried methi leaves and place  it on an tissue paper to drain out excess oil.

    Vatana Methi Malai Masala Recipe | Creamy Dry Peas Fenugreek Gravy Recipe

    In the same pan,add jeera seeds ,once it starts to change colour add chopped onions and fry till brown.

    Vatana Methi Malai Masala Recipe | Creamy Dry Peas Fenugreek Gravy Recipe

    For this add prepared tomato puree,garam masala ,red chilli powder and cook till oil starts releasing from corners. Now add above ground masala paste,to tomato gravy and cook for 5 minutes.

    Vatana Methi Malai Masala Recipe | Creamy Dry Peas Fenugreek Gravy Recipe

    Now add cooked peas and fried methi,mix well and continue to cook for another 3 minutes.

    Vatana Methi Malai Masala Recipe | Creamy Dry Peas Fenugreek Gravy Recipe

    For this add milk and cook on low flame .Add salt and sugar,once gravy starts to thicken,switch of the heat and add fresh cream.

    Vatana Methi Malai Masala Recipe | Creamy Dry Peas Fenugreek Gravy Recipe

    Mix well serve hot with, phulka ,tandoori roti ,naan or chapati.

    Vatana Methi Malai Masala Recipe | Creamy Dry Peas Fenugreek Gravy Recipe


    Palak Paneer Bhurji

    Published : September 7, 2015 | Last Update on July 25, 2018 By Muktha Gopinath

    Palak Paneer Bhurji
    Palak Paneer Bhurji

    Hi All,
    Had few requests for bachelor cooking ,so thought of preparing paneer bhurji with a well complimenting taste of palak,Its very simple and can prepare in jiffy.I usually prepare this
    to stuff inside chapathi rolls , and you can make your kids eat spinach......,this is one of the best way .

    Ingredients:
    Category:Vegetarian | Cusine : India | Course: Side Dish
    PrepTime : 5 Minutes |Cooking Time: 10 Minutes | Serves: 4

    Palak/Spinach: 2 Bunches
    Paneer/ Cottage Cheese: 200 grms
    Mustard Oil:2 Tsp
    Onions (Big) finely Chopped : 2
    Tomatto(Small):1
    Green Chilly:1-2 
    Ginger Garlic Paste:1 Tbsp 
    Jeera/Cumin Seeds: 1 Tsp
    Red Chilly Powder:½- 1 Tsp
    Jeera Powder:½ Tsp
    Kitchen King Masala:¼ Tsp
    Garam Masala:¼ Tsp
    Turmeric Powder:¼ Tsp
    Ginger Grated:½ Tsp
    Coriander leaves Chopped: 2 Tbsp
    Salt To Taste :1 Tsp

    Method:
    Wash and drain spinach and keep aside.Take a Nonstick pan,heat oil ,add jeera seeds once it starts changing colour add finely chopped onions and saute well.Add ginger garlic paste and fry till raw smell vanishes. Add chopped green chilly,tomatto and saute well.For this add chopped spinach and add ½ teaspoon of salt and cook on high flame so  that all the water content gets dried up .
    Palak Paneer Bhurji

    For this add grated paneer and mix well.Continue cooking on high heat as it removes the water content out of it.Now add all the spice powders ,salt and mix well.Finally garnish with coriander leaves and grated ginger.

    Palak Paneer Bhurji

    You can serve this with chapathi , phulka or good to eat on its own.

    Palak Paneer Bhurji


    Rasgulla Recipe | how to make Rasgulla in pressure cooker

    Published : August 25, 2015 | Last Update on October 17, 2022 By Muktha Gopinath

    rasgulla-recipe

    Rasgulla is a most popular Indian dessert made with chhena / paneer / Indian cottage cheese cooked in light sugar syrup flavored with rose and cardamom. 

    Rasgulla

    [feast_advanced_jump_to]

    About this recipe

    Origin of rasgulla or rashogulla is from East India . It is one of the most popular recipe from Bengal and Odisha . The main ingredient in preparing Rasgulla is milk. Using a full cream milk gives you the best result.

    These snow balls are favorite among many and can be easily prepared at home. Though you can make rasgulla in open pan,  I always find it easy to make in pressure cooker. As there will be no monitoring and no worries on the end results.

    I often make this recipe at home as this is the key for making many other version of rasgulla recipes like Rasmalli , Champakali , Chom Chom , Malai Sandwich and many more. 

    Watch Video

    With many trail and errors , finally I hooked up on this easy rasgulla recipe to make soft spongy bengali rasgulla.

    Here I have clearly mentioned  all the steps, tips and techniques so that you can easily attempt to make this delicious bengali sweet without fail.

    Tips to make perfect rasgulla recipe

    Use full fat milk only for this recipe as the quality  and quantity of cheena / panner will be good.

    Ice cubes are very important , as it doesn't allow further cooking and helps to get perfect texture.

    Most importantly , its kneading of cheena/ paneer to make perfect rasgulla . I took good 8 to 10 minutes to knead cheena. It looks like a soft dough once after kneading smooth. Knead on a wide plate with heels of the palm till cheena resembles soft dough. When it starts to release oil and starts to become greasy , stop kneading at that moment.

    Also you can add 1 teaspoon of arrowroot powder  or maida while kneading cheena. It's upto you to use it . Adding flours helps to bind the rasgulla without loosing its shape while cooking . But I don't like taste of my rasgulla with any flour , hence  I haven't used.

    Cooking Rasgulla : You can cook either in an open pan with close lid or pressure cooker. If using open pan once sugar syrup comes to boil , cook for 10-15 minutes on medium heat with lid closed till rasgulla doubles in size. With pressure no monitoring, 1 whistle on medium heat  and simmer for 2-3 minutes , rasgulle are ready.

    It tastes good when chilled.

    Rasgulla

    Step by step directions to make Rasgulla

    Heat milk in a sauce pan and bring it to boil .

    Rasgulla Recipe | how to make Rasgulla in pressure cooker

    When it comes to boil,  add lemon juice.

    Rasgulla Recipe | how to make Rasgulla in pressure cooker

    Stir well and simmer the flame. Heat further till whey water separates with chenna / paneer.

    Rasgulla Recipe | how to make Rasgulla in pressure cooker

    Put off the flame , for this add ice cubes (ice cubes are added to get those perfect texture).

    Take a strainer, line with a muslin cloth , pour the curdled milk.

    Rasgulla Recipe | how to make Rasgulla in pressure cooker

    Wash well with cold water to remove the sourness of lemon juice.

    Rasgulla Recipe | how to make Rasgulla in pressure cooker

    Squeeze out excess water .

    Rasgulla Recipe | how to make Rasgulla in pressure cooker

    Keep any heavy object on the chhena / paneer  wrapped cloth.

    Rasgulla Recipe | how to make Rasgulla in pressure cooker

    And keep aside for about 30 minutes. After 30 minutes , remove cloth and take out chhena (paneer) .

    Rasgulla Recipe | how to make Rasgulla in pressure cooker

    Keep chhena / paneer on a wide plate . Make sure there is no moisture in the paneer.

    Rasgulla Recipe | how to make Rasgulla in pressure cooker

    Knead well to get smooth dough. Tip : kneading the paneer is the most important step to make bengali sponge rasgulla.

    Rasgulla Recipe | how to make Rasgulla in pressure cooker

    After getting smooth dough , spread the dough in plate , bring small size of dough in fingers , rub to plate and make balls.

    Then shape into balls using hands( refer video) . Make smooth balls of desired size and set aside. I got around 15 balls of  medium size.

    Rasgulla Recipe | how to make Rasgulla in pressure cooker

    Take a pressure cooker add water, sugar and cardamom powder bring it to boil. You can also make an instant pot rasgulla

    Rasgulla Recipe | how to make Rasgulla in pressure cooker

    Once sugar dissolves completely and sugar syrup starts to boil , add few drops of rose / kewra water (optional).

    Rasgulla Recipe | how to make Rasgulla in pressure cooker

    Add prepared balls carefully one by one.

    Rasgulla Recipe | how to make Rasgulla in pressure cooker

    Close the lid and cook for one whistle on a medium flame. After a whistle keep in simmer for 3-4 minutes and turn off the heat.

    Rasgulla Recipe | how to make Rasgulla in pressure cooker

    Allow pressure to release on its own.

    Rasgulla Recipe | how to make Rasgulla in pressure cooker

    Once pressure is released open the lid, rasgulla's would have doubled in size. Allow it to cool down completely .

    Rasgulla Recipe | how to make Rasgulla in pressure cooker

    Soft and spongy sweets rasgulla are ready . Tastes best when served chilled.

    Rasgulla

    Recipe

    rasgulla-recipe
    5 from 3 votes

    Easy Rasgulla Recipe

    Rasgulla is a most popular Indian dessert made with chhena / paneer / Indian cottage cheese cooked in light sugar syrup flavored with rose and cardamom. 
    Prep Time15 minutes mins
    Cook Time15 minutes mins
    Resting Time30 minutes mins
    Total Time1 hour hr
    Course: Dessert
    Cuisine: Bengali, Indian
    Keyword: Festivals, Paneer
    Servings: 15 Makes
    Calories: 113kcal
    Author: Muktha H S

    Ingredients

    • 1000 ml Full Fat cream Milk
    • 2 tablespoon Lemon Juice / Vinegar
    • 2 cup Sugar
    • 4 cup Water
    • 15-20 Ice cubes
    • ½ teaspoon Cardamom Powder
    • 4-5 Saffron strands optional
    • 2 Rose Water / Kewra drops optional
    • 4 Pista Chopped optional

    Instructions

    • Heat milk in a sauce pan and bring it to boil.
    • When it comes to boil, add lemon juice or vinegar.
    • Stir well and simmer the flame. Heat further to curdle milk completely and let whey water separates with chhena / crumbled milk / paneer.
    • Put off the flame, for this add ice cubes (ice cubes are added to get those perfect texture) .
    • Take a strainer, line with a muslin cloth, pour the curdled milk and wash well with cold water to remove the sourness of lemon juice.
    • Squeeze out excess water, keep any heavy object on the chhena / paneer wrapped cloth and keep aside for about 30 minutes.
    • After 30 minutes, remove cloth and take out chhena .
    • Keep chhena / paneer on a wide plate. Make sure there is no moisture in the paneer.
    • Knead well to get smooth dough.
    • Make smooth balls of desired size and set aside. I got around 15 balls of medium size.
    • In a pressure cooker add water, sugar and cardamom powder bring it to boil.
    • Once sugar dissolves completely and sugar syrup starts to boil, add few drops of rose / kewra water (optional).
    • Add prepared balls carefully one by one.
    • Close the lid and cook for one whistle on a medium flame. Alternatively, cook in any pan on medium heat for about 12- 15 minutes with lid closed. Till rasgulla doubles in size.
    • After 1 whistle keep in simmer for 3-4 minutes and turn off the heat.
    • Allow pressure to release on its own. Once pressure is released open the lid, rasgulla's would have doubled in size.
    • Allow it to cool down completely.
    • Serve soft and spongy Rasgulla's chilled.

    Video

    Notes

    1. Ice cubes are added to get that perfect texture.
    2. Make sure there is no water content in chhena before kneading.
    3. Kneading it to a smooth dough, is most important to get that smooth good looking rasgulla.
    4. Refrigerating paneer for 1-2 hrs, this is an optional step but it's foolproof ,as it avoids cracking/breaking of chhena  balls when put in hot sugar syrup.

    Nutrition

    Calories: 113kcal

    Similar recipes

    • gulab-jamun-milkpowder-recipe
      Gulab Jamun | Soft Gulab Jamun with Milk Powder
    • Pista badam kulfi on plate
      Kulfi | Pista Badam Kulfi Recipe
    • Rabdi-dessert
      Rabdi Recipe, how to make best rabri at home
    • rasmalai
      Rasmalai Recipe | Easy Rasmalai Recipe

    Sabudana Vada | Baked Sabudana Vada

    Published : July 23, 2015 | Last Update on September 26, 2022 By Muktha Gopinath

    sabudana-vada-hari-chutney-yogurt

    Sabudana Vada is a popular snack for vrat( fasting ), basically a deep fried fritters made with tapioca pearls , boiled potatoes , roasted peanuts and spices.

    This version of baked sabudana vada is similar to fried one 's ; it is tasty , crispy but low on caloriles and non greasy . Does not it sound awesome ?

    If you are on a vrat (fasting) or if you love to eat varitiey of sabudana dishes just like me then I have few more recipes shared for you like - Sabudana Khichdi , Sabudana Thalipeeth , Sabudana Kheer and Sabudana Chivda.

    sabudana-vada-lemon--hari-yogurt
    [feast_advanced_jump_to]

    About this recipe

    Basically , Sabudana Vada is a crispy , golden brown , deep fried Maharashtrian snack made with tapioca pearls (sago), boiled potatoes , peanuts , herbs and mild spices.

    But this version is a baked Sabudana vada recipe , by following the same recipe you can either air fry , shallow fry or deep fry .

    Sabudana is also known as Sabakki vade in Kannada , Sugubiyyam vadalu in Telgu laguage and Javvarisi Vadai in Tamil languge. These Crispy , golden brown, and crunchy vadas are perfect to pair with green chutney and masala chai on any monsoon day.

    Sabudana Vada are prepared and eaten during vrats (Indian fasting days) like Navratri, Ekadeshi, Janmashtami, Shivratri, etc.

    Sabudana /tapioca are loaded with carbohydrates hence it energises instantly and keeps you full for longer on fasting days. Tapioca Pearls ( sago) are made from starch extracted from tapioca roots and then processed to give pearl like structure.

    Sabudana contains very large quantity of starch with low amounts of vitamins, minerals, calcium,iron and fiber . However lack of these nutrients are made up by adding veggies, peanuts , milk and ghee to create myriad of lip smacking dishes.

    This Sabudana Vada is,

    • Apt for fasting days
    • Perfect for monsoon days
    • Gluten Free
    • Scalable

    Ingredients

    Below is the quick glimpse on ingredients used to make baked sabudana vada.

    sabudana-vada-ingredients

    Sabudana (Tapioca Pearls) - Sabudana comes in a variety of sizes, small, medium, and large pearls. Use the medium size Sabudana pearls to make this recipe.

    Boiled Potatoes -  are used to hold the mixture. Boil the potatoes in whichever way you want ,I prefer to pressure cook them . As an alternative to potatoes you can use either raw banana or sweet potatoes .

    Roasted Peanuts - It's a star ingredient in this recipe. It adds on texture and taste to the sabudana vada. Makes sure to crush rosted peanuts coarsely and not fine.

    Ginger - Adds on good flavour to sadudana vada.

    Jeera /Cumin Seeds - It's optional , you can either use or skip .It doesn't alter with the taste.

    Clarified butter / ghee or Oil - You can use clarified buter / ghee or any vegetable oil to make this recipe. As this recipe ius mainly followed during vrat , I prefer to use Ghee to make Sabudana Vada.

    Others - Black Salt , sugar ,green chillies , coriander leaves and lime juice as used as per taaste.

    Top Tip

    Before soaking Sabudana , rinse well couple of times and drain excess of starch .

    To soak Sabudana, always use 1 cup ( to 1.25 ) of water to 1 cup sabudana .1 : 1 ratio works fine to soak soabudana , if you find sadudana too hard after soaking for 5 hours then use another ¼ cup of extra water and soak for another 30 minutes or more.

    Watch Video

    How to make Sabudana Vada

    Preparations

    Wash sago thoroughly 

    Sabudana Vada | Baked Sabudana Vada

    soak in 1 ¾ cup of water for about 5 hrs or overnight.

    soak sabudana for 5 hours

    After soaking for 5 hours, Drain water completely and check sabudana if it can mash between fingers. If it is hard in between then add ¼ cup water and continue to soak for another 30 minutes.

    Sabudana Vada | Baked Sabudana Vada

     Pressure cook potatoes, peel skin and mash potatoes and keep aside.

    Dry roast peanuts on an iron skillet ,till skin starts peeling.Allow to cool completely.

    Take peanuts in a mixer jar ,coarse powder it using pulse mode for 10 seconds.

    To make Vada

    In a mixing bowl or large plate, add potatoes, peanut powder, chopped green chillies, coriander leaves, lemon juice,1 tablespoon oil, jeera seeds , grated ginger and salt to taste.

    add spices, herbs and potatoes

    Mix everything very well ,

    mix well everything

    gently mash with hands or masher.

    Sabudana Vada | Baked Sabudana Vada

    Scoop out small portion, make a ball and press from your palm to shape into patties.

    shape into patties

    Preheat oven to 220 deg C .

    Divide the mixture into 24 -25 equal size patties, grease the baking tray and arrange the patties.Brush the top of patties with oil.

    grease lightly

    Place in preheated oven and bake for 35-40 minutes. In between, around 15 minutes flip the vada to other side and again continue to bake .

    Bake until top turns nice golden in colour.

    golden and crisp

    Yummy and delicious Baked sabudana vadas will be ready to serve along with curds and green chutney.

    Recipe

    sabudana-vada-with chutney-dahi-and-lemon
    3.90 from 10 votes

    Sabudana Vada Recipe

    Sabudana Vada is a popular vrat ( fasting) snack made with tapioca pearls , boiled potatoes , roasted peanuts and spices. My recipe shares a baked version of popular fried sabudana vada.
    Prep Time15 minutes mins
    Cook Time25 minutes mins
    Soaking Time6 hours hrs
    Total Time30 minutes mins
    Course: Breakfast, Snack
    Cuisine: Indian
    Keyword: Fasting
    Servings: 25 Makes
    Calories: 120kcal
    Author: Muktha H S

    Ingredients

    • 1.5 Cups Sabudana (Pearl Tapioca)
    • 4 Potatoes ,medium size ,boiled medium size
    • ½ cup Peanuts , roasted and crushed
    • 1 teaspoon Ginger grated
    • 1 teaspoon Jeera /Cumin Seeds
    • 1 tablespoon Lime Juice
    • 3 Green chillies chopped or as required
    • 2 tablespoon Coriander Leaves chopped
    • 1 ½ teaspoon Powdered Rock Salt / Sendha Namak or as required
    • 2 teaspoon Clarified butter or oil

    Instructions

    • Wash sago in running water for 3-4 times. Soak in 2 ½ cup of water for 5-6 hrs.
    • After 5 hours,drain water completely from Sabudana and keep it in a colander bowl,so that water drains away  completely,if any.
    • Boil Potatoes,in a pressure cooker for 2-3 whistles.
    • Peel potato skin and mash the potatoes completely.
    • Dry roast peanuts on an iron skillet ,till skin starts peeling.Allow to cool completely.
    • Take peanuts in a mixer jar ,coarse powder it using pulse mode for 10 seconds.
    • In a mixing bowl,add sabudana ,potato,cumin seeds,salt,grated ginger,green chillies, coriander leaves,lemon juice,1 teaspoon of oil and mix everything very well.
    • Take small portion of mixture ,make it round using hands and press it lightly to  form a shape of flat round vada or patties.
    • Preheat the oven to 220 deg celsius.
    • Grease the baking tray with oil ,and place the vada and brush the top of vad with oil.
    • Once preheated , Bake it for 35-40 minutes. In between, around 15 minutes flip the vada to other side and again continue to bake .
    • Bake untill top turns nice golden in colour.

    Video

    Notes

    1.You can add  2 tablespoon of kuttu ka atta (buckwheat flour ) or rajgira atta (amaranth flour) ,if you are deep frying the vada's .It gives nice colour .Though its completely optional
    2.No need to add Oil while mixing , if you are not Baking.

    Nutrition

    Calories: 120kcal

    FAQ's

    Can I use the same recipe and fry ?

    Yes , you can deep fry or shallow fry this. To deep fry , heat oil in deep pan ,once the oil turns hot, simmer the heat to medium. Drop 4-5 vada in the hot oil and fry until golden brown from both sides.

    How to serve Sabudana vada ?

    Serve Sabudana vada with Hari Chutney ( coriander mint chutney ) and masala chai . You can also serve these vada with sweet curds.

    You may also like

    • dates kheer
      Dates Kheer | Khajoor Ki Kheer
    • Makhana-kheer-recipe
      Makhana Kheer Recipe
    • Sweet potato Halwa
      Sweet Potato Halwa | Shakarkandi Halwa
    • rajgira halwa
      Rajgira Halwa Recipe

    Rasmalai Recipe | Easy Rasmalai Recipe

    Published : July 12, 2015 | Last Update on October 17, 2022 By Muktha

    rasmalai

    Rasmalai recipe with step by step photos and short video. Soft and sweet flattened rasgulla are dipped in a creamy condensed milk flavored with saffrons cardamom and garnished with nuts.

    This Indian dairy delight is a luscious treat with an incredible melt-in-your-mouth texture that will only leave you craving for more.

    rasmalai
    [feast_advanced_jump_to]

    About this recipe

    Rasmalai is a popular Bengali Indian sweet made from milk – it’s chhena dumplings with sweetened milk.

    This milk-based dessert consists of spongy rosogolla or paneer balls doused in thick and creamy milk, garnished with saffron, pistachios and almonds. They are tender and filled with juicy cream in every bite.

    Making this dessert is quite simple and I usually split into 2 recipes , one is making of Rasgulla and next step is making of Rabri and then finally dipping delicious rasgulla in rabri yields Rasmalai.

    Sounds simple or tedious...? If you feel daunted by looking into big words , many steps and pictures , don't worry , in fact this a easy recipe without much monitoring. I have tried to cover all possible tips to make a perfect rasmalai.

    Watch Video

    Here I have split the recipe into 2 parts , First I have made Rasgulla then I have dipped in rabri . Rasgulla recipe I have already shared along with video . So refer Rasgulla recipe to make this rasmalai. Video of rasmalai has all steps including rasgulla and rasmalai . You can check the Rasmalai Video for complete recipe. 

    This tasty dessert is one of may favorites . So I always  make this on special occasions  and also when I host party at home. If you have Rasgulla ready at home then , you can prepare this very easily, refrigerate and serve.  

    Pro tips to make perfect Rasmalai 

    • Kneading of paneer to soft dough like , is very important . When it starts to release oil , you should stop at that point.
    • Unlike Rasgulla , there is no need for refined flour / fine sooji /corn flour while kneading the paneer .
    • To make rasmalai , cook rasgulla is pressure cooker than in open pan , As it increases well in size and can easily squeeze out syrup and flatten it between fingers. I prefer to make rasgulla balls and then flatten it. As it doesn't flatten much and absorbs rabri well and holds the shape , when you serve. 
    • Always dip warm rasgulla in hot / warm rabri , so that milk syrup is well soaked. Once it completely cool down then transfer into refrigerator to chill .
    Rasmalai_recipe

    Rasmalai is a easy and simple milk based dessert loved by many . I love to treat myself with this sweet whenever I crave for. Though one should think about the amount of refined sugar that gets into the dessert , treating ourselves with this kind of delicious sweet once in a while is  "No Harm" .

    I never say "No" for this Rasmalai, as it contains good protein,  fats from milk and nuts. Though eating sweets  made out of refined sugars regularly is not good , occasional indulgence with moderation is always YES for me 🙂 . After all happy mind is a happy body . 

    Other milk based desserts recipes shared on my blog are : Rasgulla , Kalakand , Mawa

    How to make Easy Rasmalai Recipe using Rasgulla

    Heat 1 litre full fat milk in a sauce pan.

    Rasmalai Recipe | Easy Rasmalai Recipe

    When it comes to boil , stir well and add about 30 saffron strands.

    Rasmalai Recipe | Easy Rasmalai Recipe

    Stir well and boil milk on low flame.

    Rasmalai Recipe | Easy Rasmalai Recipe

    During the process , milk froths and comes up . Stir , scrape edges and continue to boil on low flame. It takes about 30 -35 minutes for milk to reduce , half  of the volume. 

    Rasmalai Recipe | Easy Rasmalai Recipe

    Milk reduces to half.

    Rasmalai Recipe | Easy Rasmalai Recipe

    Whilst in a small mixer jar / blender , add sugar , cashews  and cardamom pods and make fine powder .

    Rasmalai Recipe | Easy Rasmalai Recipe

    Add sugar powder into reduced milk, stir well .

    Rasmalai Recipe | Easy Rasmalai Recipe

    Bring to 1 boil.

    Rasmalai Recipe | Easy Rasmalai Recipe

    Turn off the stove, add chopped pistachios , slivered almonds and stir well.

    Rasmalai Recipe | Easy Rasmalai Recipe

    Add 1 teaspoon of dry crushed rose petals or few drops of rose water or kewra water. If you are using rose essence or kewra essence , then add 1 drop only. Though this step is optional , it adds lot of flavours to the dessert.

    Rasmalai Recipe | Easy Rasmalai Recipe

    Stir well everything and set aside , rabri is ready.

    Rasmalai Recipe | Easy Rasmalai Recipe

    While adding rasgulla into rabri milk syrup , make sure Rasgulla are warm. If rasgulla are refrigerated  , heat  rasgulla syrup , add rasgulla , let it become warm .

    Then squeeze out extra sugar syrup from rasgulla , press and flatten rasgulla balls between fingers and add into hot/warm rabri.

    Rasmalai Recipe | Easy Rasmalai Recipe

    Let rasgulla sit in rabri for about 45 to 60 minutes.

    Rasmalai Recipe | Easy Rasmalai Recipe

    Once it cools completely, transfer to a air tight container and chill in refrigerator. Rasmali stays good upto 1 week when refrigerated . Serve chilled rasmali.

    rasmalai

    Recipe

    rasmalai
    4.75 from 4 votes

    Rasmalai Recipe

    Soft and sweet flattened rasgulla are dipped in a creamy condensed milk flavored with saffrons cardamom and garnished with nuts.
    Prep Time5 minutes mins
    Cook Time40 minutes mins
    Total Time45 minutes mins
    Course: Dessert, Sweets
    Cuisine: Bengali, Indian
    Keyword: Festivals, Paneer
    Servings: 4 people
    Calories: 204kcal
    Author: Muktha H S

    Ingredients

    • 15 Rasgulla , refer notes for Rasgulla recipe
    • 1 ltr Milk
    • 30 Saffron Strands
    • ¼ cup Sugar
    • 6 Cashews , halved
    • 6 Cardamom Pods
    • 8 Almonds , slivered
    • 8 Pista, Chopped
    • 1 teaspoon Dry Rose Petals , crushed or few rose water drops

    Instructions

    • Heat 1 litre full fat milk in a sauce pan.
    • When it comes to boil , stir well and add about 30 saffron strands.
    • Stir well and boil milk on low flame till it reduces to half .  During the process , milk froths and comes up . Stir , scrape edges and continue to boil on low flame. It takes about 30 -35 minutes for milk to reduce , half  of the volume.
    • Whilst in a small mixer jar / blender , add sugar , cashews  and cardamom pods and make fine powder .
    • Add sugar powder into reduced milk, stir well and bring to 1 boil.
    • Turn off the stove, add chopped pistachios , slivered almonds and 1 teaspoon of dry crushed rose petals or few drops of rose water or kewra water. If you are using rose essence or kewra essence , then add 1 drop only.
    • Stir well everything and set aside.
    • While adding rasgulla into rabri milk syrup , make sure Rasgulla are warm. If rasgulla are refrigerated  , heat  rasgulla syrup , add rasgulla , let it become warm .
    • Then squeeze in extra sugar syrup from rasgulla , press and flatten rasgulla balls between fingers and add into hot/warm rabri.
    • Let rasgulla sit in rabri for about 45 to 60 minutes. Once it cools completely, transfer to a air tight container and chill in refrigerator. Rasmali stays good upto 1 week when refrigerated .
    • Serve chilled rasmali.

    Video

    Notes

    • You can prepare rasmalai from the scratch by preparing rasgulla . Rasgulla recipe is already shared.
    • Soak warm rasgulla in hot / warm rabri (flavoured condensed milk) , allow it come to room temperature and then refrigerate.

    Nutrition

    Calories: 204kcal

    Similar recipes

    • rasgulla-recipe
      Rasgulla Recipe | how to make Rasgulla in pressure cooker
    • Pista badam kulfi on plate
      Kulfi | Pista Badam Kulfi Recipe
    • Kesar-badam-milk
      Kesar Badam Milk
    • Rabdi-dessert
      Rabdi Recipe, how to make best rabri at home

    Grilled Veg Sandwich

    Published : June 25, 2015 | Last Update on December 13, 2018 By Muktha Gopinath

    Grilled Veg Sandwich
    Grilled Veg Sandwich
    Sandwiches are my all time favorite,Though I didn't wanted to blog this simple recipe,often my friends used to say that they always miss those veg sandwiches which I

    used to prepare for them.So I thought of blogging this,so that they can try this and get that actual taste of my sandwiches.From health point of view, I'm using whole wheat brown bread ,if you are not a health freak then you are free to have white bread with lots of cheese and butter over it 😊


    Ingredients:

    Category:Vegetarian | Cusine : Fusion | Course: Breakfast,Snack 
    PrepTime : 8 Minutes |Cooking Time: 5 Minutes | Serves: 4-5

    Whole wheat Bread:1 Loaf
    Butter as required
    Cheese as required
    Onion:1
    Capsicum:1
    Tomato:1
    Cucumber:1
    Carrot:1
    Fresh coriander leaves chopped:2 Tbsp
    Fresh Mint Leaves:¼ Cup
    Green Chilies: 1
    Salt as required
    Freshly Grounded Black pepper,Oregano,Basil:½ Tbsp
    *oregano and basil optional

    Method:
    Grind Mint,green chillies,½ teaspoon salt and keep it aside.Slice all the vegetables as thin as possible.Chop coriander leaves,grate cheese and keep it aside.
    Grilled Veg Sandwich

    Take 2 slices of bread,smear some butter on both sides of the bread,apply mint chutney over the inner side of the bread,arrange all the slice vegetables one over the other.


    Grilled Veg Sandwich

    Sprinkle some salt and pepper over it.Sprinkle grated cheese and coriander leaves ,close this bread with other slice of butter coated,mint chutney smeared bread.Place it over sandwich maker grill cook for 5 minutes.

    Grilled Veg Sandwich


    Serve hot with tomato Ketch up.

    Grilled Veg Sandwich
    Copyright Your Blog Name 2009 at palatesdesire.blogspot.com

    Kalakand

    Published : June 11, 2015 | Last Update on October 17, 2022 By Muktha Gopinath

    Kalakand

    Kalakand is rich milk based dessert , origin of Rajasthan. Traditional kalakand is quite lengthy as paneer needs to be done and also milk needs to be condensed. Quick versions of Kalakand is also done by using store bought paneer,sweet condensed Milk and cardamom. Milk being the main ingredient this is calcium rich sweet. And kids would love this sweet for its moist tiny granular texture with flavours of cardamom and pista.

    Kalakand

    Though the process is quite lengthy ,I'm posting the authentic Kalakand recipe.You can also prepare paneer a day before and prepare the sweet the next day ,just to ease out the procedure.If you are using store bought paneer just make sure ,it's fresh. A rich milk dessert for your Sweet Tooth.

    You may also look for other milk based desserts like Basundi , Paneer Pista Almond Rolls, Rasgulla and Rasmalai from my space.

    RECIPE CARD FOR KALAKAND

    Recipe

    Kalakand
    5 from 2 votes

    Kalakand

    A rich , delicious milk based dessert, made with full fat milk and cottage cheese is flavoured with cardamom and  garnished with nuts.
    Prep Time30 minutes mins
    Cook Time50 minutes mins
    Total Time1 hour hr 20 minutes mins
    Course: Dessert, Sweets
    Cuisine: Indian, Rajasthan
    Keyword: Diwali, Holi, Kids Recipes, Sweets
    Servings: 8 Pieces
    Calories: 145kcal
    Author: Muktha H S

    Ingredients

    For making Cheena / Paneer

    • 1 litre Full Cream Milk or 1 Cup Paneer grated
    • ½ teaspoon Lemon Juice

    Other Ingredients:

    • 500 ml Full cream milk
    • ⅓ Cup Sugar
    • 8 no Pista unsalted , sliced or chopped
    • 5 no Almonds , Sliced
    • ¼ teaspoon Cardamom Powder
    • ½ teaspoon Milk Masala Powder ,optional
    • Ghee/ Clarified butter for greasing

    Instructions

    To Make Paneer / Chenna

    • Boil 1 Litre Full cream milk, once boiled add 1 teaspoon of Lemon juice , allow it to curdle.
    • Wash with cold water, strain whey water and extract paneer/chenna and keep it aside.
    • Gets approximately 1 cup of cottage cheese/paneer.

    For making Kalakand

    • Take a thick bottom pan/non stick pan add ½ litre of milk and bring it to boil.
    • Reduce heat and on a low flame keep stirring till it condenses to half and becomes thick.
    • Add prepared paneer/cheena to condensed milk stir continuously and cook till mixture thickens and looks grainy.
    • Add Sugar and mix well, cook till it reaches a barfi consistency.
    • Add cardamom powder and chopped nuts mix well. 
    • Turn off the heat.
    • Pour the mixture on a prepared greased tin, and cut into squares and serve.

    Notes

    • If not using Milk Masala then you can increase the amount of cardamom powder to ½ Tsp
    • You can use store bought paneer too,thaw paneer completely and blend it too smooth in that case.
    • You can use condensed milk and milk powder along with paneer. But for authentic taste ,you need to use full cream milk.
    • This has short shelf life for 4-5 days ,when refrigerated in a airtight container.
     

    Nutrition

    Calories: 145kcal

    Step -by-Step Directions on making of Kalakand :

    Microwave / heat 1 liter milk, once it starts to boil add lemon juice and allow it to curdle.

    Then wash with cold water, strain the whey from it and extract the chenna/paneer out of it.

    Kalakand

    In a thick bottom pan/ nonstick pan, add ½ liter of milk and bring it to boil.

    Keep low flame and stir the milk occasionally . Stirring is done to make sure milk doesn't scorch at the bottom.

    Once milk  volume reduces exactly to half and becomes little thick , add paneer and stir it continuously.

    Kalakand

    Cook the mixture till it gets thick and looks grainy.

    Now add sugar,cardamom powder to it and mix well.Till it gets the consistency of burfi and thickens.

    Now add finely chopped nuts and mix well.

    Kalakand

    Grease the plate,tray with ghee and pour the mixture over it. Let it set for 10-15 minutes.

    Once it is set ,garnish with some more finely chopped nuts and cut into  squares / pieces .

    Kalakand

    Kalakand is ready to serve 🙂

    Kalakand

    Chettinad Fish Fry

    Published : January 29, 2015 | Last Update on September 21, 2022 By Muktha

    Chettinad Fish Fry

    Chettinad style fishy fry is a spicy pan fried fish loaded with aromatic flavors of freshly pound spices. You can serve this spicy fish fry as a side dish with your meals or just as a starter.

    Chettinad fish fry is a simple recipe and gets ready under 30 minutes , if you exclude marination time.

    Though I don't make fish often but there are few dishes which I love the most like Bangda fish fry , Mangalore Fish Curry and Amritsari Fish . You can try any of these recipes , I'm sure you'll never be disappointed .

    Chettinad fish fry
    [feast_advanced_jump_to]

    About this recipe

    Spicy Chettinad Fish Fry Recipe is a delicious and spicy fish made in the Chettinad region of South India. Chettinad cuisine is known for spicy food which is made using freshly ground spices.

    To make this spicy fish fry you can use either sea water fish or fresh water fish. Just make sure to use firm fleshed fish. I made this with fresh water fish this time but I often make this with Seer fish , also known as Vanjaram fish.

    Yo can serve Chettinad Fish Fry Recipe with Steamed Rice and Dal tadka to make it a complete meal.

    Fish is rich in omega 3 fatty acids which promote heart health. Eating fish regularly lowers blood pressure and increases good cholesterol levels when eaten in moderate quantity. They are also rich in proteins and promotes eye and brain health.

    This Chettinad fish fry recipe is

    • Easy to make
    • Spicy
    • Tasty and Flavorful

    Ingredients

    chettinad-fish-fry-ingredients

    Fish - Any kind of fish , sea water or fresh water fish can be used in this recipe. Just make sure to use firm fleshed fish. Use equal sized, thick slice fish to make this recipe.

    Spices - Black peppercorns , cumin seeds , fennel seeds and mustard seeds are most used spices in chettinad masala . Along with it red chilli powder , coriander powder and turmeric are used in this recipe. Instead of red chilli and coriander powder , you can also use dry red chillies and coriander seeds in this recipe.

    Produce - Also you need Curry leaves , Tamarind pulp , Ginger , Garlic cloves and tomatoes .

    Cornflour (or Riceflour ) helps masala to coat well on fish.

    Other Ingredients - Cooking Oil and Salt are used.

    Recipe Notes

    This is a very spicy fish fry . You can reduce the amount of black peppercorns in this recipe.

    Usually , fish takes in more spice. Longer the marination hours ,more flavorful it turns.

    Watch Video

    How to make Chettinad Fish Fry

    Clean fish slices, wipe it dry and set aside.

    In a pan, dry roast black peppercorns, fennel seeds, cumin seeds, mustard seeds , ginger, garlic and curry leaves.

    dry roast spices

    Pound them in a mortar and pestle or a mixer jar into a powder.

    Chettinad Fish Fry

    Now add the chopped tomato, turmeric powder, red chili powder, coriander powder , salt , tamarind and oil .

    Chettinad Fish Fry

    Blend till smooth.

    Chettinad Fish Fry

    Apply the masala ( spice paste) all over the fish pieces.

    Chettinad Fish Fry

    Marinate the fish and keep in the fridge minimum 4 hours .

    After 4 hours, sprinkle some cornflour or over the fish. The cornflour helps the masala to coat well.

    sprinkle corn flour

    In a pan, heat 2-3 tablespoon of oil and fry the fish on both sides.

    Chettinad Fish Fry

    Finally, serve hot with a bit of lemon squeezed, sprinkle some fried curry leaves and green chilies over and a few lemon wedges, onion slices , on the side.

    chettinad fish fry

    Recipe

    Chettinad Fish Fry
    5 from 2 votes

    Chettinad Fish Fry Recipe

    Chettinad style fishy fry is a spicy pan fried fish loaded with aromatic flavors of freshly pound spices. You can serve this spicy fish fry as a side dish with your meals or just as a starter.
    Prep Time5 minutes mins
    Cook Time20 minutes mins
    Marination4 hours hrs
    Total Time1 day d 25 minutes mins
    Course: Side Dish, Starters
    Cuisine: South India
    Servings: 4 people
    Calories: 461kcal
    Author: Muktha H S

    Ingredients

    • 750-800 grams Fish Slices
    • 2-3 tablespoon oil to pan fry

    Marination

    • Garlic cloves small size
    • 1.5" inch ginger knob mashed
    • 1 teaspoon cumin seeds
    • 1 tablespoon fennel seeds
    • 1.5 - 2 tablespoon black peppercorns
    • 1 teaspoon mustard seeds
    • 2 sprig Curry leaves
    • Salt to taste
    • 1 teaspoon oil to grind
    • 1 tablespoon water
    • 1 to mato small size chopped
    • 3 teaspoon coriander powder
    • 2 teaspoon red chilli powder
    • ½ teaspoon turmeric powder
    • 1 small marble size tamarind
    • 2 tablespoon cornflour or rice flour to sprinkle

    To serve

    • Lemon wedges
    • Onion slices
    • Fried curry leaves

    Instructions

    • Clean fish slices, wipe it dry and set aside.
    • In a pan, dry roast black peppercorns, fennel seeds, cumin seeds, mustard seeds , ginger, garlic and curry leaves.
    • Pound them in a mortar and pestle or a mixer jar into a powder.
    • Now add the chopped tomato, turmeric powder, red chili powder, coriander powder , salt , tamarind and oil .
    • Blend in a mixer jar till smooth.
    • Apply the masala ( spice paste) all over the fish pieces.
    • Marinate the fish and keep in the fridge minimum 4 hours .
    • After 4 hours, sprinkle some cornflour or over the fish. The cornflour helps the masala to stick
    • In a pan, heat 2-3 tablespoon of oil and fry the fish.
    • Serve hot with a bit of lemon squeezed, sprinkle some fried curry leaves and green chillies over and a few lemon wedges, onion slices , on the side.

    Video

    Notes

    • This is a very spicy fish fry . You can reduce the amount of black peppercorns in this recipe.
    • Usually , fish takes in more spice. Longer the marination hours ,more flavorful it turns. 

    Nutrition

    Calories: 461kcal

    You may also like

    • bangda fish fry
      Bangda fish fry|Mackerel fish fry recipe
    • Mangalore Fish Curry
      Fish Curry | Meen Gassi - Mangalore Style
    • chicken gassi
      Chicken Gassi Recipe | Mangalore Style
    • koli saaru
      Koli Saaru | Chicken Curry - Karnataka Style

    Paneer Kalimirch Tikka

    Published : January 26, 2015 | Last Update on July 25, 2018 By Muktha Gopinath


    Paneer Kalimirch Tikka
    Paneer Kalimirch Tikka


    This is one of the best paneer tikka i have ever made.My mom had visited house recently
    ,as she likes paneer tikka, i thought of preparing this tikka.The source of this recipe is from Sanjeev Kapoor's Healthy Cooking.I have done few changes to suit our taste buds.As Paneer is a store house of protein and calcium ,its necessary to include paneer in our diet.And if you are skeptical about using store brought paneer , you can always prepare it by yourself either from low fat milk or full fat milk,so that it would be beneficial for all weight watchers 🙂 Well,let me not bore you with all blah blah blah.............! Here comes the recipe 🙂

    Ingredients :

    Category:Vegetarian | Cusine : India | Course: Starter / Snack
    PrepTime : 1 Hour (inactive) |Cooking Time: 10 Minutes | Serves: 4

    Paneer Cut into Cubes: 200 grams

    Black peppercorns, roasted and coarsely powdered:8-10 
    Ginger: ½ " inch
    Garlic :6 cloves
    Green chillies :2-3
    Olive oil :2 tablespoons + to baste
    Onions, sliced :2 medium
    Hung yogurt :½ cup
    Fresh cream:11/2 tablespoons
    Cornflour/ corn starch:½ tablespoon
    Garam masala powder:¼ teaspoon
    Green cardamom powder :¼ teaspoon 
    Green capsicum, cut into 1 inch pieces:1 medium
    Salt to taste

    Method:

    Dry roast Black peppercorns and coarsely powder along with green cardamom.

    Paneer Kalimirch Tikka

    Heat olive oil in a wok and saute onions till brown. 

    Paneer Kalimirch Tikka

    Cool and grind to a fine paste along with ginger, garlic and green chillies. 

    Paneer Kalimirch Tikka

    In a large bowl combine browned onion paste and  ginger-garlic-green chilli paste , hung yogurt, cream, cornflour, garam masala powder, crushed black peppercorns, green cardamom powder  and salt .

    Paneer Kalimirch Tikka

    Add paneer cubes and green capsicum pieces, mix well and allow to marinate for one hour preferably in the refrigerator. 

    Paneer Kalimirch Tikka

    Preheat oven at 200 deg cel. String the paneer cubes and capsicum pieces alternately on a skewer and cook in the preheated oven for 6 minutes basting occasionally with olive oil and then place the tray on high rack and grill paneer for 2-3 minutes  or till tikkas turn golden brown.

    Paneer Kalimirch Tikka
    Serve hot with onion rings and mint chutney. 


    Paneer Kalimirch Tikka


    Copyright Your Blog Name 2009 at palatesdesire.blogspot.com

    Avarekallu Usali | Surti Papdi Usal

    Published : January 14, 2015 | Last Update on January 13, 2020 By Muktha Gopinath

    Avarekallu Usali recipe with step by step photos. Avarekallu is Hyacinth Bean also referred as Vaal or surti papdi in few regions. Avarekalu Usali is a dry lentil preparation made with fresh coconut, green chillies and later tempered with curry leaves , asafoetida , red chillies and mustard seeds.

    Avarekallu Usali | Surti Papdi Usal

    During sankranthi festival, it is custom to make avarekallu/surti papdi usal in our house. I have grown up eating this Usal especially on Makar Sankranti . I really don't know whether its a custom or just a practice to make a dish out of Avarekalu on sankranti day .  As Avarekallu/ Surti Papdi  is seasonal, many kind of dishes will be prepared using this hyacinth bean (avarekallu/surti papdi). Making usul is just similar to any other usal , we make. But tastes differs with every bean , we use. One more usal recipe on blog is green gram usal .

    Avarekalu / Surti Papadi belongs to a family of green beans and is a very good source of vitamin A, vitamin K and is rich in dietary fiber.When its seasonal do include in your diet.

    Other Avarekalu recipes that are popular in Karnataka are Avarekalu Bath , Avarekalu Mixture , Avarekalu Roti , Avarekalu Uppittu , Avarekalu pongal and avarekalu Bisi bele bath . It's just about adding avarekalu  , either de-skinned or steamed into all the dishes.

    Ingredients:
    Category:Vegetarian|Cuisine: India|Course: Side Dish
    Prep Time: 3 Minutes(inactive)|Cooking Time:20 Min|Serves:4

    Avarekallu/Surti Papdi :2 Cups
    Green chillies : 5-6
    Fresh Coconut grated: ½ Cup
    Turmeric:½ Tsp
    Oil:2 Tsp
    Mustard Seeds : ½ Tsp
    Channa Dal:1 Tsp
    Urad Dal:1 Tsp
    Curry leaves 1 sprig
    Dry Red Chilly:2 broken
    Asafoetida big pinch
    Salt to taste
    Coriander leaves:2 Tbsp
    Lemon juice:1 Tsp

    Method:Take fresh Avarekallu/Surti Papdi  and wash thoroughly. In a pressure cooker add the Avarekallu/Surti Papdi  along with very little water and salt  and  pressure cook for 1-2 whistle.Allow to release pressure on its own.

    Avarekallu Usali | Surti Papdi Usal

    Meanwhile grind the grated coconut,green chillies and turmeric without adding water,it should be coarse.

    Avarekallu Usali | Surti Papdi Usal

    Take a wok heat oil, add mustard seeds once it splutters,add  curry leaves,red chilly broken pieces ,channa dal,urad dal and asafoetida

    Avarekallu Usali | Surti Papdi Usal
    To this add cooked Avarekallu/Surti Papdi saute and finally add grinded coconut chilly
    paste,salt as per taste .

    Avarekallu Usali | Surti Papdi Usal

    Add coriander leaves and lemon juice and mix thoroughly.
    Avarekallu Usali | Surti Papdi Usal

    Avarekallu Usali | Surti Papdi Usal

    Tangdi Kebab Recipe

    Published : December 18, 2014 | Last Update on July 13, 2022 By Muktha Gopinath

    chicken-tangdi-onion-rings-lemon-wedges

    Tangdi Kebab is a popular appetizer made with chicken drumsticks , marinated with hung curds and spices overnight. This juicy , tender fall from bones chicken is tasty and has a cooking time less than 30 minutes.

    Tangdi Kebabas are very flavourful , main key for flavourful and tenderized chicken is marination resting hours. More resting time , more flavourful and tasty chicken , you can make.

    If you love similar recipes then you must check out my best ever chicken recipes - Seekh Kebab , Tandoori Chicken and Chicken Tikka

    tangdi-kebab-with-onion-rings-lemon-wedges
    [feast_advanced_jump_to]

    About this recipe

    Authentic Kebabs are meat dishes, marinated overnight with whole lot of freshly ground spices ,skewered and cooked on charcoal fire basting oil occasionally.

    There are many methods of doing kebab, which tastes ultimate when cooked on fire by basting oil using tandoor - grill.

    Modern day Kebabs in Indian trace their origin to the influence of the Mughlai Cuisine. Some varieties of kebab are more or less similar with their distinct taste, which can be credited to the use of the indian spices. Origin of Kebab is from Middle East.

    Here I’m posting my version of Tangdi Kebab in a pressure cooker or one pot .

    Serve Kebabs hot with Mint chutney ,onion rings and lemon Wedges.

    This tangadi kabab recipe is

    • Flavourful and juicy
    • Delicious
    • No monitoring time
    • Easy to make

    Ingredients

    To make this delicious and juicy chicken , you need few basic spices that are readily available in any Indian Kitchen along with chicken drumsticks and hung curds.

    chicken-tangdi-kebab-first-marination-ingredients
    chicken-second-marination-tangdi-kebab-ingredients

    Refer the recipe card for actual measurements.

    Watch Video

    How to make Tangdi Chicken

    Wash and clean chicken, make deep incisions on the drumsticks.

    Take chicken in a mixing bowl , add salt , red chilli powder , roasted cumin powder, garam masala , coriander powder, lime juice and mustard oil.

    first-marination-chicken

    Mix well everything , rub all spices to chicken pieces and refrigerate for at least 1 hour.

    first-marinated-chicken

    For second marination , into a bowl add hung curd , salt, red chilli powder, cumin powder, kitchen king masala ( or tandoori masala) , coriander powder , ginger paste, garlic paste and mix well .

    marination-spices

    Add 1 hour marinated chicken into second marination and mix well thoroughly.

    marinated-chicken-drunsticks

    Cover and keep chicken in refrigerator for minimum 5 hours or overnight.

    You can either cook in oven , air fryer , tandoor or one pot. I'm cooking in a traditional pressure cooker.

    Take a wide bottom pressure cooker pan and drizzle 1 teaspoon of oil. Arrange marinated chicken drumsticks in single layer without crowding.

    chicken-arranged-in-a-pan

    Drizzle 1 teaspoon of oil on top and cover pressure cooker pan and pressure cook for 1 whistle.

    pressure-cook-1-whistle

    When pressure releases on it’s own, remove lid. Keep on high flame and cook until water content dries up completely.

    chicken-completely-cooked

    Take a frying pan , add butter and add cooked chicken drumsticks.

    cooked until crisp

    Toss and cook chicken on high heat until chicken gets a crisp charred coat.

    Garnish with chopped coriander leaves and sprinkle chaat masala powder.

    garnished-with-coriander-leaves

    Serve hot with onion slice, lemon wedges and mint chutney.

    Recipe

    Tangdi-chicken-recipe
    5 from 6 votes

    Tangdi Kebab Recipe

    Tangdi Kebab is a popular tasty appetizer made with chicken drumsticks , marinating with hung curds and spices overnight.
    Prep Time10 minutes mins
    Cook Time30 minutes mins
    Marination Time6 hours hrs
    Total Time40 minutes mins
    Course: Appetizer, Starters
    Cuisine: Indian, Mughlai
    Keyword: Chicken
    Servings: 6 makes
    Calories: 214kcal
    Author: Muktha H S

    Ingredients

    • 6 Chicken Drumsticks
    • 1.5 Tbsp Butter
    • 1 tablespoon Coriander leaves
    • ½ teaspoon Chaat masala powder

    For 1st Marination

    • ¼ teaspoon Turmeric powder
    • 1 teaspoon Chilly Powder
    • ½ teaspoon Coriander Powder
    • ½ teaspoon Jeera Powder
    • ½ teaspoon Garam Masala Powder
    • 1 teaspoon Salt
    • 1 teaspoon Mustard Oil
    • ½ tablespoon Lime juice

    For 2nd Marination

    • ¼ Cup Hung Curd
    • 1 teaspoon Garlic Paste
    • 1 teaspoon Ginger Paste
    • 1 teaspoon Red Chilly Powder
    • ½ teaspoon Jeera Powder /Cumin powder
    • ½ teaspoon Kitchen King Masala or garam masala or tandoori masala
    • ½ teaspoon Coriander Powder
    • 1 /2 teaspoon Salt
    • ½ tablespoon Lime juice

    Instructions

    • Wash and clean chicken, make deep incisions on the drumsticks.
    • Take chicken in a mixing bowl , add salt , red chilli powder , roasted cumin powder, garam masala , coriander powder, lime juice and mustard oil.
    • Mix well everything , rub all spices to chicken pieces and refrigerate for at least 1 hour.
    • For second marination , into a bowl add hung curd , salt, red chilli powder, cumin powder, kitchen king masala ( or tandoori masala) , coriander powder , ginger paste, garlic paste and mix well .
    • Add 1 hour marinated chicken into second marination and mix well thoroughly.
    • Cover and keep chicken in refrigerator for minimum 5 hours or overnight.
    • Take a wide bottom pressure cooker pan and drizzle 1 teaspoon of oil.
    • Arrange marinated chicken drumsticks in single layer without crowding.
    • Drizzle 1 teaspoon of oil on top and cover pressure cooker pan and pressure cook for 1 whistle.
    • When pressure releases on it’s own, remove lid. Keep on high flame and cook until water content dries up completely.
    • Take a frying pan , add butter and add cooked chicken drumsticks.
    • Toss and cook chicken on high heat until chicken gets a crisp charred coat.
    • Garnish with chopped coriander leaves and sprinkle chaat masala powder.
    • Serve hot with onion slice, lemon wedges and mint chutney.

    Video

    Nutrition

    Calories: 214kcal

    Aloo Palak / Potato with Spinach

    Published : February 21, 2014 | Last Update on July 25, 2018 By Muktha Gopinath

    Aloo Palak / Potato with Spinach

    Knowing the health benefits of spinach i somehow try to incorporate in my diet.As cooked Spinach is more advantageous than the raw spinach with many vital antioxidant

    vitamins, is rich in iron than any other leafy vegetables.Potato and spinach is a very known combination,aloo palak recipe is very similar to plak paneer recipe.But i have done very slight modifications to palak paneer and tried to get that authentic taste of Aloo Palak.It goes very well with rice as well as roti. 


    Ingredients:
    Category:Vegetarian|Cuisine:India|Course:Main 
    Prep Time:5 Min|Cooking Time:15 Minutes|Serves:3-4

    Palak :500 grams

    Potato: 2 big
    Onion: 2 Medium
    GingerGarlic Paste:1 Tsp
    Green Chilly:3-4
    Jeera: 1 Tsp
    Red Chilly Powder:½ Tsp
    Garam Masala:½ Tsp
    Oil:1 Tbsp
    Salt To Taste

    Method:

    Blanch Spinach and drain out excess water and puree it along with 3-4 green chilly and keep it aside.

    Aloo Palak / Potato with Spinach


    Aloo Palak / Potato with Spinach


    Boil potatoes ,peel the skin and cut it into cubes, set aside.

    Take a Kadai ,heat oil add cumin seeds ,chopped onions,Ginger Garlic paste fry well till raw smell goes off.

    Aloo Palak / Potato with Spinach


    To this add Palak/Spinach Puree mix well and cook for 3-4 minutes.Add garam masala and red chilly powder.


    Aloo Palak / Potato with Spinach


    Adjust salt,add potato cubes.Keep on simmer for 5 minutes and turn off heat.

    Aloo Palak / Potato with Spinach


    Serve with Roti/Rice and enjoy!

    Aloo Palak / Potato with Spinach


    Copyright Your Blog Name 2009 at palatesdesire.blogspot.com
    • « Previous Page
    • 1
    • …
    • 6
    • 7
    • 8
    • 9
    • 10
    • Next Page »

    Hey ! Nice To Meet You

    Muktha-about-me

    Hi ! I'm Muktha , Blogger , Nutrition Advisor & Recipe Creator behind Palate's Desire . I share tried & tested everyday meal recipes for healthy living and occasional indulgence. Palate's Desire helps even a novice to cook like a pro. Happy Cooking...! Read More about me →

    Stay Connected

    • Instagram

    Baking Recipes

    • pumpkin bread
      Pumpkin Bread
    • coconut-cookie-sandwich
      Cookie Sandwich
    • crispy-coconut-cookies
      Coconut Cookies
    • peanut butter cookies
      Peanut Butter Cookies
    • ragi-cookies
      Ragi Almond Cookies with Jaggery
    • lamingtons
      Lamington - how to make Australian Lamington Cake

    Baking Recipes→

    Popular Recipes

    • bisi bele bath powder
      Bisi bele bath powder recipe - how to make
    • pineapple-salsa
      Pineapple Salsa - How to make spicy salsa
    • dry gobi manchurian recipe
      Gobi Manchurian Dry | Cauliflower Manchurian
    • okra-peanut-stir-fry
      Moongphali Bhindi | Peanut Okra Stir fry
    • Mangalore Fish Curry
      Fish Curry | Meen Gassi - Mangalore Style
    • moringa-tea-to-burn-fat
      Moringa Tea Recipe | Sip everday to Burn Fat easily

    Rice Recipes

    • bellada-anna-recipe
      Bellada Anna - Gudanna
    • Rice Varities
      Masala Lemon Rice | Nimbehuli Chitranna Recipe
    • huggi anna recipe
      Huggi Anna | how to make Huggi
    • mavinakayi-chitranna
      Mavinakayi Chitranna | Raw Mango Rice
    • chicken-fried-rice-recipe
      Chicken Fried Rice
    • chicken-pulao
      Chicken Pulao Recipe
    • vegetable fried rice
      Vegetable Fried Rice | Indo-Chinese Fried Rice Recipe
    • chana-pulao-recipe
      Chana Pulao | Chickpea Pilaf

    Egg Recipes

    • scrambled mushroom eggs
      Scrambled Egg with Mushroom
    • spanish-potato-omelette-cut-into-wedges
      Spanish Potato Omelette
    • Kolhapuri Egg Masala
      Kolhapuri Egg Masala
    • Mumbai Style Egg Burji
      Mumbai Style Egg Bhurji
    • onion egg bhurji
      Onion Egg Bhurji
    • moringa egg bhurji
      Murungai Keerai Muttai Poriyal | Moringa Egg Stir Fry
    • beet-root-egg-bhurji
      Beetroot Egg Bhurji | Scrambled Egg with Beetroot

    Sweets & Desserts

    • Ragi-coconut-milk-pudding-recipe
      Ragi Coconut Milk Pudding
    • Thandai-kulfi
      Thandai Kulfi Recipe
    • eggless chocolate mousse
      Eggless Chocolate Mousse
    • Besan halwa recipe
      Besan Halwa Recipe
    • kayi -hollige-obbattu
      Kayi Holige Recipe
    • mango-phirni-topped-with-pistachios-rose-petals
      Mango Phirni Recipe
    • moongdal-barfi-recipe
      Moongdal Barfi | how to make moongdal burfi
    • Instant Modak in 20 minutes, make festivals more special
      Instant Modak in 20 minutes, make festivals more special

    Footer

    ↑ back to top

    ABOUT

    • ABOUT MUKTHA
    • MEDIA KIT

    STAY CONNECTED

    • SIGN UP ! FOR E MAILS
    • CONTACT ME

    POLICIES

    • PRIVACY POLICY
    • TERMS & CONDITIONS

    COPYRIGHT © 2025 PALATE'S DESIRE

    Rate This Recipe

    Your vote:


    A rating is required
    A name is required
    An email is required